ChartField Inactivation
This training guide covers the steps to request a new ChartField in ARC.
Last revision: August 2025
In order to inactivate a ChartField (Department, Project, etc.), the ChartField generally cannot have open items associated with it. You can identify open items by running the ChartField Inactivation Reports in ARC. If a report appears, there are open items associated with the ChartField indicated in that report. You must close out the indicated items from each report in order to inactivate the ChartField.
In certain instances, exceptions may be granted to allow current fiscal year activities (i.e., budget, assets, etc.) to remain. Guidance on those exceptions is provided below, organized by ChartField type.
The ChartField Requester role is required to have access to the ChartField Inactivation page in ARC. For details on applying for ARC roles, please refer to the Completing the Financial Systems Security Application job aid.
Note: Project activities will automatically deactivate based on the period end date and project terms. Sponsored Projects Finance (SPF) may also reactivate or deactivate thereafter. Contact SPF to get assistance on deactivating (PG/GG) projects.
Topics
You can run reports on any ChartField to view open items (i.e., purchase orders, vouchers, general ledger balances, etc.) that need to be closed before submitting a CFR form to inactivate a ChartField.
- Click Main Menu > Columbia Specific > Common > ChartField Inactivation.
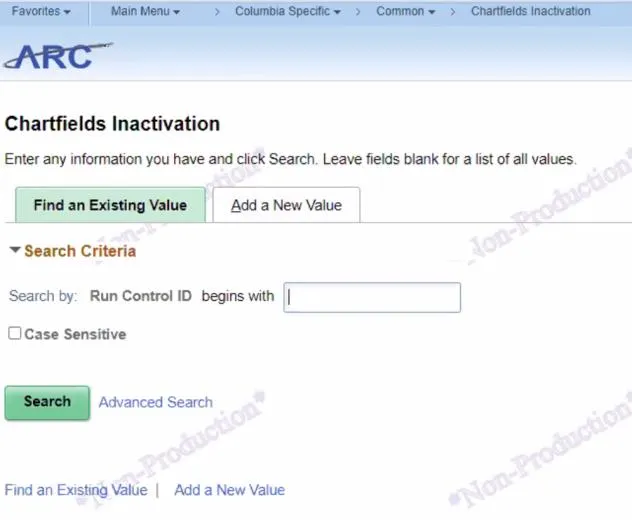
- Click the Add a New Value tab.
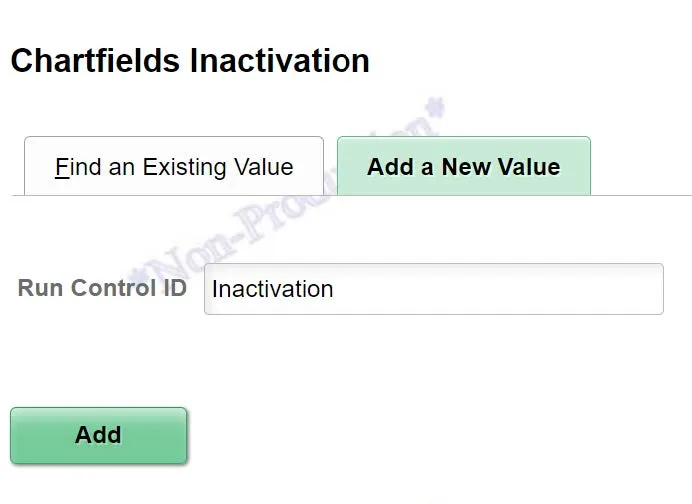
- Type a Run Control ID and click Add. The ChartField Inactivation screen appears.
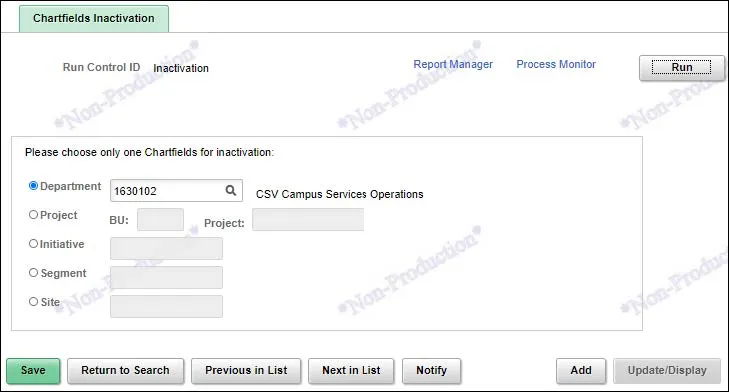
- Enter a Department, Project BU and Project, Initiative, Segment, or Site ChartField. Indicate one ChartField only.
- Click Run. The Process Scheduler Request screen appears.
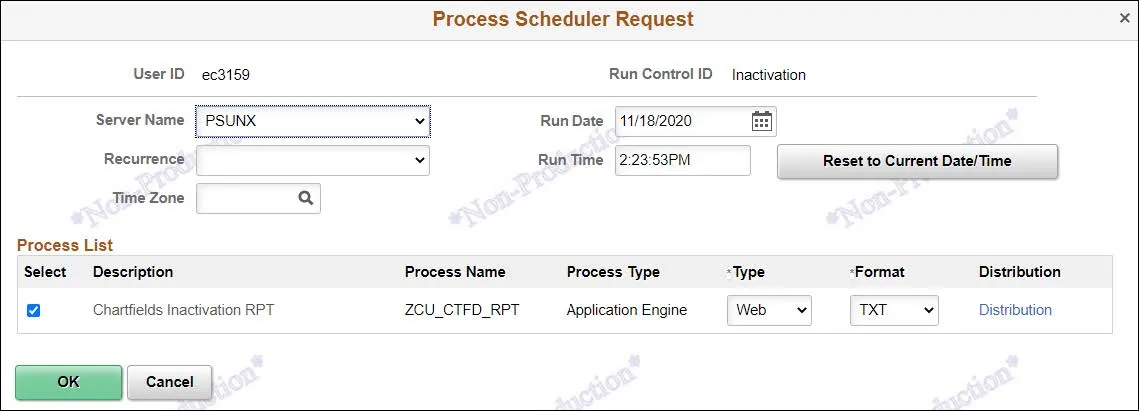
- Click OK to return to the ChartField Inactivation screen.

- Click the Process Monitor link. The Process Monitor displays the Run Status and Distribution Status of your report request. Wait until the run status becomes ‘success’.
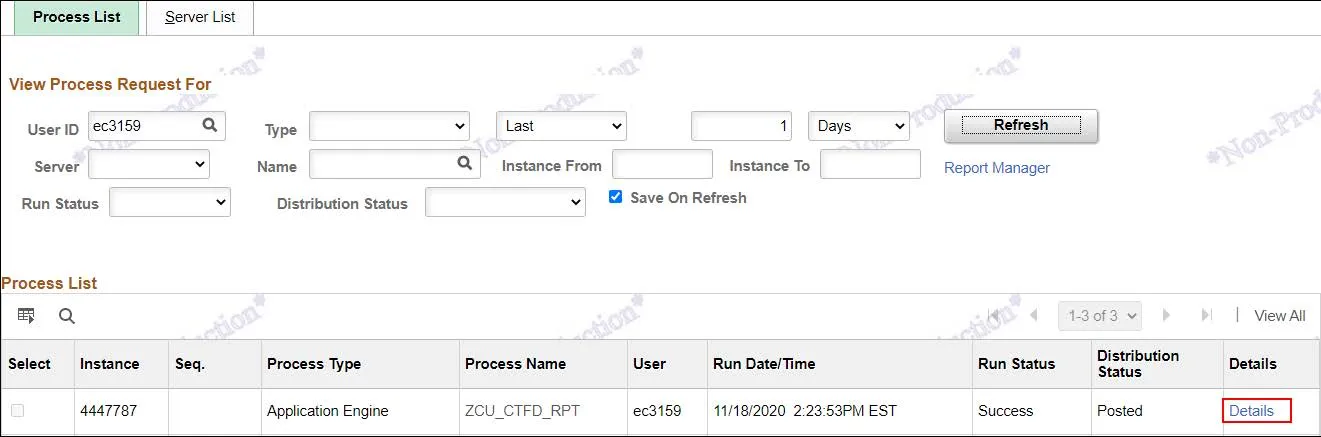
- Click the Details link. The Process Detail screen appears.
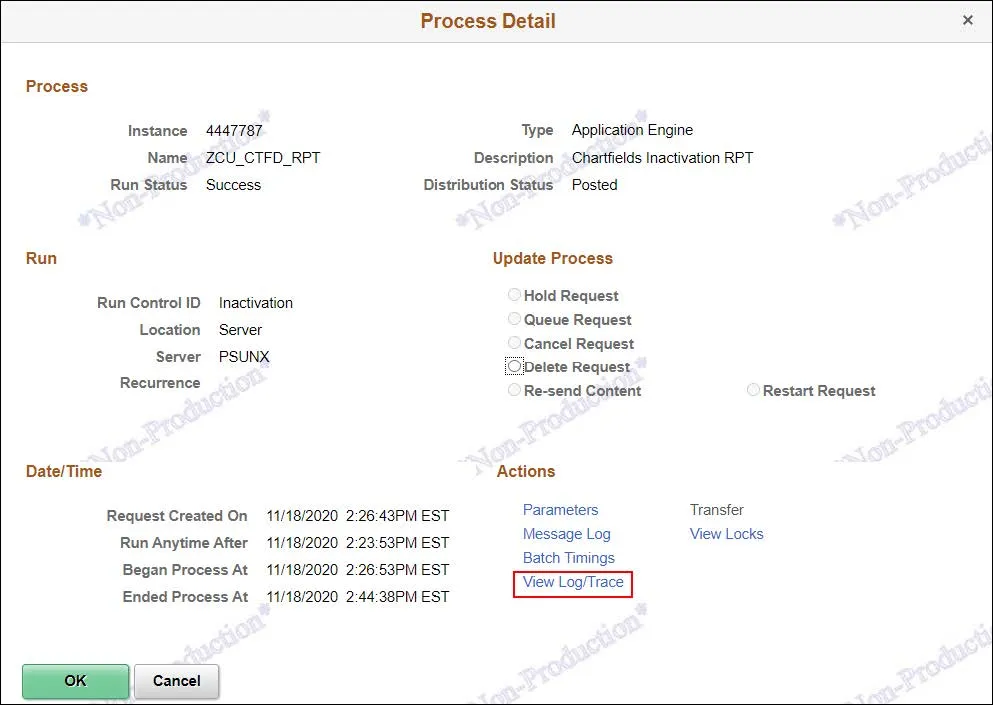
- Click the View Log/Trace link. The View Log/Trace screen will display Excel files for each open item type for your ChartField.
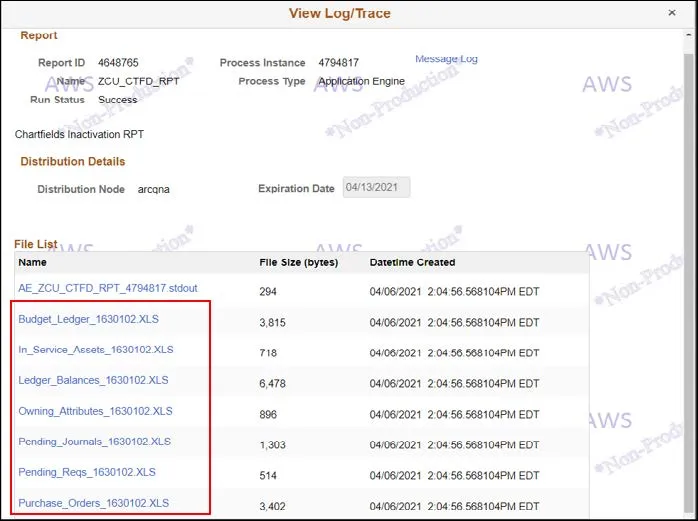
Note: See the Excel Report Types section for a list and explanation of the available reports for each type of open item.
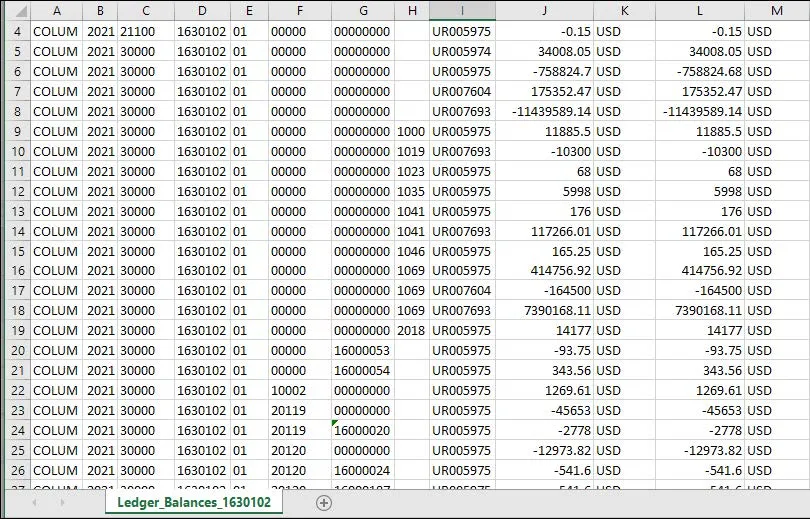
- Click the Excel file link for the desired report.
Excel Report Types
Below is a list of reports that might appear in the View Log/Trace screen with the brief explanation of each report. You will only see the reports for which pending items exist.
- In_Service_Assets – Shows any in-service assets associated with the deactivating ChartField.
- Ledger_Balances – Contains the GL ending balance at the full ChartString level in the Actuals ledger.
- Budget_Ledger – Similar to Ledger Balances, this report shows the ending balances in the Budget Tool. Clearing the ending balance varies depending on the type of project.
- Owning_Attributes – Shows any active project and activity attributes associated with the deactivating ChartField.
- Pending_Journals – Shows any pending journals associated with the deactivating ChartField.
- Vouchers – Shows any pending vouchers associated with deactivating ChartField.
- Pending_Reqs – Shows any pending requisitions associated with deactivating ChartField.
- Purchase_Orders – Contains any open purchase orders associated with the deactivating ChartField.
If the In_Service_Assets report shows that you have assets associated with the ChartField you are inactivating, first confirm that the asset belongs with the ChartField and email [email protected] for further assistance.
This section applies for the entire Project deactivation or other ChartField deactivation. Disregard if you are trying to deactivate the project activities only. If the Ledger_Balances report shows that you have Actuals associated with the ChartField, you must either transfer the non-zero balances to another active ChartField or clear the ChartString balances. You can create journals or use the journal import template to make the necessary changes.
Below is an example of actual ledger report to deactivate project – IN001318.

In this example, the fund balance is zero. However, the following entry is required to clear the ChartString balance.
Use the journal import tool to upload the journal to clear the ChartString balances. Refer to the Downloading and Using the Journal Import Tool job aid on how to make the necessary ledger changes using the Journal Import Tool.

Transfer non-Zero (Surplus/Deficit) Fund Balances to another active ChartField (i.e., Project to Project / Initiative to Initiative) to make the fund balance for the deactivating ChartField equal zero. Use the same natural accounts for the Balance Sheet accounts.
In the example above, account 22010 is used to clear the ChartString balance. For the statement of activities accounts, use an appropriate matched pair of 7 series accounts. For our example, the match pair accounts (70400 and 75400) are used to clear the ChartString balances for the statement of accounts activities. The match pair accounts vary depending on the project type.
Refer to the table below to determine which central department to contact for assistance on which match pair accounts to use.
Refer to the Downloading and Using the Journal Import Tool job aid on how to make the necessary ledger changes using the Journal Import Tool.
If the Budget_Ledger report shows that you have open budget items associated with the ChartField, you must close out the budget balances using the Budget Tool. To do so, you can download a batch spreadsheet with all the budget items for an associated ChartField, enter 0 for the current and future fiscal years, and then upload the batch to process the changes in the Budget Tool.
Logging Into the Budget Tool
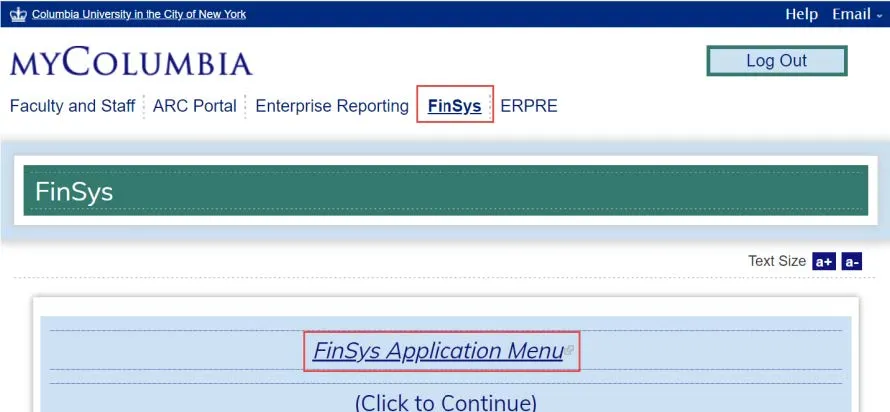
Log into FinSys via MyColumbia and click the FinSys Application Menu link
The FinSys/FFE Menu appears.
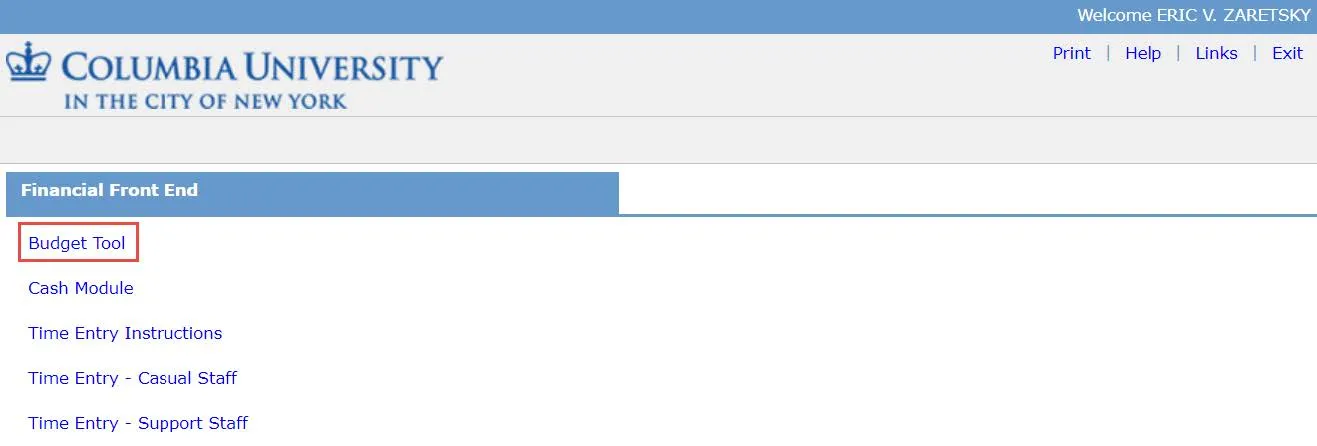
Click the Budget Tool link. The Worklist screen appears.
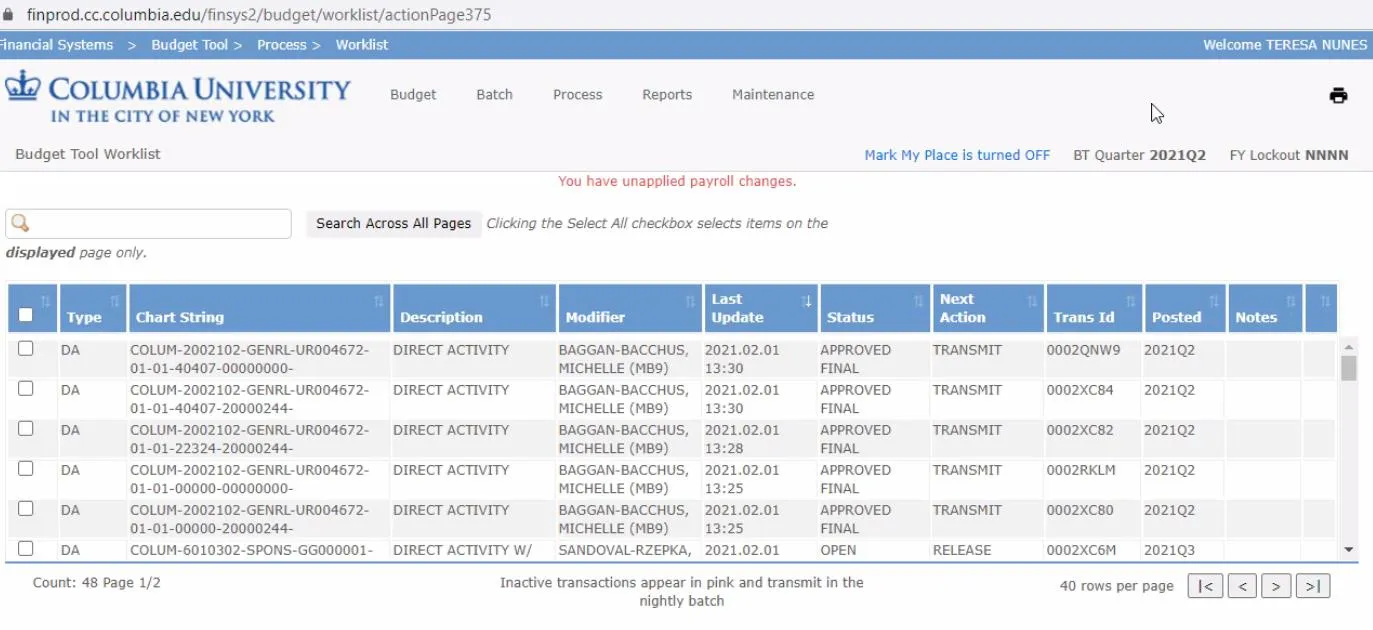
Closing ChartField Budgets: Downloading the Batch Spreadsheet File
- Click the Batch menu. The menu options appear.

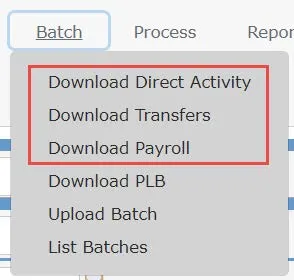
- Select one of the following menu items depending on the Natural Account numbers for the Budget(s) you are closing:
- Download Direct Activity – Natural Account numbers beginning with 4 or 6.
- Download Transfers – Natural Account numbers beginning with 7
- Download Payroll - Natural Account numbers beginning with 5
The ChartString Selector screen appears and works the same for any of the selections above.
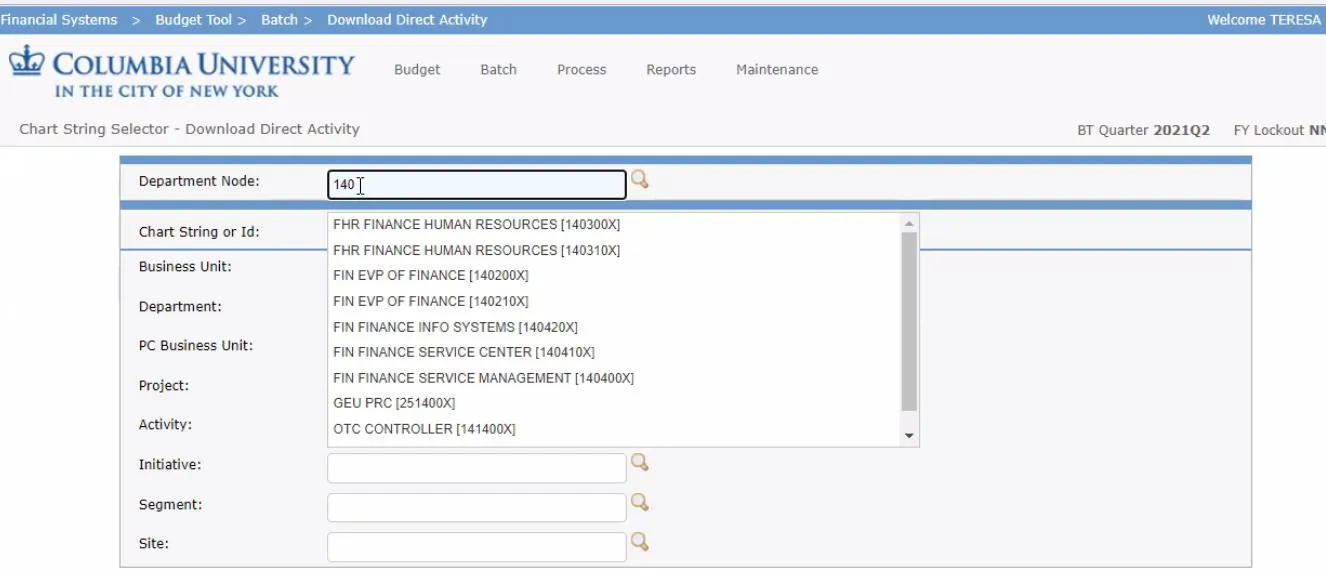
- Enter the ChartField information in the field for ChartField you are inactivating.
- Click Find. You search results appear.
- Select the matching item and click Download Spreadsheet. Save the spreadsheet to your files.
Editing the Batch Spreadsheet
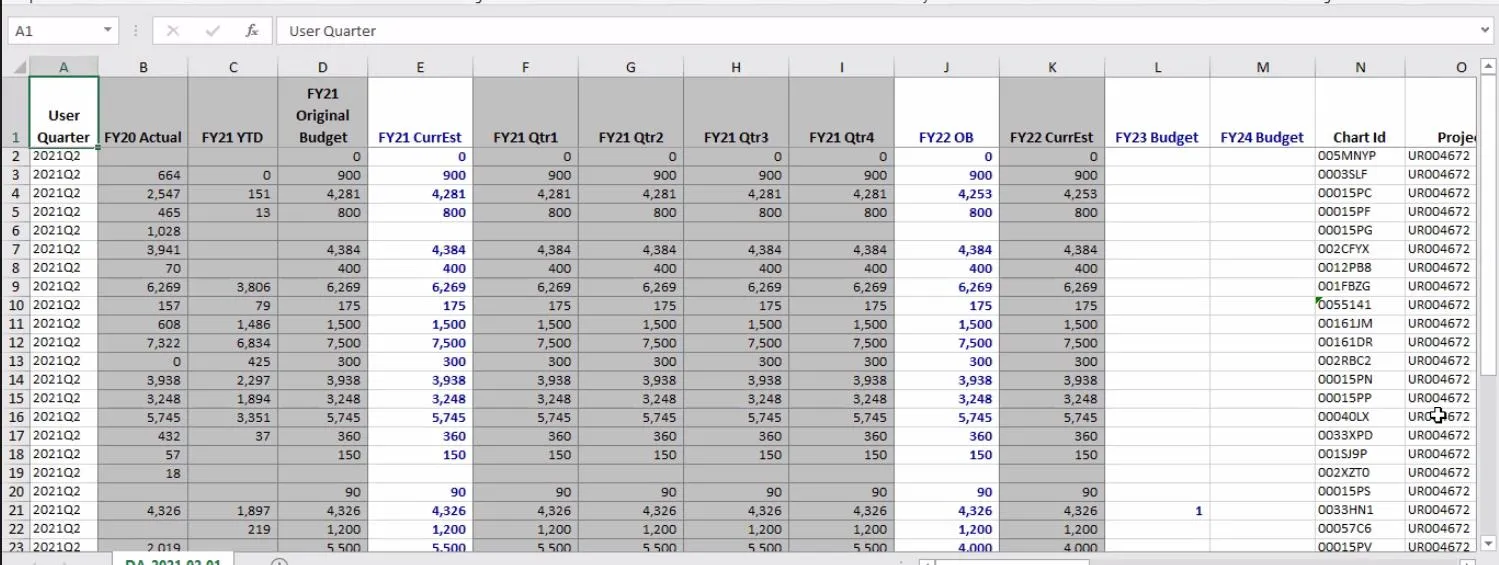
- In the columns for the Current Estimate and future Fiscal Years, edit all budget items to be 0.
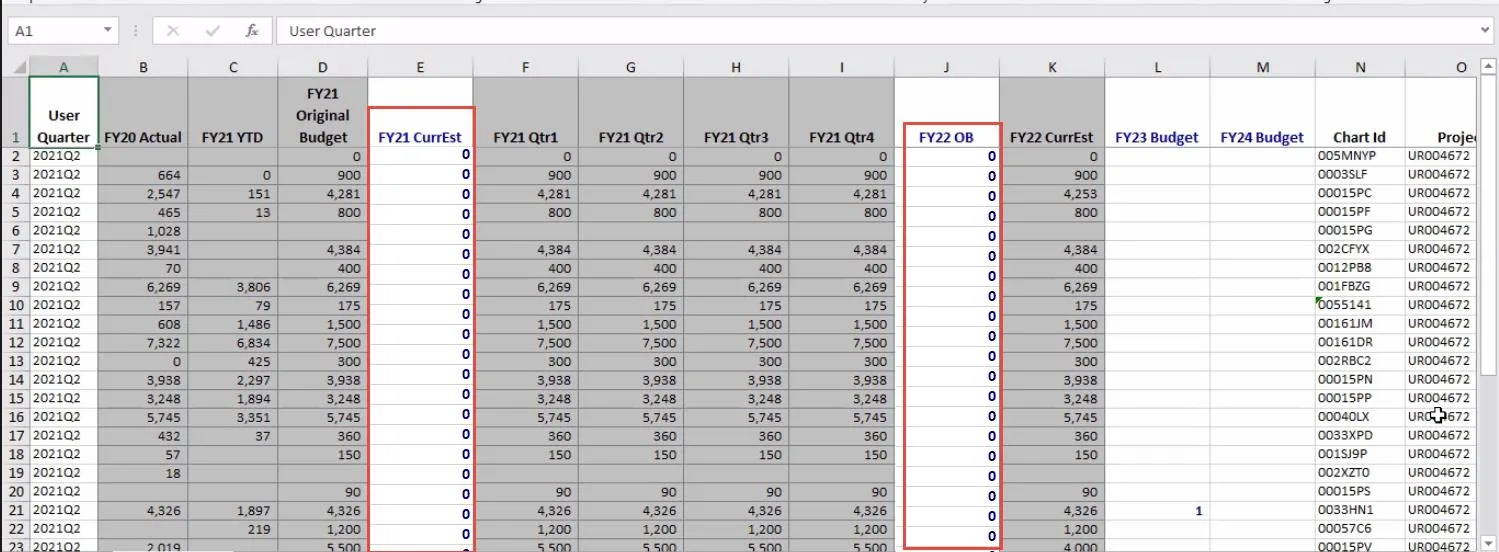
- Save the file.
Uploading the Batch Spreadsheet File
- Click the Batch menu and select Upload Batch. The Batch Upload Screen appears.
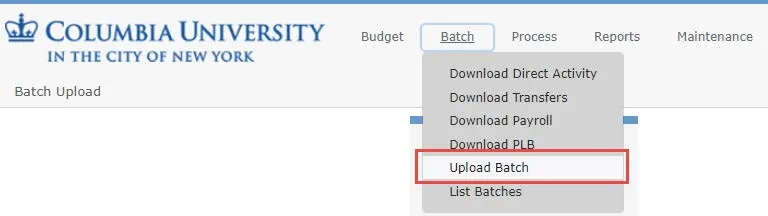
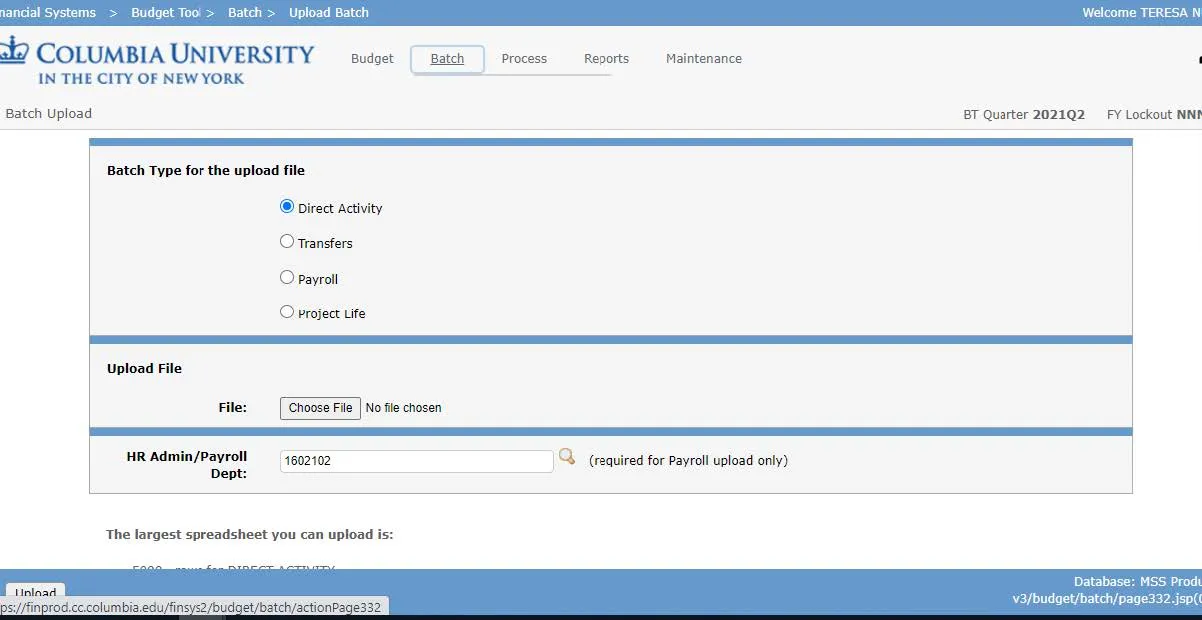
- Select Batch Type for the upload file depending on the Natural Account numbers for Budget(s) you are closing:
- Direct Activity – Natural Account numbers beginning with 4 or 6.
- Transfers – Natural Account numbers beginning with 7
- Payroll - Natural Account numbers beginning with 5
- Click Choose File then browse and select the batch spreadsheet file you are uploading.
- Click Upload. The Batch Upload List screen appears with your upload.
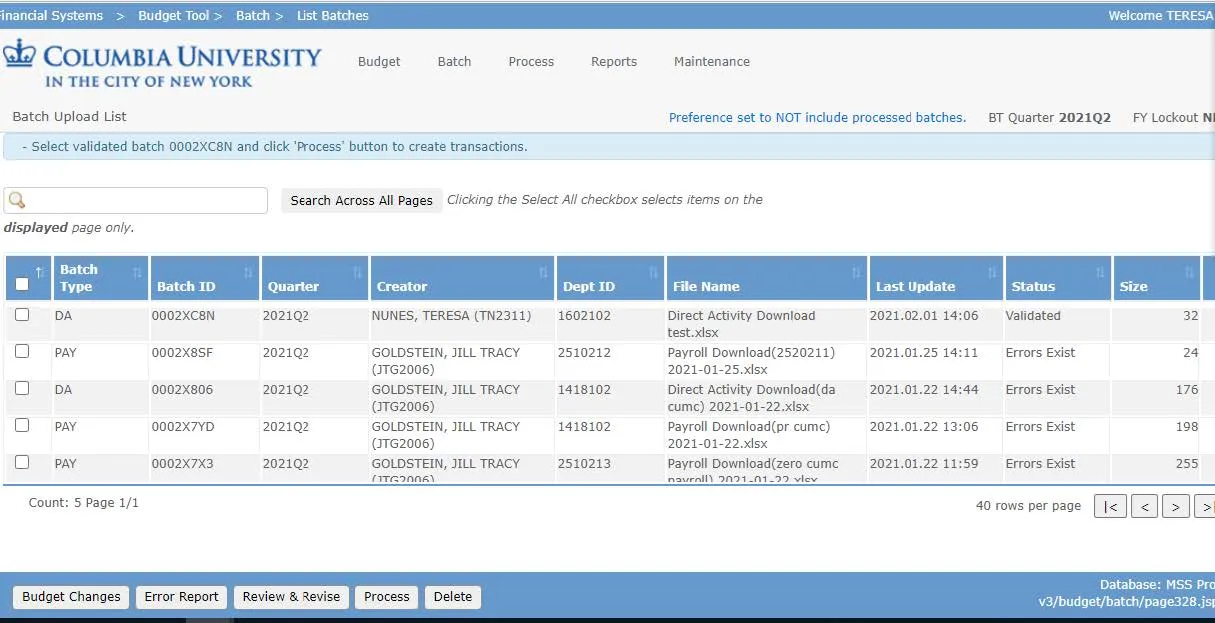
Processing the Batch Upload
- Select the checkbox for the Batch you are processing.
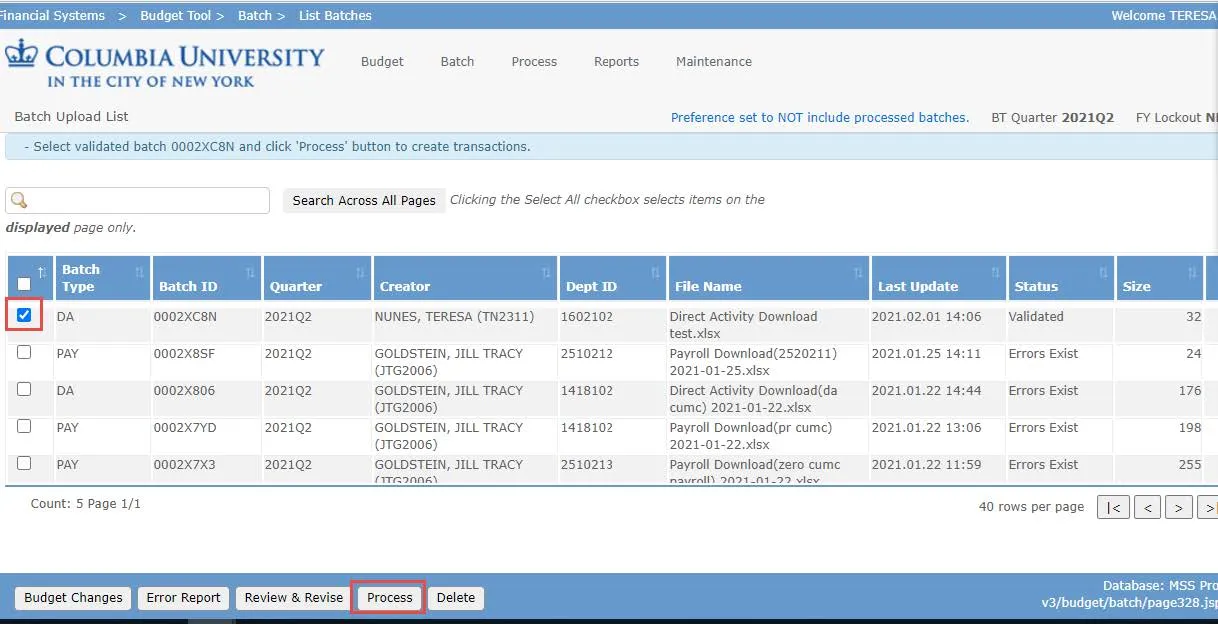
- Click the Process button.
- Select the Process menu and select Worklist. The Worklist screen appears with your Batch items listed with the Next Action indicating “Release”.


- Select the checkboxes for each Batch item and click the Release button.
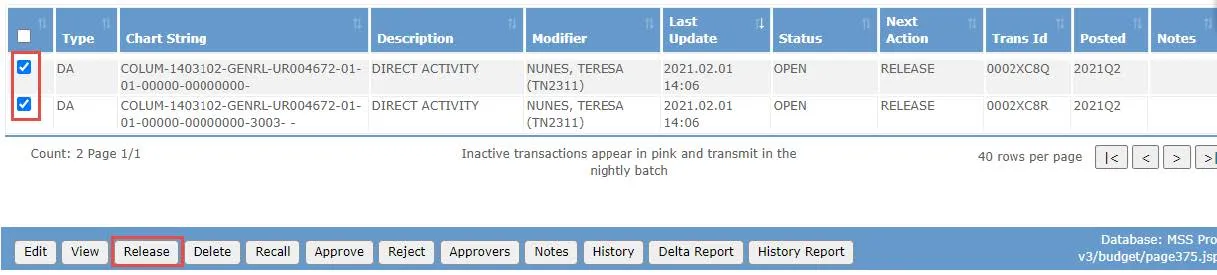
- Return to the Worklist screen. The Batch items will be listed with the Next Action as Approve.
- Select the checkboxes for each Batch item and click the Approve button.

If the Owning Attributes report appears, the Projects and Activities listed in the report need to be updated and reassigned to an active ChartField. For the example below, department 1630102 owns 4 activities and 4 projects. Before we can inactivate department 1630102, you need to submit Chartfield Request Forms to update the attributes of the 4 projects and 4 activities and assign a different owning Department.
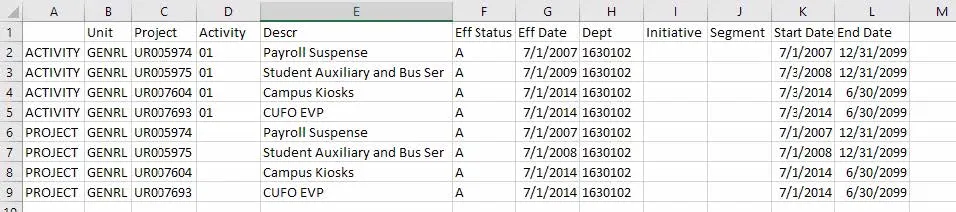
Updating Owning Attributes
Refer to the ChartField Request Form Training Guide and refer to the following sections:
- Page 12: Requesting an Update to an Existing Department
- Page 21: Requesting an Update to an Existing Initiative
- Page 23: Requesting an Update to an Existing Segment
Click here to access the ChartField Request Form.
If the Pending_Journals report exists, open it to take note of the Source column to determine who to contact to close the associated Pending Journals.
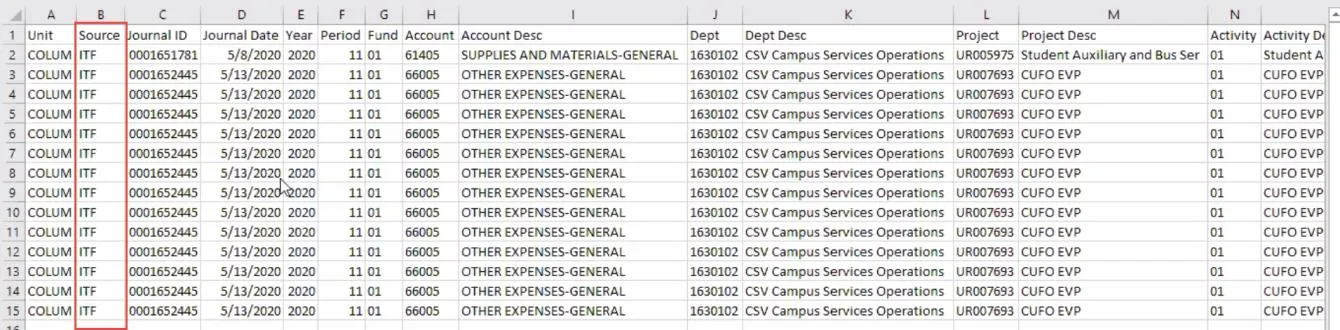
Depending on the Source, use the table below to determine whom to contact to close your Pending Journals.
Searching for the Journal Entry Initiator (Internal Transfers or Online Journal Transactions)
- In ARC, navigate to search for the relevant pending Journal Entry.
- Internal Transfers (ITF): Click Main Menu > Columbia Specific > General Ledger > Internal Transfer JournalEntry.
-
Online Journal Transfers (ONL): Click Main Menu > General Ledger > Journals > Journal Entry > Create/Update Journal ID.
- Click the Find an Existing Value tab.
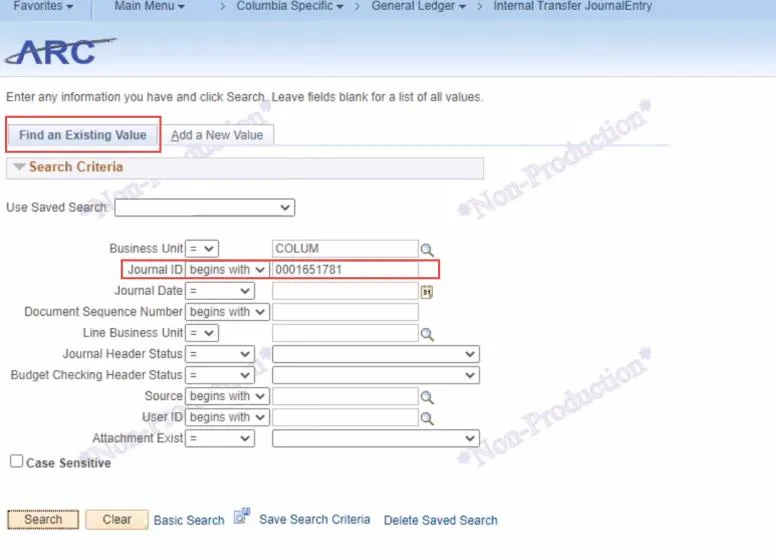
- Enter the Journal ID.
- Click Search. The matching Journal Entry appears.
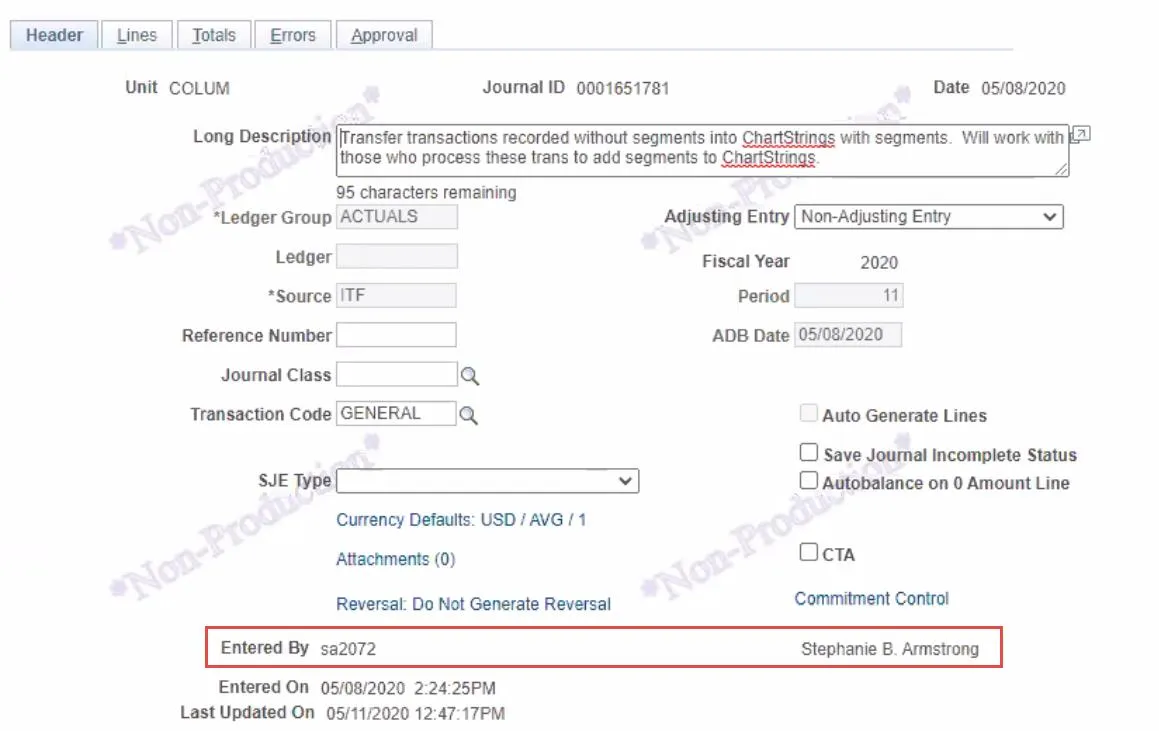
Note the Entered By field to determine the Initiator to contact in order to close out the Journal Entry.
The Vouchers report shows any pending vouchers associated with deactivating the ChartField. As long as a voucher is still in the approval workflow, you can either edit the voucher to change the relevant ChartField information or just cancel it.
Refer to the Managing Vouchers job aid on how to edit or cancel voucher.
The Pending_Reqs report shows any pending requisitions associated with deactivating the ChartField. As long as a requisition a still in the approval workflow (a Purchase Order is not yet issued), you can either edit the requisition to change the relevant ChartField information or just cancel it.
Refer to the Managing Requisitions job aid on how to edit or cancel requisitions.
The Purchase_Orders report shows any in-progress purchase orders associated with deactivating the ChartField. You submit a Financial (Distribution Only) Change Order to change the relevant ChartField. You can also choose to close the Purchase Order.
Refer to the Change Orders job aid for details on how to create a Financial (Distribution Only) Change Order to update the ChartField information for a Purchase Order.
Refer to the Closing Purchase Orders job aid for instructions on how to close Purchase Orders.
Once all the open items associated with the ChartField you want to inactivate are closed, you can now inactivate the ChartField.
Refer to the ChartField Request Form training guide for detailed instructions on the ChartField request and inactivation process.