Concur Profile Quick Guide
This Quick Guide covers the basics of setting up your Concur Profile so that you can immediately begin using Concur to book Travel or submit Expense Reports. If you have the benefit of administrative support, you can setup Delegates to update your Concur Profile settings on your behalf.
Refer to the Setting up Your Concur Profile for Travel and Expense User Training Guide for detailed instructions on completing your entire Profile.
Last Updated:
Details
If you have the benefit of administrative support to help you book travel or submit Expense Reports, you can set them up to be your Delegate in Concur to act on your behalf. Your delegates can also setup your Concur Profile on your behalf. Refer to the Job Aid: Managing Delegates for detailed instructions on managing delegates.
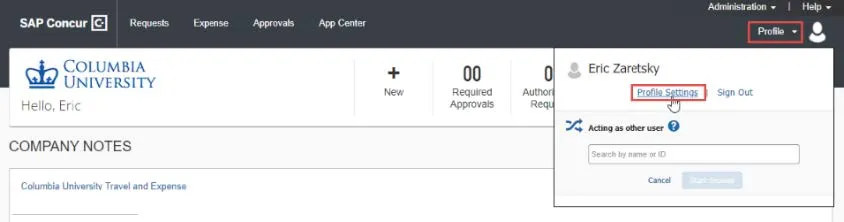
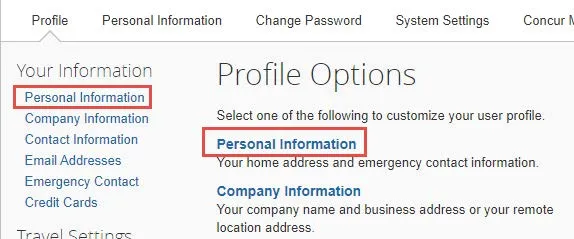
- Navigate to the Travel and Expense website and Log into Concur. Click Profile on the top right of your screen and select Profile Settings. The Profile Page appears.
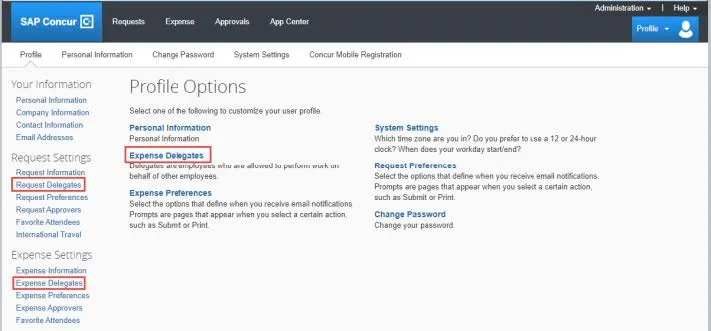
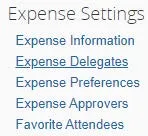
- Click Expense Delegates (from Profile Options or Expense Settings) or Request Delegates. Delegates’ functionality and lists are the same in all places.
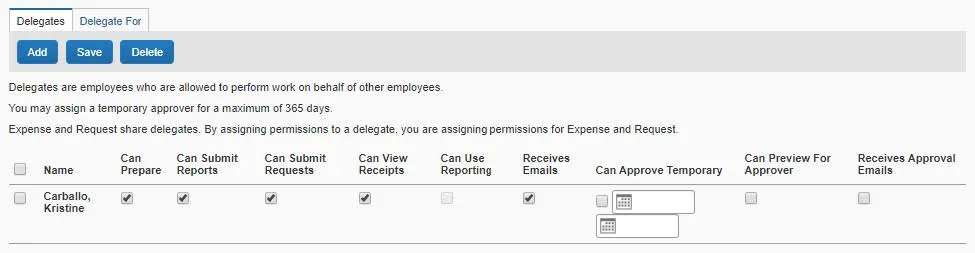
- Click Add.
- Type your Search using last name, UNI, email, etc. A list of matches appears.
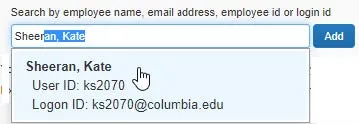
- Select the desired match or click the Add button next to the search field if your selection is not added.
- Select the appropriate checkboxes to assign the permissions you wish to give the delegate. Note: Assigning Delegates permission to Submit Reports or Requests allows them to click Submit Report once they have finished preparing your Expense Report. However, a Preparer Delegate is not able to submit the Expense Report into workflow. You must review the Report for accuracy and completeness prior to submitting into workflow for approval. Clicking Submit Report is the equivalent of you signing the Expense Report to state that everything is appropriate and correct.
- Click Save.
If you do not have the benefit of having Delegates who can update your Profile on your behalf, you will need to make sure that your Profile contains certain required information. You must ensure the following required pieces of information are complete:
Your Name (including Middle and Suffix)
Company Information
Home Address
Contact Information
Emergency Contact
TSA Secure Flight
- Log in to Concur and click Profile on the top right of your screen and select Profile Settings.
- Click the Personal Information link from the left menu or from the Profile Options.
Scroll to the appropriate sections to update the required fields. These are intermingled with Travel Preferences and other optional sections. After making updates, you can click Save anywhere on the page. You cannot click Save on your Profile until all required fields are complete.
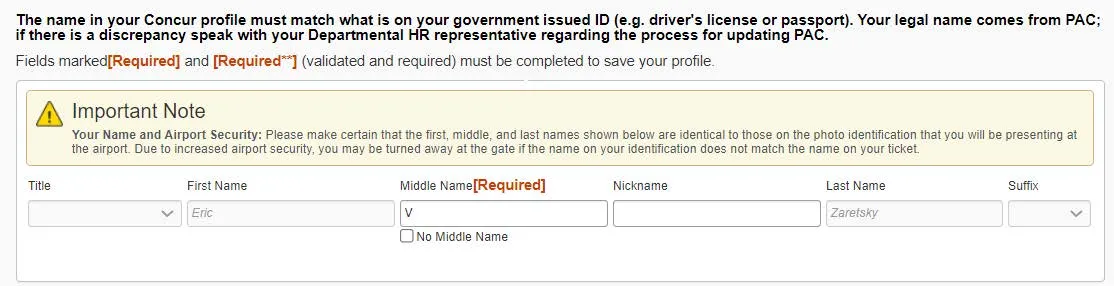
Confirming Your Name
Your name appears as it does in PAC (the University’s Human Resources system). Be sure that it matches with how your name appears on your travel documents such as your driver’s license and/or passport. If there is a discrepancy, speak with your Departmental HR representative regarding the process for updating PAC, as this is where the information for Concur comes from.
Middle Name is a required field. Be careful to enter your middle name, an initial, or select No Middle Name to match how it appears on your travel document(s). If you need to change it after entering and saving for the first time, you will not be able to do so yourself and must contact the Finance Service Center to request assistance.
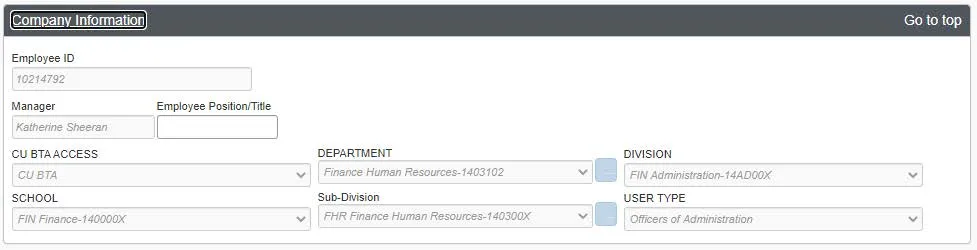
Confirming Company Information
Your Company Information (University role, department, etc.) will be pre-populated from PAC. The name of your Manager will appear if they are in PAC as your Manager; if you have no Manager in PAC, for example, you are a Faculty member, this field may be blank. If there is a discrepancy, speak with your Departmental HR representative.
Home Address
Scroll down to the section for Home Address.
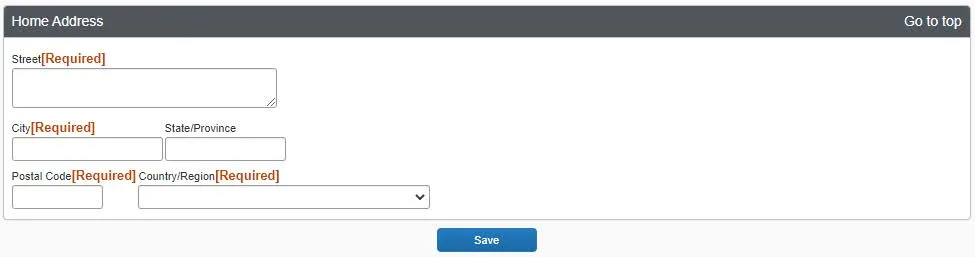
- Complete the Street, City, and Postal Code fields.
- Select the Country/Region from the dropdown menu.
Contact Information
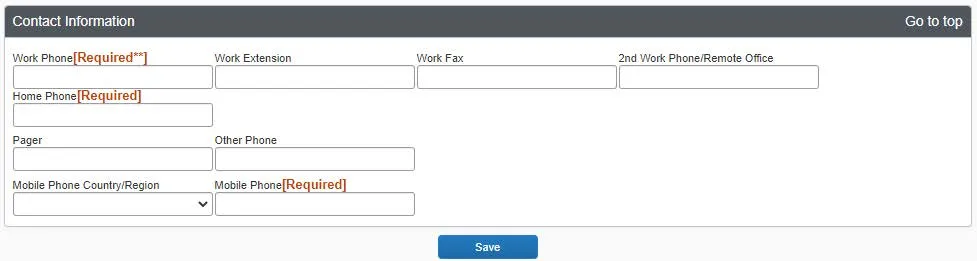
- Complete the Work Phone, Home Phone, and Mobile Phone fields. Select your Mobile Phone Country/Region from the dropdown when entering your mobile phone number.
- Add any other contact numbers, as desired.
Emergency Contact
Scroll down to the section for Emergency Contact.
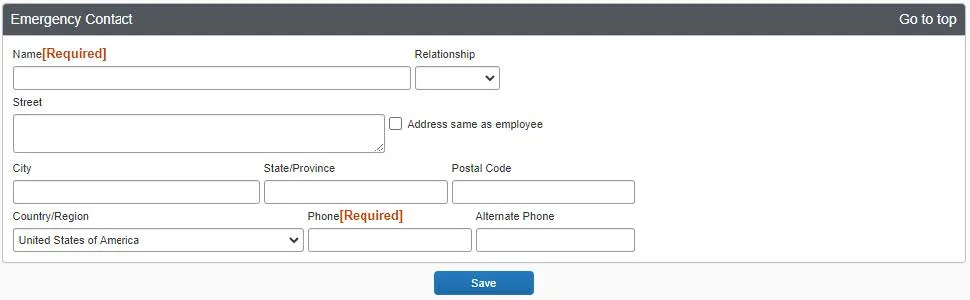
- Enter the Name of your Emergency Contact. Optionally, you can enter your Emergency Contact’s Relationship.
- You can complete the Street, City, Postal Code, and Country/Region fields OR you can select the Address same as employee if your emergency contact lives at the same address as you.
- Complete the required Phone field.
TSA Secure Flight
Scroll down to the section for TSA Secure Flight.

- Select the option for Gender (this is a TSA requirement, not a University requirement).
- Enter your Date of Birth.
- Optionally, you can enter a DHS Redress No (to help eliminate watch list misidentification) and/or your TSA Pre number for expedited security screening.
A ChartString is a series of ChartFields that track information about your expense and the funding associated with it. By entering a default ChartString in your profile, it is automatically populated in your Expense Reports. If needed, the ChartString information can be edited on individual Expense Reports if it differs from the default. In addition, Expense Reports can be allocated to multiple ChartStrings at the individual Expense lines. The ChartFields in Expense Reports can be modified by the Financial Approver if needed.
ChartString information is setup in the Request Settings or Expense Settings sections of your Profile. Settings for Request/Expense Information are exactly the same and updating these settings can be accomplished in either place as the information is identical.
- Log in to Concur and click Profile on the top right of your screen and select Profile Settings.
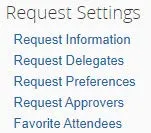
- Click Request Information or the Expense Information link to display the ChartString form.

- The Request / Expense Information is pre-populated from PAC with your School, Division, Sub-Division and Admin Department. These values will default to new Requests / Reports and have an impact on workflow routing. The Division will drive workflow routing to Senior Business Officers, when applicable. The Admin Department will drive approval workflow routing to the Initial Reviewer when applicable. It is possible that your Admin Department may not be populated or is incorrect. Ask your Departmental Administrator for guidance on how to update PAC. Refer to Job Aid: The Concur Approval Workflow for additional details. The GL BU (1), Department (2), PC Business Unit (3), Project (4), and Activity (5) ChartFields drive workflow routing to the Financial Approver. These values are a connected list and need to be entered in sequential order. Only budget valid ChartFields are available.
-
Click Save after updating the form.
Below is a template that can be completed by the Financial Administrator in your department to assist you with populating the default ChartField values in your profile: