Creating and Editing Tables on Columbia Sites
This job aid details the process of editing, deleting, or creating a table content block. It is designed for users who make edits to the following websites: Finance; Travel & Expense; Student Financial Services; Registrar; Student Service Center; and University Policies.
Last Revision: July 2023
What is a table content block?
A table content block is a way content owners can organize data and information on a page.
Table content blocks may only be used on basic pages and never landing pages.
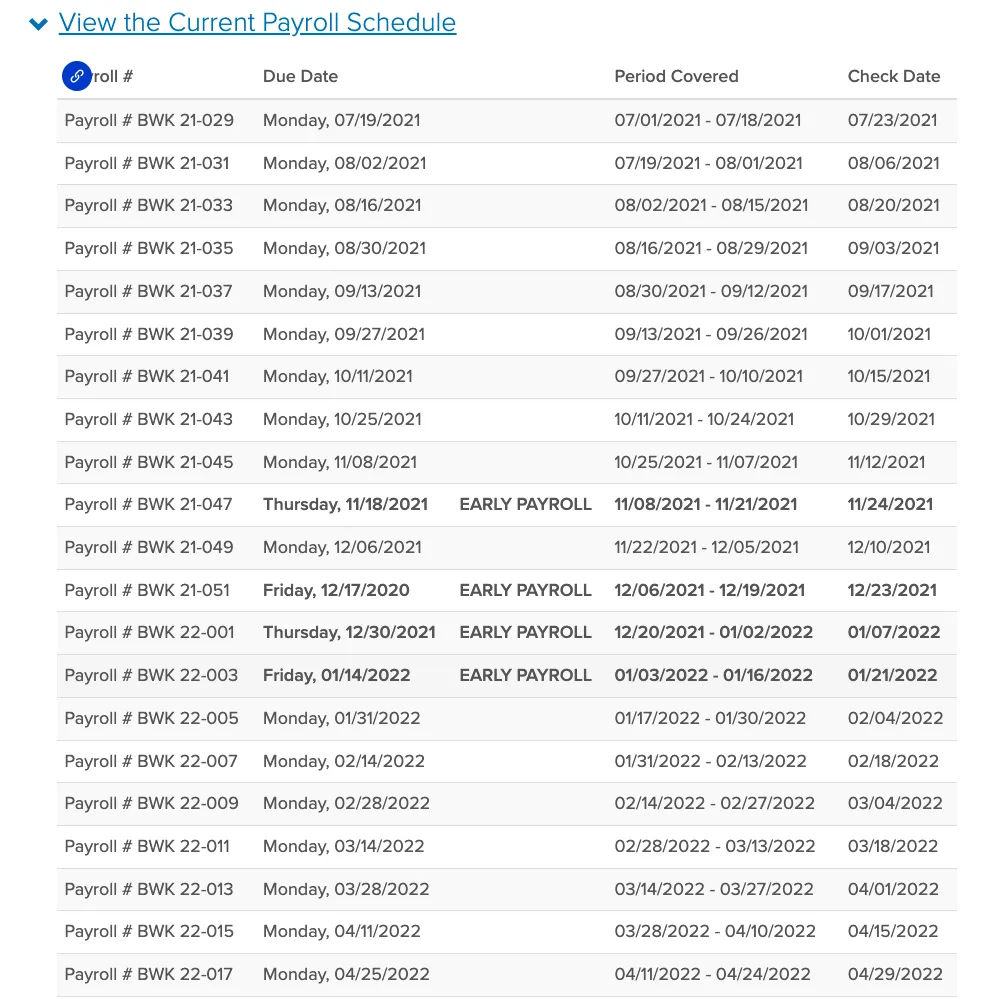
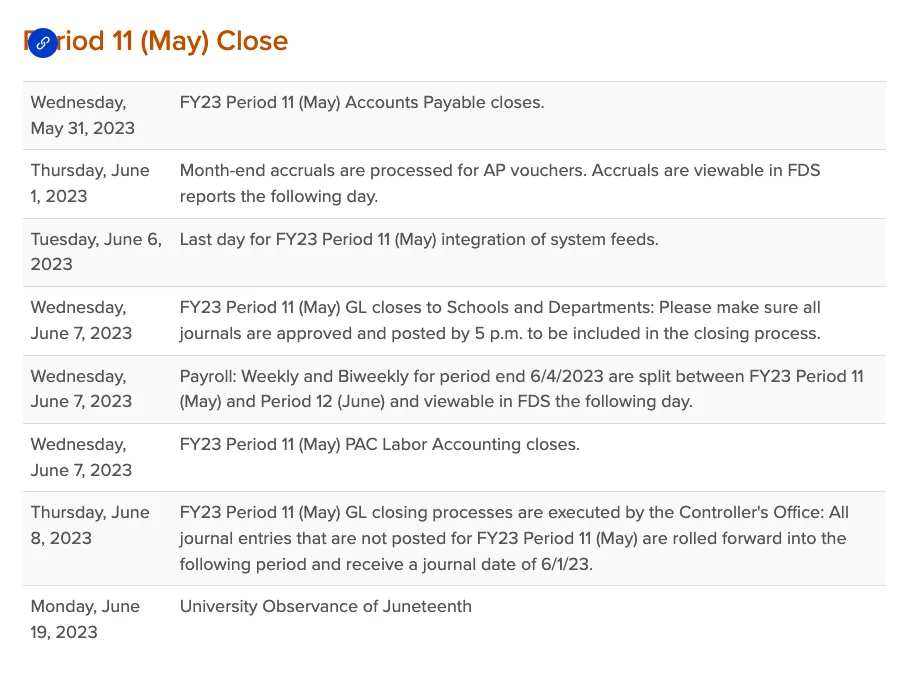
Example tables:
- Log in to the site you’re trying to edit. To log in, go to the homepage URL and type “/user” at the end of the URL (do not include the quotation marks), then hit Return to navigate to that page. You will be asked to authenticate, which will log you into the site and return you to the homepage.
- Look for the editor ribbon on the page and select Edit. This ribbon is toward the top of the page underneath the main navigation menu. It will only appear if you are logged into the site. Once you click Edit, you will be taken to a backend editor’s view of the page.
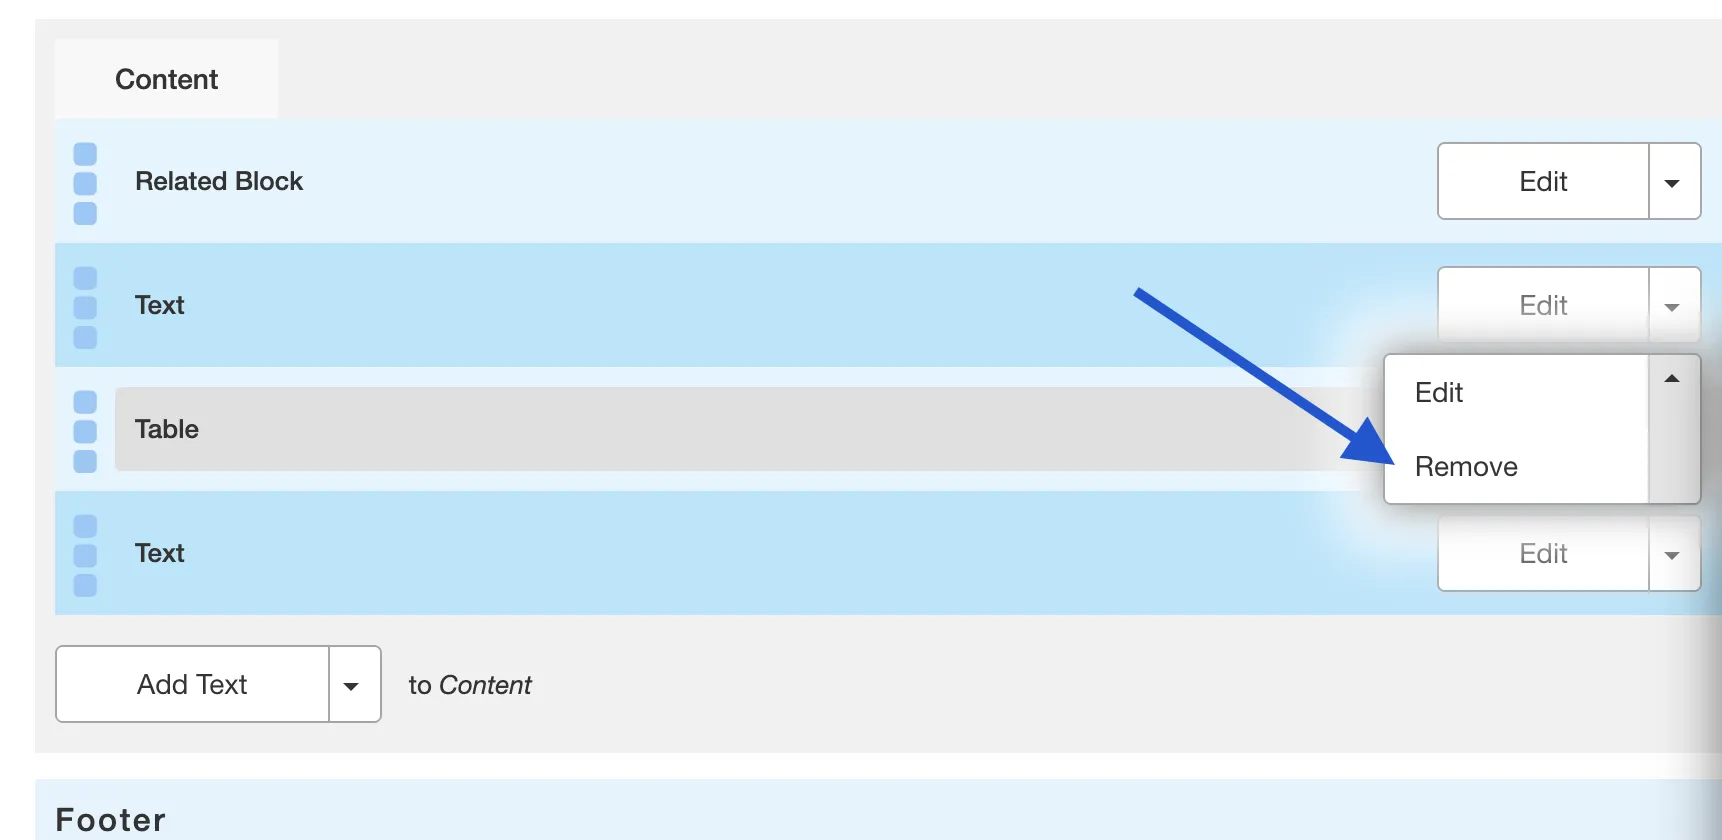
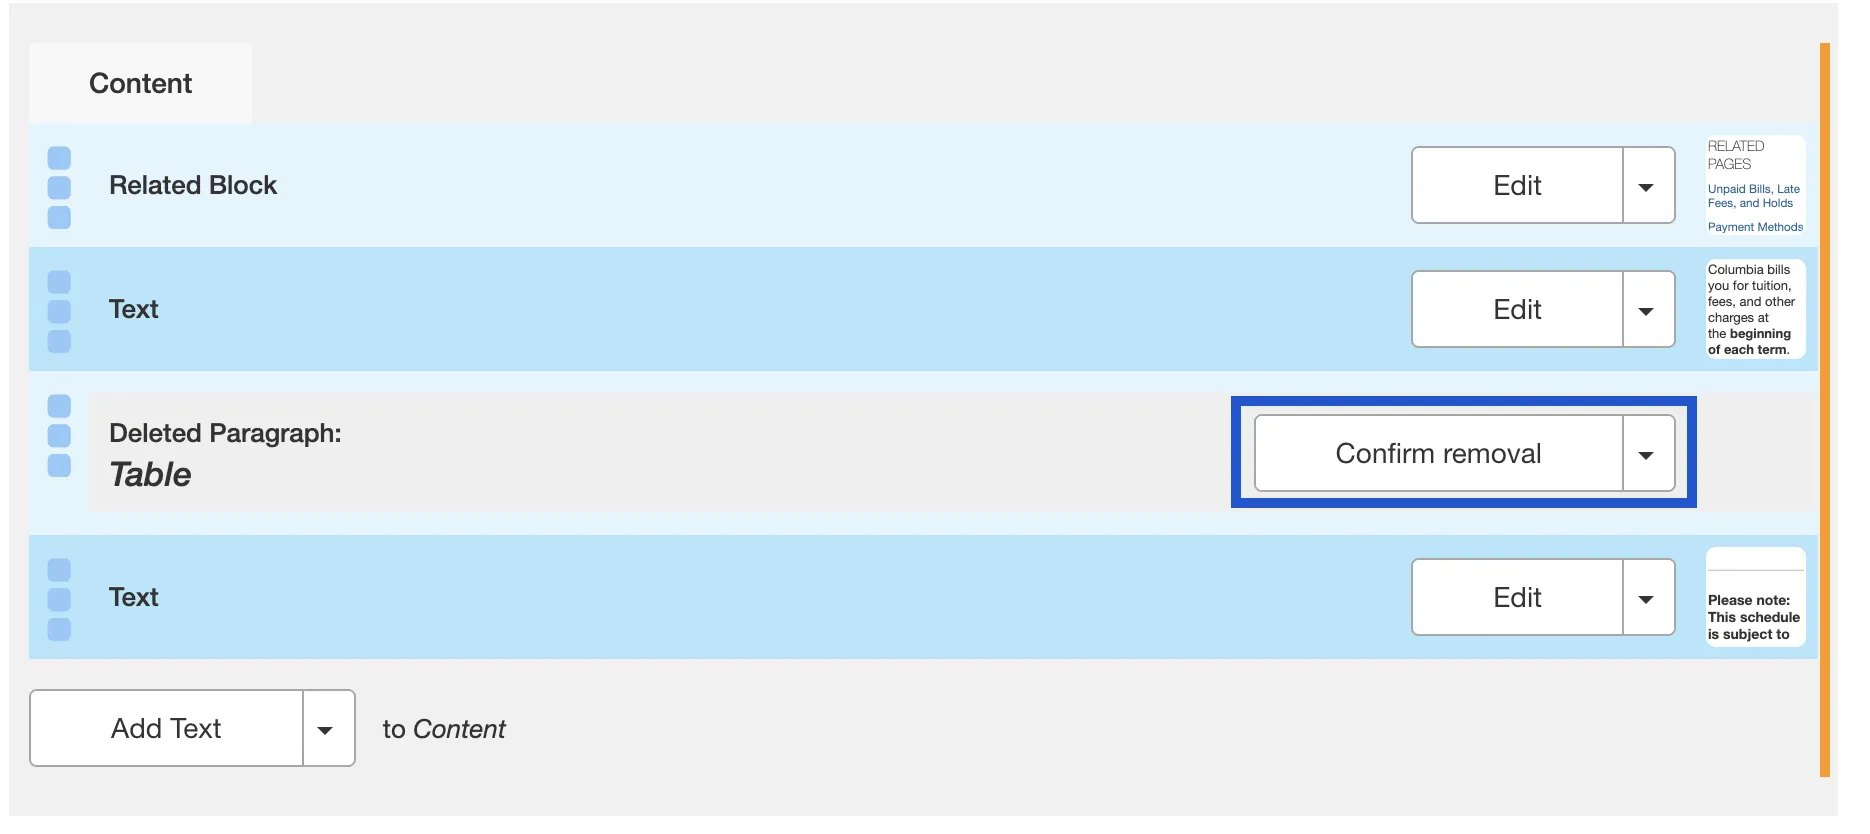
- On the backend of the basic page, you will find your editor options. Scroll down to the series of content blocks. Find the table you would like to change. If you wish to remove the entire table from the page, click the arrow pointing down to find more options, including the option to Delete.
- To Delete click on the arrow next to the edit button of the table you want to delete. A drop-down menu will appear prompting you to edit or remove the table. Click Remove.
- You will be prompted to confirm you would like to remove the table content block. Click Confirm.
- Selecting Delete will not immediately remove the table. You must scroll to the bottom of the page and click Save, which will immediately record your changes and return you to the normal user’s view of the webpage, reflecting your new updates to the page.
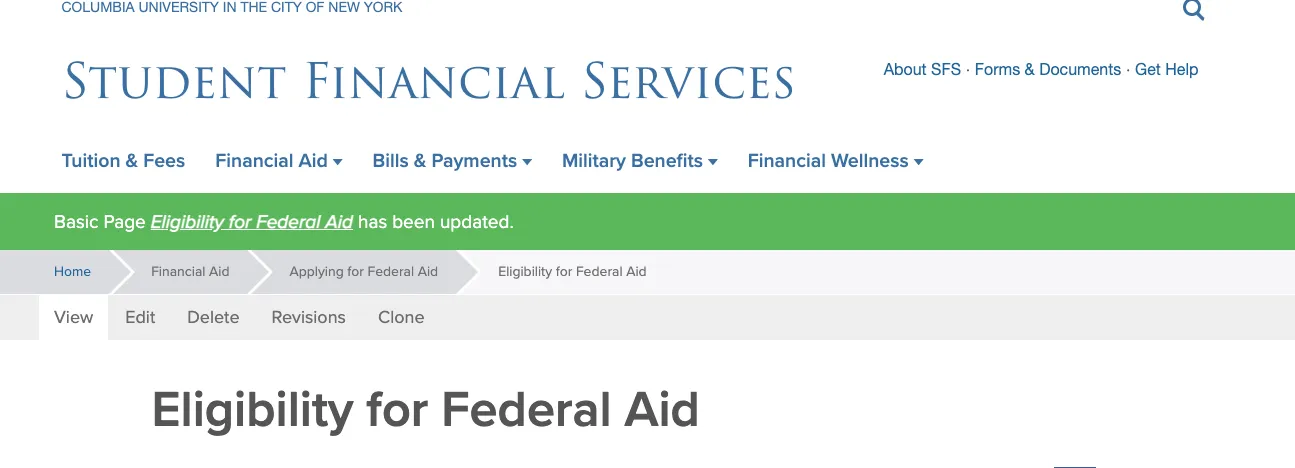
- After you select Save, you will be brought back to the user view of the page you edited. There will be a green bar near the top navigation to alert you the page has been updated. Your new changes will appear immediately on the page.
- If you need to change elements of a table instead of deleting the whole content block, click the table’s Edit button. This will open the table’s content block and all the individual accordion items will be displayed.
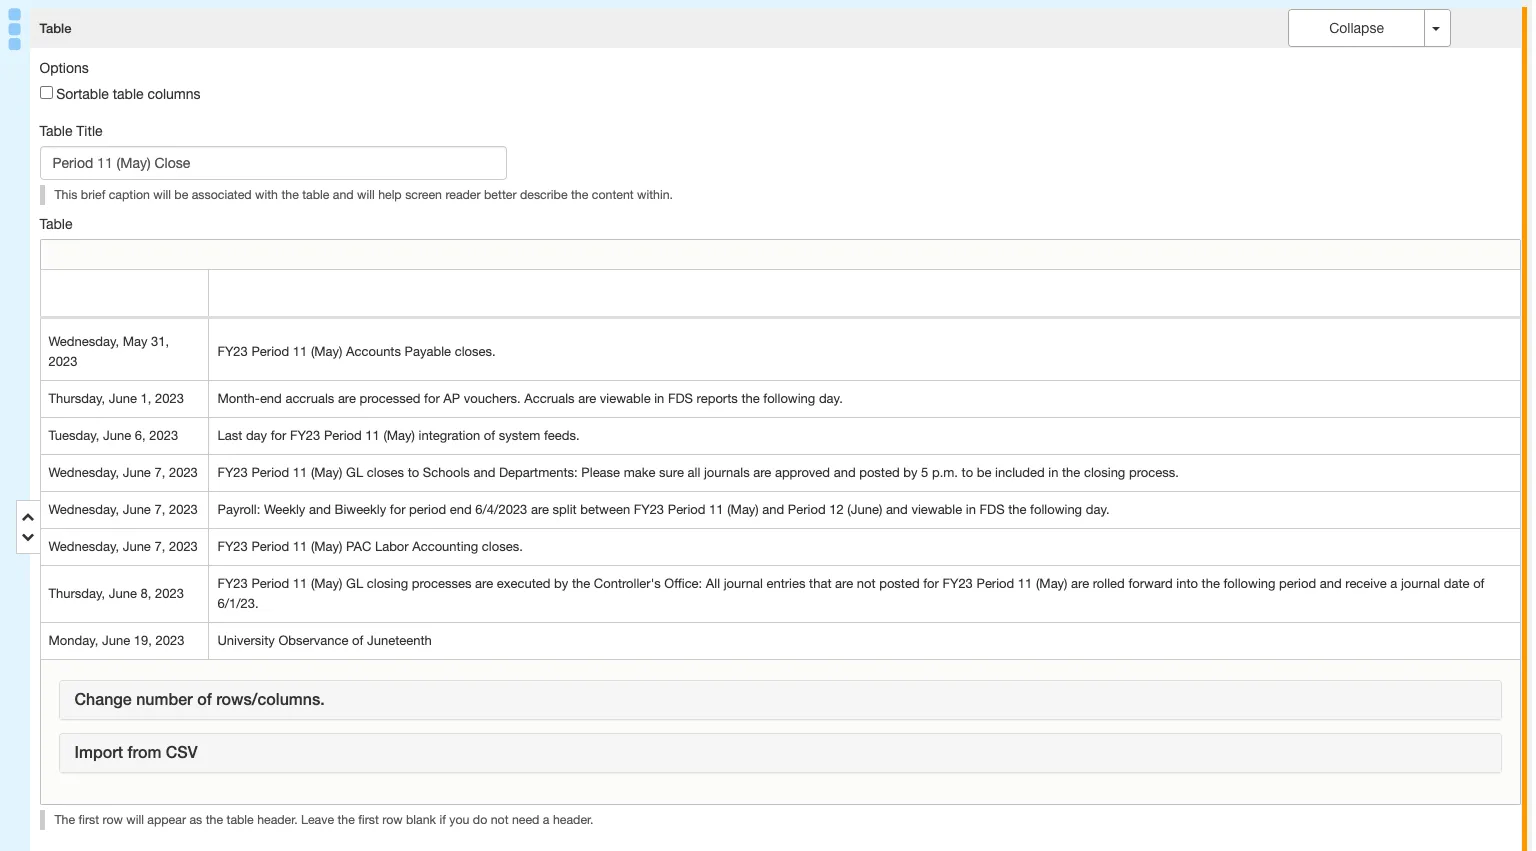
- Click on the cell within the table. The cell that you’re working in will be highlighted blue and a toolbar will appear above the cell. Edit the text you’d like to edit.
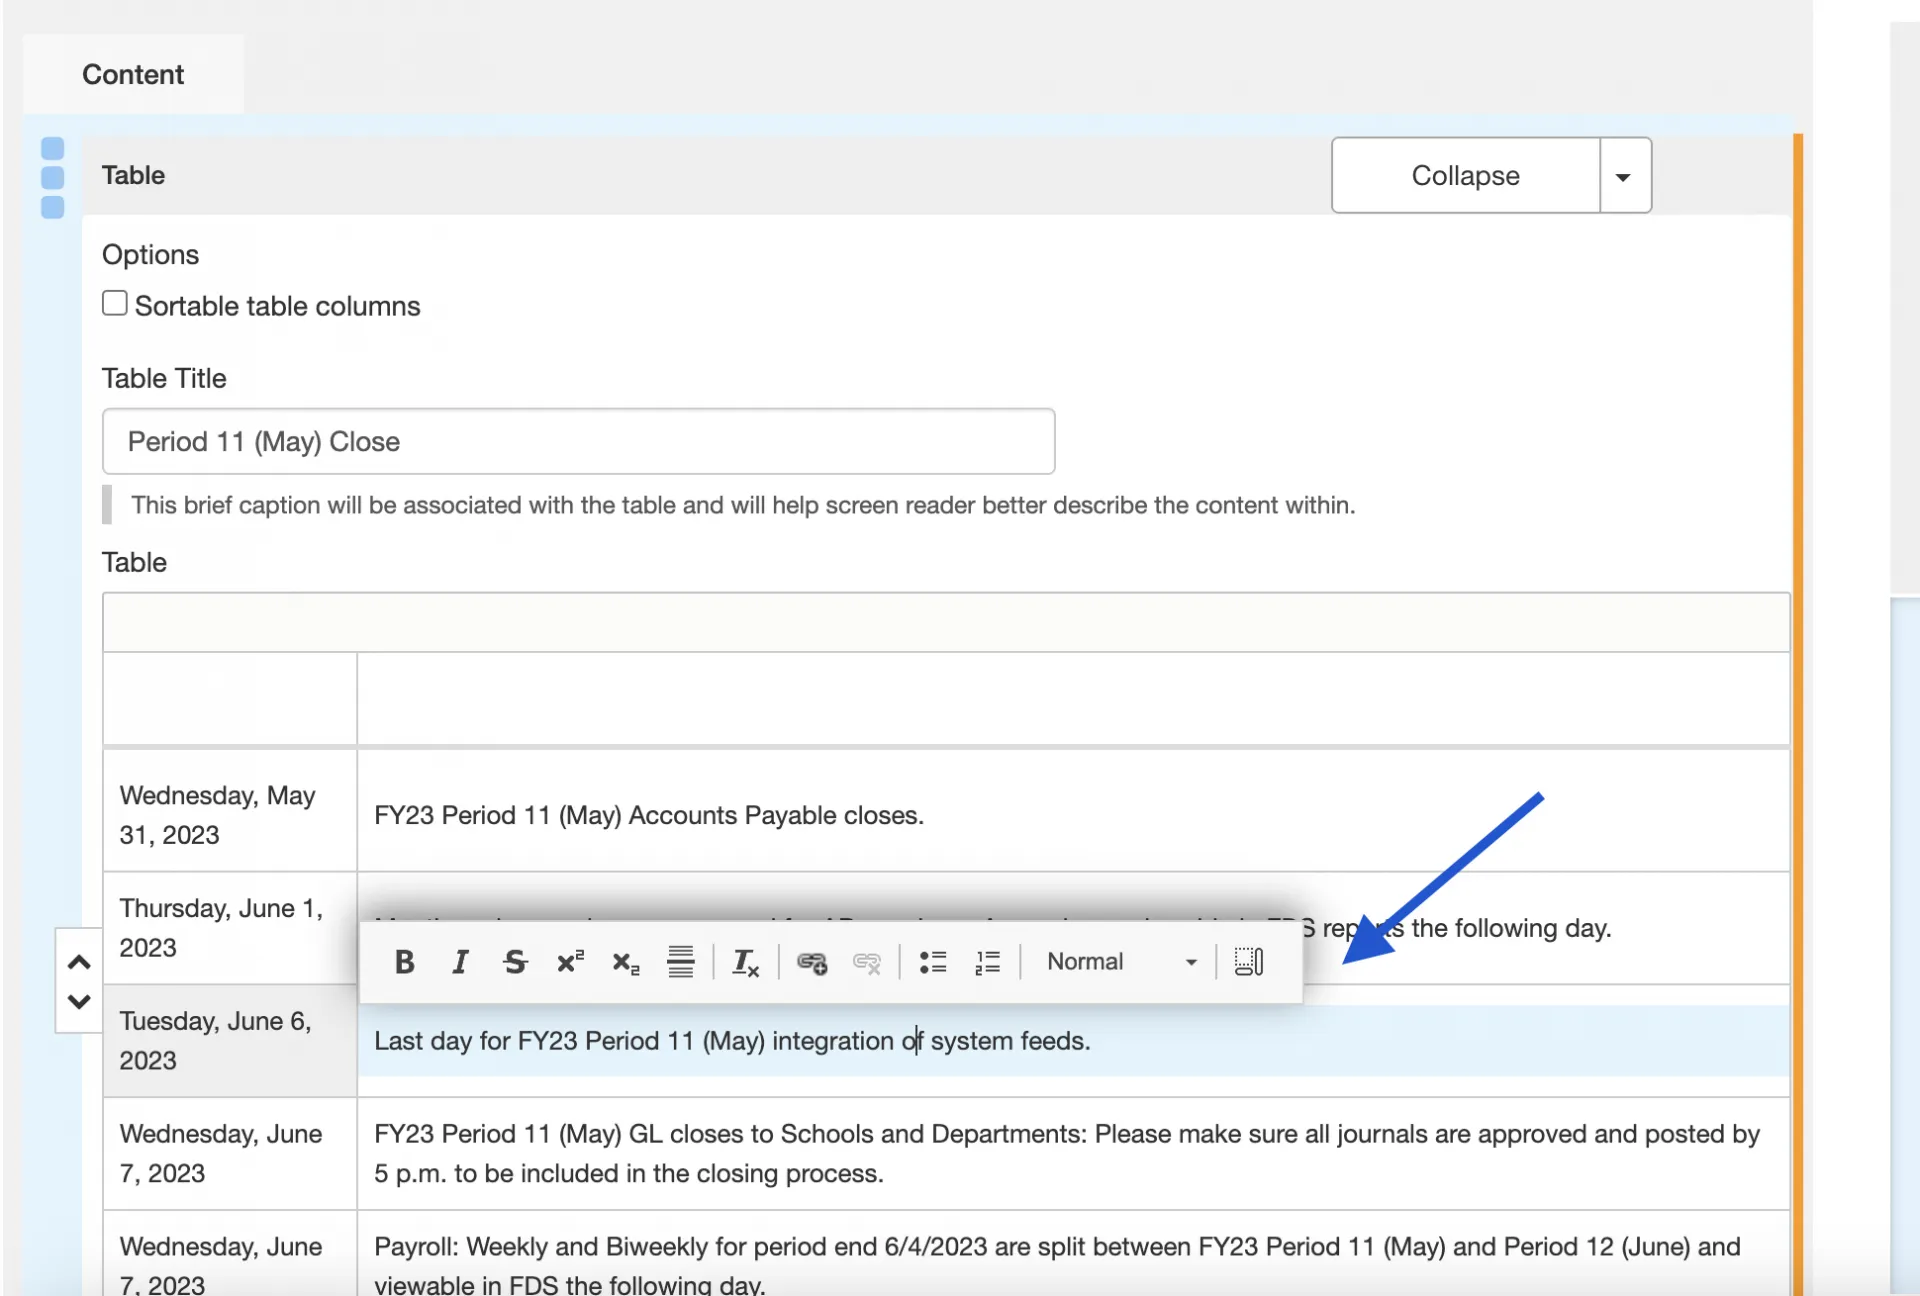
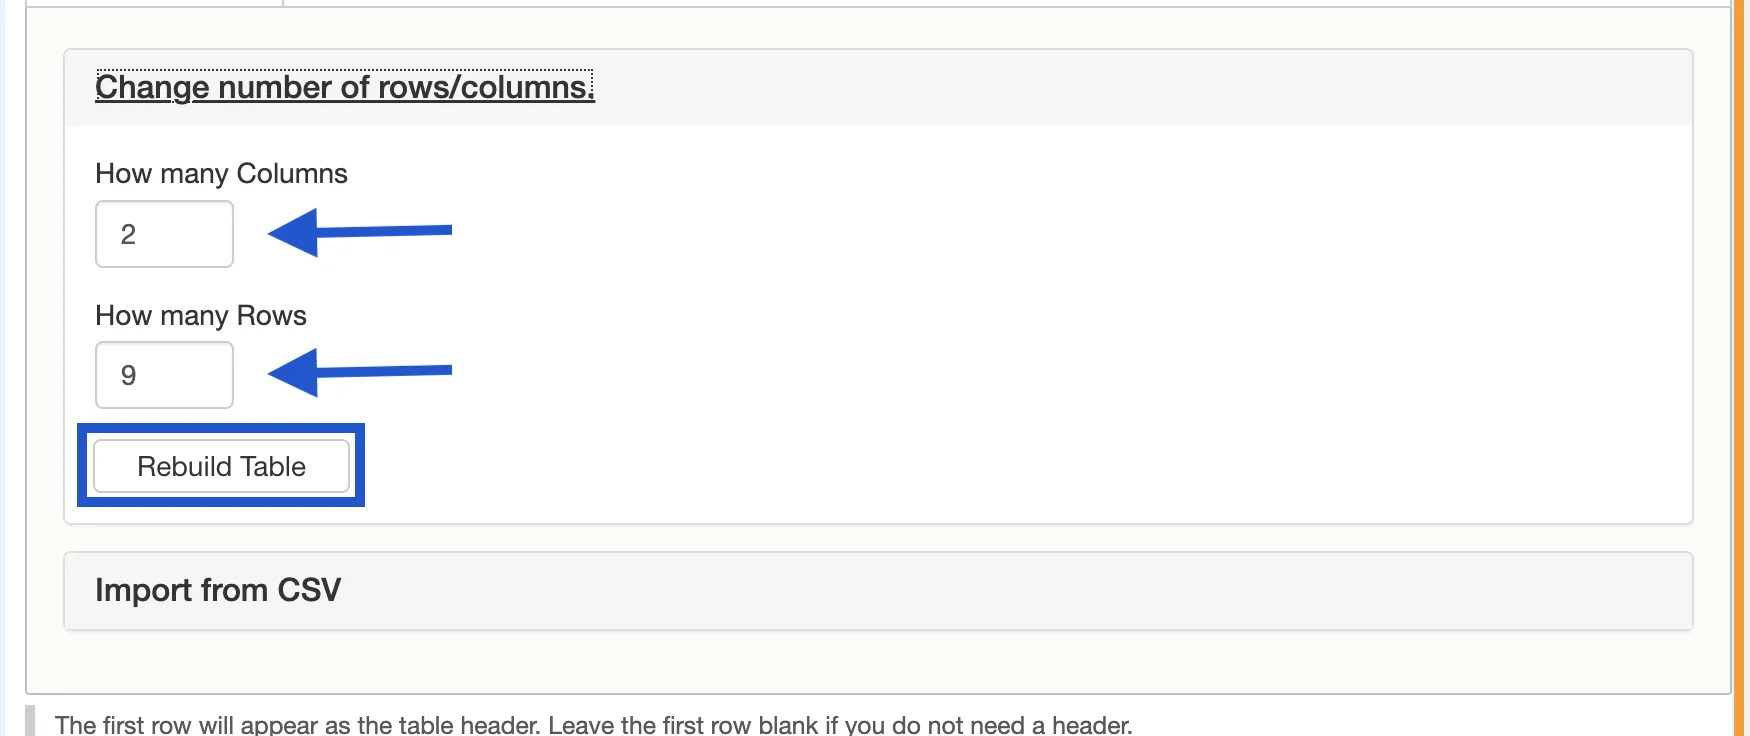
- To edit the table size (how many rows/columns) scroll down to the button of the table and click the line change number of rows/columns.

- Insert the new number of rows and columns you’d like for your table. Click rebuild table.
- You must scroll to the bottom of the page and click Save, which will immediately record your changes and return you to the normal user’s view of the webpage, reflecting your new updates to the page.
WHILE EDITING A TABLE, YOU MAY NEED TO MAKE MULTIPLE EDITS TO DIFFERENT CONTENT BLOCKS ON THE PAGE. YOU DO NOT NEED TO SELECT SAVE FOR EVERY CHANGE YOU MAKE.
YOU CAN MAKE MULTIPLE CHANGES ON THE PAGE BEFORE CLICKING SAVE AND ALL EDITS WILL BE RECORDED.
WAITING TO SAVE UNTIL ALL UPDATES TO THE PAGE ARE COMPLETE IS A WAY TO BE MORE EFFICIENT WITH YOUR TIME ON THE PAGE.
- Log in to the site you’re trying to edit. To log in, go to the homepage URL and type “/user” at the end of the URL (do not include the quotation marks), then hit Return to navigate to that page. You will be asked to authenticate, which will log you into the site and return you to the homepage.
- Look for the editor ribbon on the page and select Edit. This ribbon is toward the top of the page underneath the main navigation menu. It will only appear if you are logged into the site. Once you click Edit, you will be taken to a backend editor’s view of the page.
- On the backend of the basic page, you will find your editor options. Scroll down to find the Add Text button. Click the arrow on the right side of the text. A drop-down menu will appear.
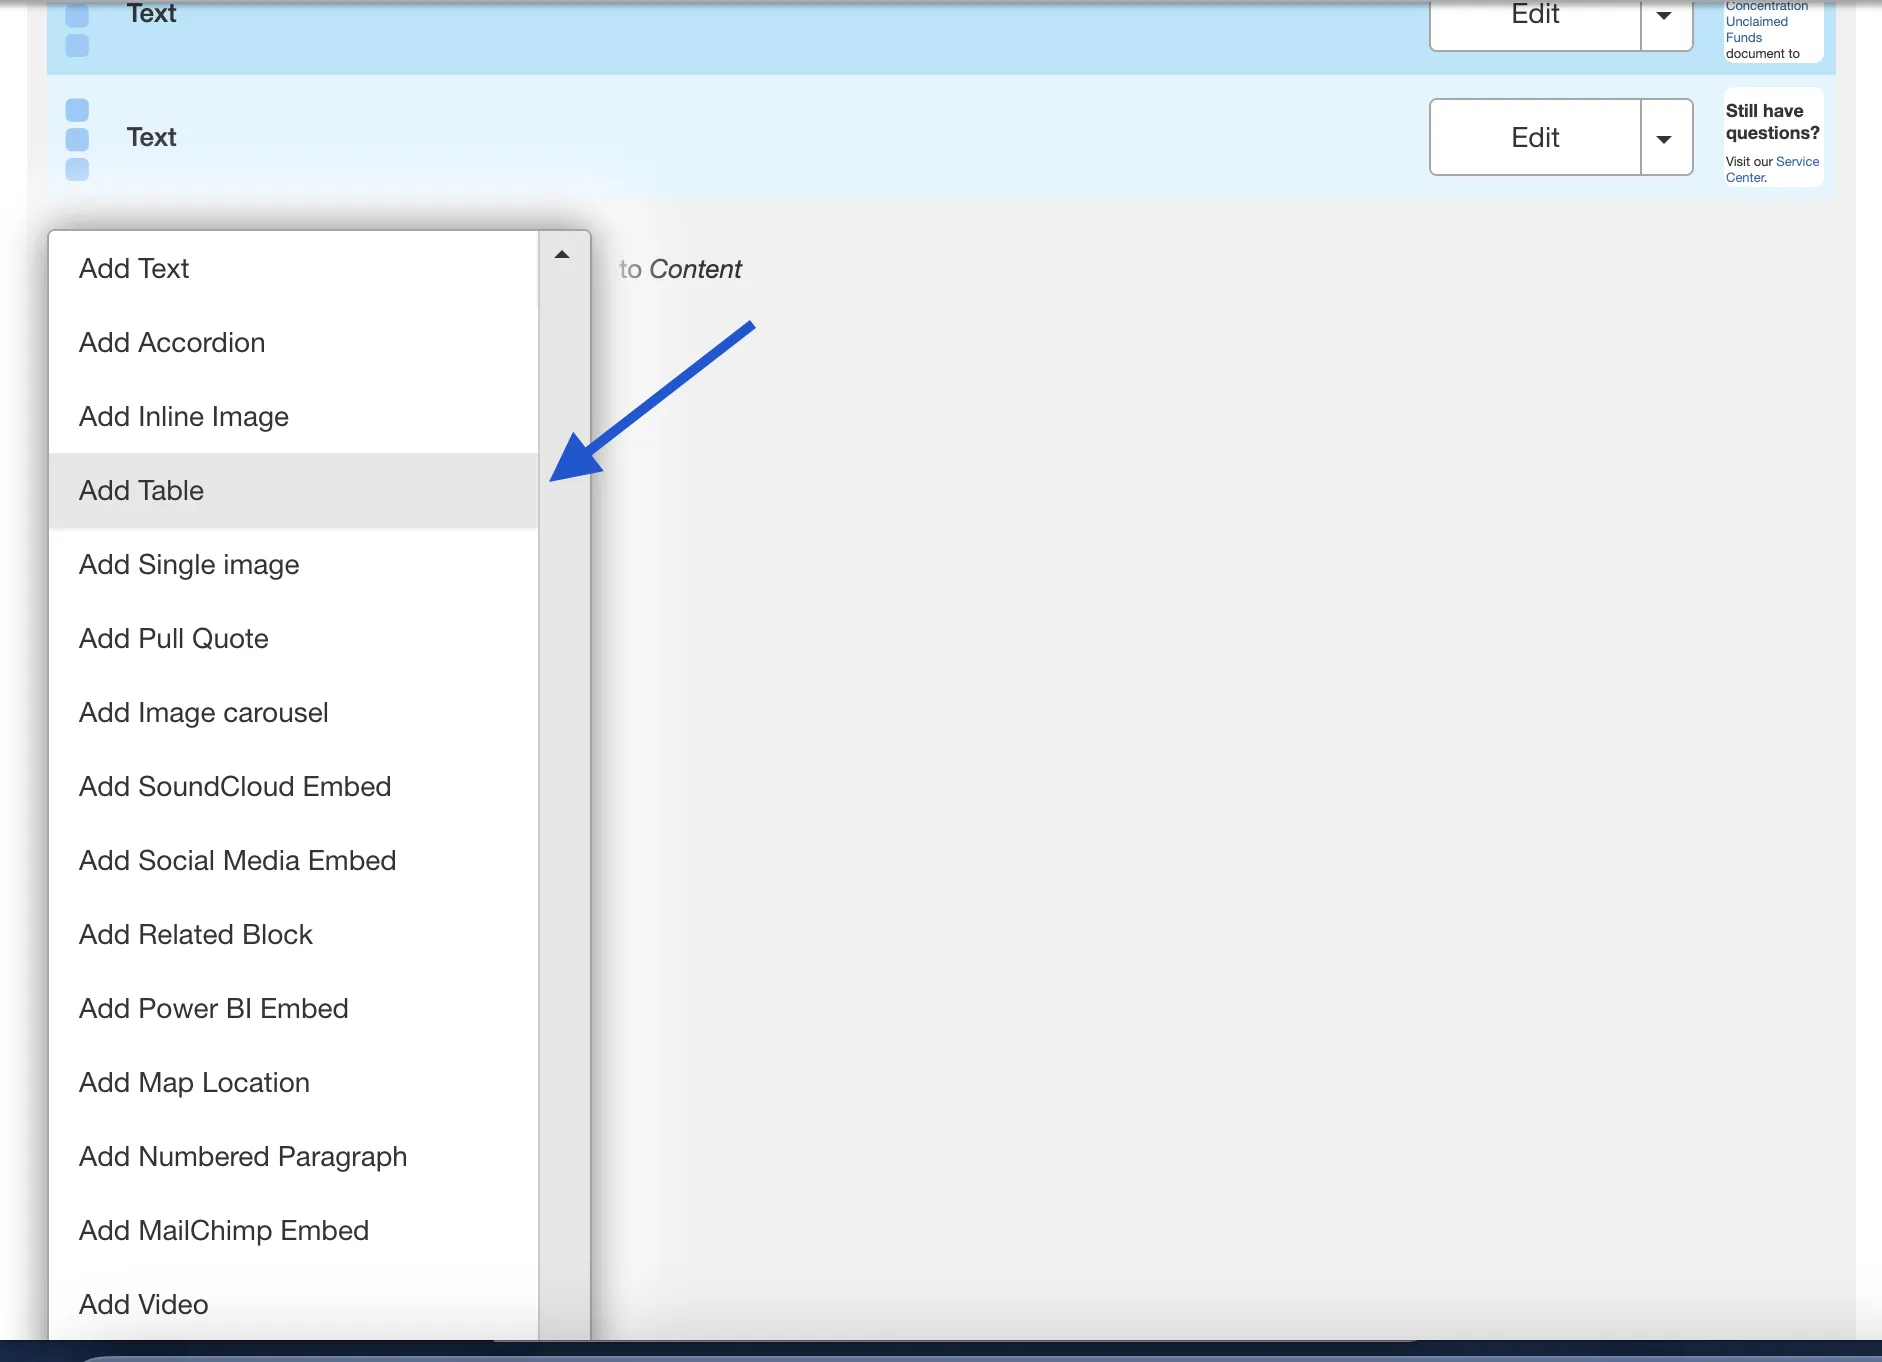
- Click Add Table The new table content block will appear. The table content block will be opened to a blank 5x5 table. Fill out the Title field to give your table a title. Add the content to the table’s field.
- To edit the table size (how many rows/columns) scroll down to the button of the table and click the line change number of rows/columns. Insert the new number of rows and columns you’d like for your table. Click rebuild table.
- You must scroll to the bottom of the page and click Save, which will immediately record your changes and return you to the normal user’s view of the webpage, reflecting your new updates to the page.
WHILE CREATING A NEW TABLE, YOU MAY NEED TO MAKE MULTIPLE EDITS TO DIFFERENT CONTENT BLOCKS ON THE PAGE. YOU DO NOT NEED TO SELECT SAVE FOR EVERY CHANGE YOU MAKE.
YOU CAN MAKE MULTIPLE CHANGES ON THE PAGE BEFORE CLICKING SAVE AND ALL EDITS WILL BE RECORDED.
WAITING TO SAVE UNTIL ALL UPDATES TO THE PAGE ARE COMPLETE IS A WAY TO BE MORE EFFICIENT WITH YOUR TIME ON THE PAGE.
While editing a page, if you accidentally delete the wrong content and need to start over, simply click the back arrow in the top left of your browser or close out of the browser tab or window completely.
As long as you do not save any mistakes you will not publish any mistakes.
If you need assistance creating, editing, removing, or recovering a table on your website, please contact the Finance Web Team at [email protected] with a summary of your needs.