Creating a PO Voucher in the CU Marketplace
This job aid covers how to create Vouchers for Purchase Orders (PO Vouchers) in the CU Marketplace. Those with the Voucher Initiator role can create and submit Vouchers into approval workflow.
Last Revised: September 2026
Need help submitting PO Vouchers or any other CU Marketplace transaction, click the JAI chat icon in the lower right corner of the CU Marketplace window.

Details
Navigate to the Finance Buying and Paying website, click the CU Marketplace logo, and log in using your Single Sign On. The JAGGAER application launches.

Note: The CU Marketplace will automatically time out after thirty minutes of inactivity, consistent with other University Enterprise Systems.
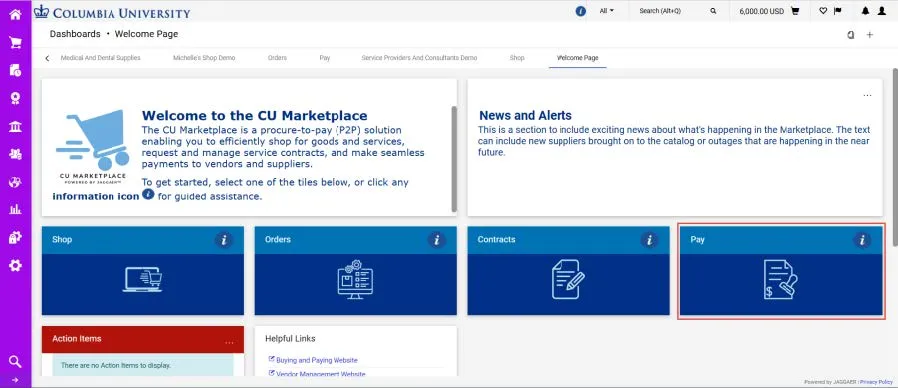
- Select the Pay tile. The Pay dashboard appears.
- In the Create Vouchers and Receipts section, select Voucher from the Type dropdown and PO from the From dropdown.
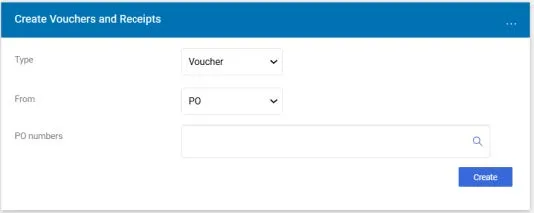
- Enter the PO number for the Purchase Order for which you are creating the voucher. You can click the Search icon to search and select the Purchase Order.
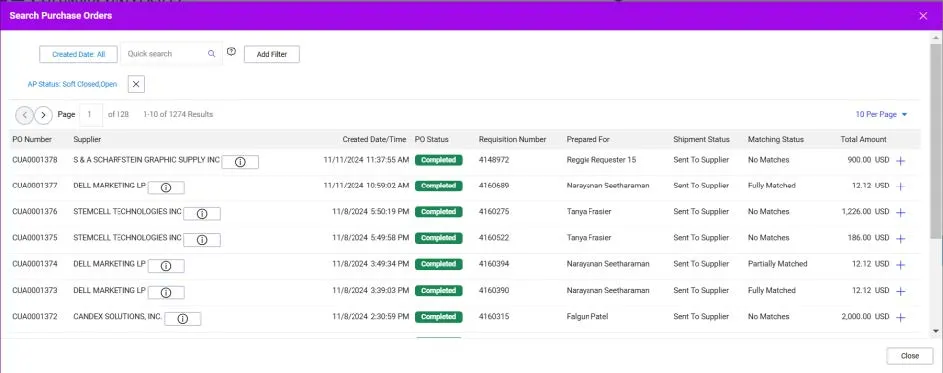
Type your criteria in the Quick Search field, press Enter, and click the Add icon for the matching Purchase Order.
- Click the Create button. The Voucher form appears.
Viewing the Purchase Order and Associated Vouchers
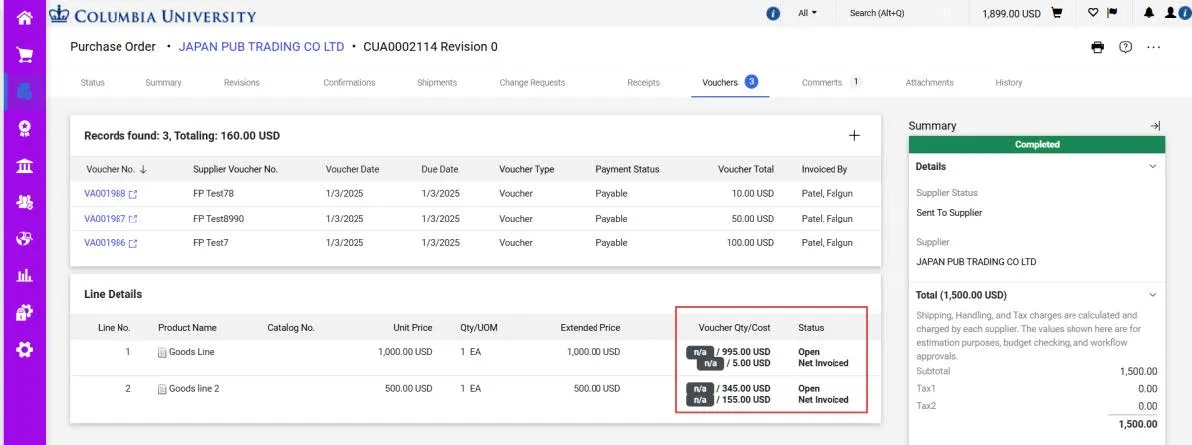
If a Purchase Order already has Vouchers against it, the Vouchers tab at the top of Purchase Order screen will display the number of Vouchers and links to the Voucher documents will be listed in the Summary pane. You can create a new Voucher from the Vouchers tab
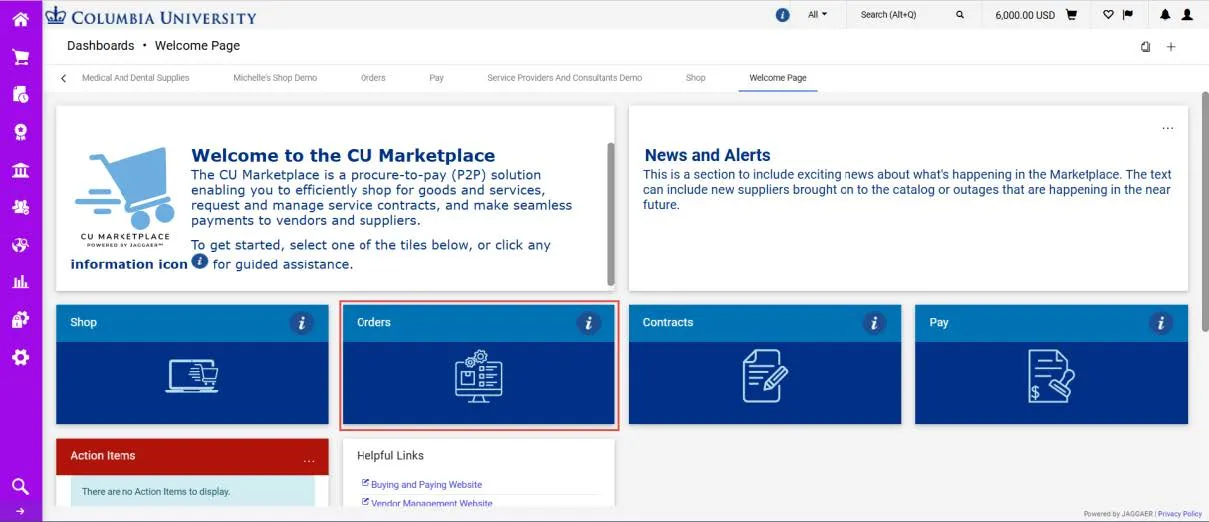
- Select the Orders tile and view the My Purchase Orders section to see your list of Purchase Orders
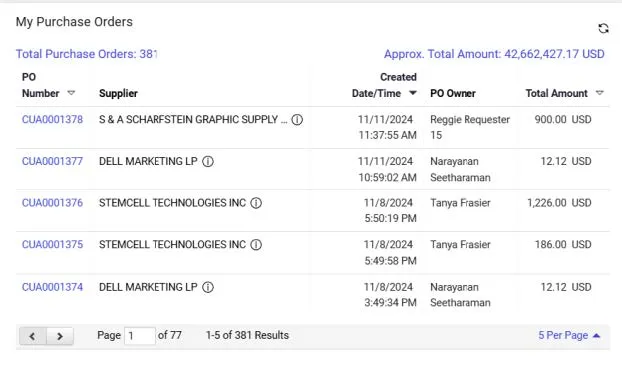
- Click the PO Number for the desired Purchase Order. The Purchase Order page appears.
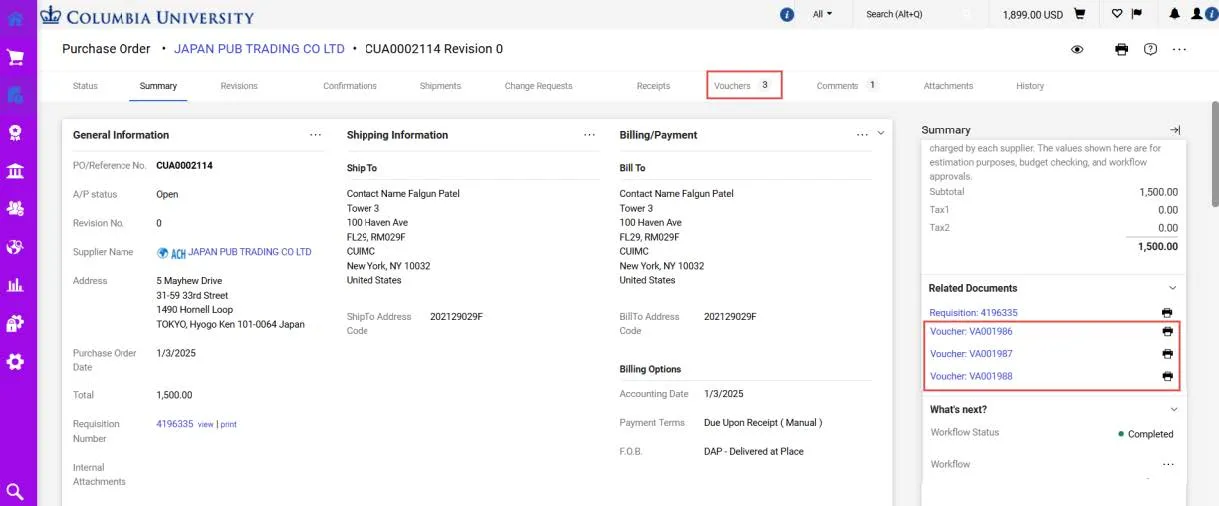
- Click the Vouchers tab to view Voucher information and Line Details showing the Voucher Qty/Cost applied to the Purchase Order Line(s).
Creating a Voucher from the Purchase Order
In the Voucher tab of the Purchase Order, click the Add icon. The Voucher form appears.

The Voucher Entry screen will pull line item data from the PO (accounting information, requester details, etc.). The Summary pane will indicate the fields you must complete.
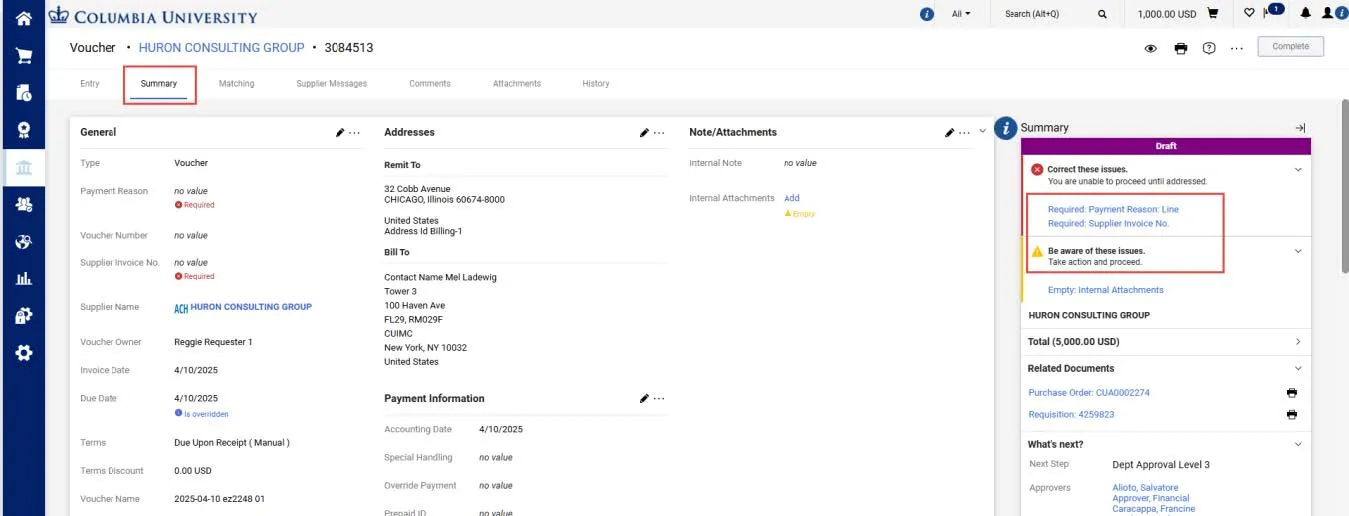
- Click the Summary tab to begin completing the Voucher. Do not complete any information from the Entry tab.
- In the Summary pane, click either the Required Payment Reason Line or Required Supplier Invoice No. link.
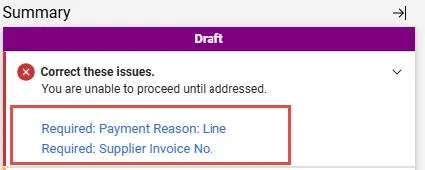
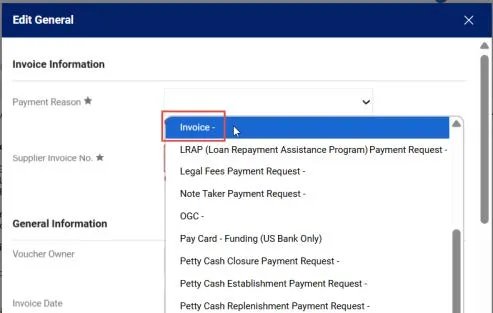
You will be able to complete the required information for both fields. The Edit General window appears.
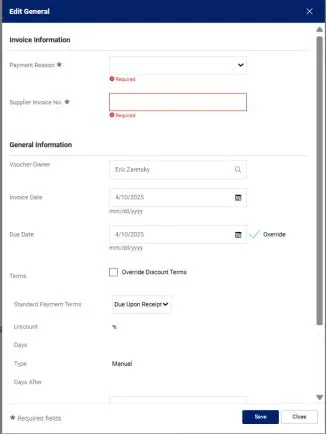
- Select Invoice from the Payment Reason dropdown.
- Type the Supplier Invoice No. as indicated on the invoice you received from the Supplier.
If an invoice number is not provided, enter the document date (or today’s date) + Total Gross Amount (MMDDYYAMOUNT) – do not include $ sign. - Enter the Invoice Date as the date indicated on the invoice.
- Click the Save button.
Overriding the Payment Method
The default payment method is indicated by the icon next to the Supplier Name. The Supplier must be set up for the payment method for the method you are selecting in their Supplier profile.
1. Click the Edit Payment Information Section icon.
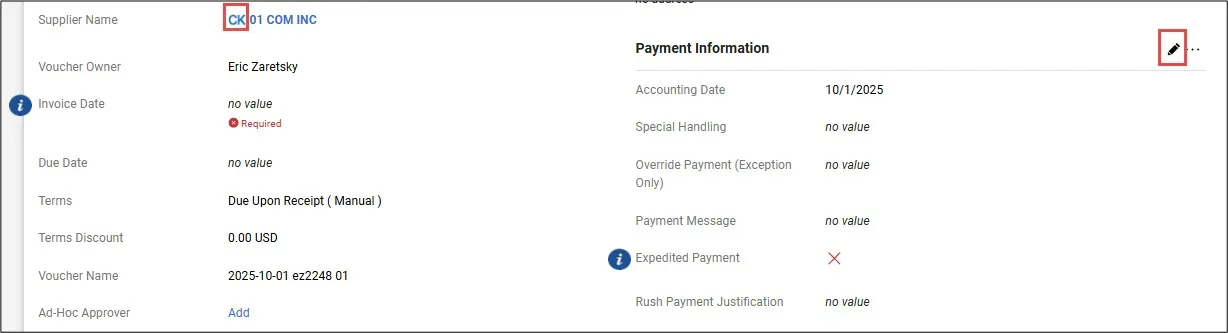
The Edit Payment Information window appears.
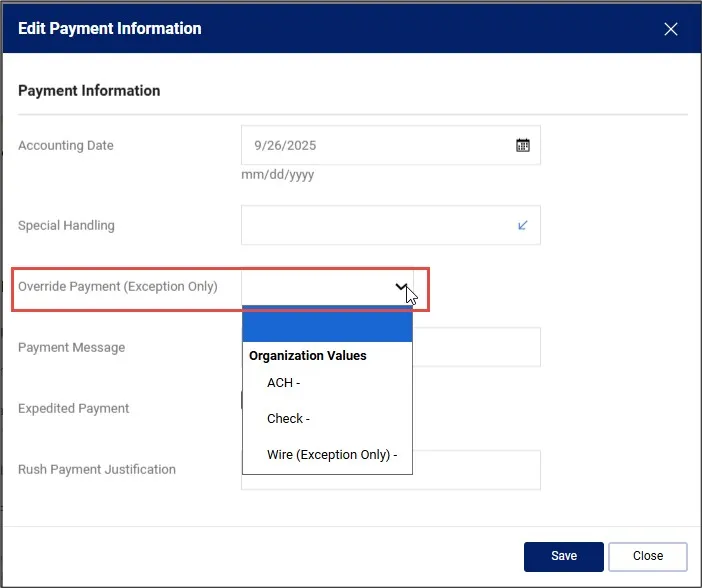
2. Click the Override Payment (Exception Only) dropdown and select the desire alternate payment method.
3. Click the Save button.
Updating Check Payment Information
If a Supplier is to be paid by check, you can provide handling instructions and/or enter a 70 character message that will appear on the check.
1. Click the Edit Payment Information Section icon.
The Edit Payment Information window appears.
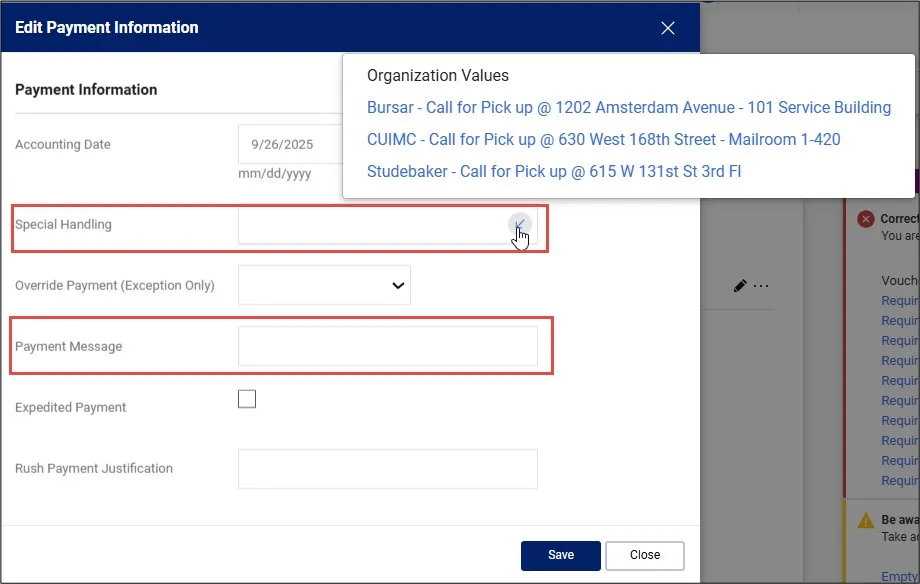
2. If the check is going to be picked up rather than mailed to the supplier, click the Special Handling dropdown menu and select the desired option.
If you would like to have a message printed on the check, type up to 70 characters in the Payment Message field.
Completing Wire Payment Information
If the Supplier is to be paid by Wire, either as their default payment or when selected to override their default payment method, you must complete the Wire Payment Information fields. Please note that the Supplier’s profile must be setup to receive Wire payments.
1. Click the Edit Wire Payment Information Section icon.
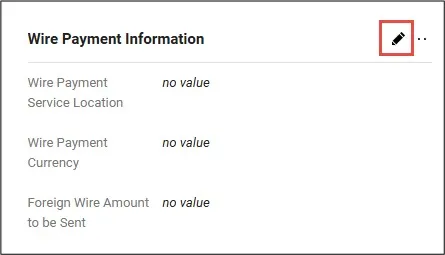
The Edit Wire Information window appears.
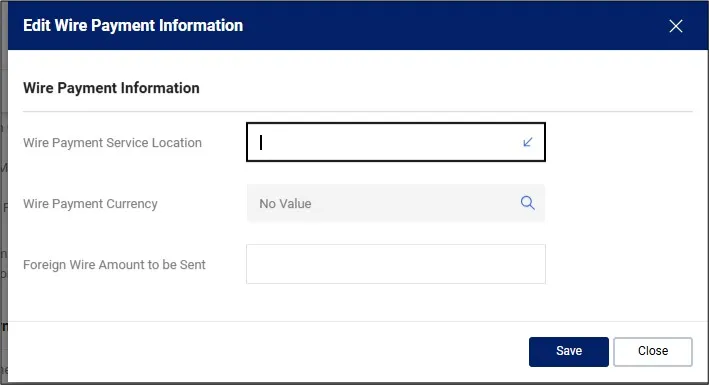
2. Click the Wire Payment Service Location dropdown and select the appropriate location of where the Service was provided. If it the purchase is for a good the payment is a reimbursement, select Not Applicable.
3. Click the Wire Payment Currency dropdown to select the currency that the Supplier will be paid in.
4. Enter the Foreign Wire Amount to be Sent for the amount in the currency you selected. You must print and attach the Oanda currency conversion to the Voucher as proof of the amount you are paying. If you selected USD as the Currency, leave this field blank.
If you will receive multiple invoices for the Purchase Order, or if the invoice does not equal the total amount of the Purchase Order, you can edit the Lines to indicate the correct amount and/or quantity of the Purchase Order that is being paid.
Note: Be aware of the Change Request Policy to ensure that any price increase is within the allowable variance tolerance threshold. Above the threshold, a Change Request is required to increase the value of the original Purchase Order.
If the Purchase Order has multiple Lines but the invoice is for a specific Line, you can remove any Line from the Voucher that is not yet invoiced.
Editing Price and/or Quantity to Match the Invoice
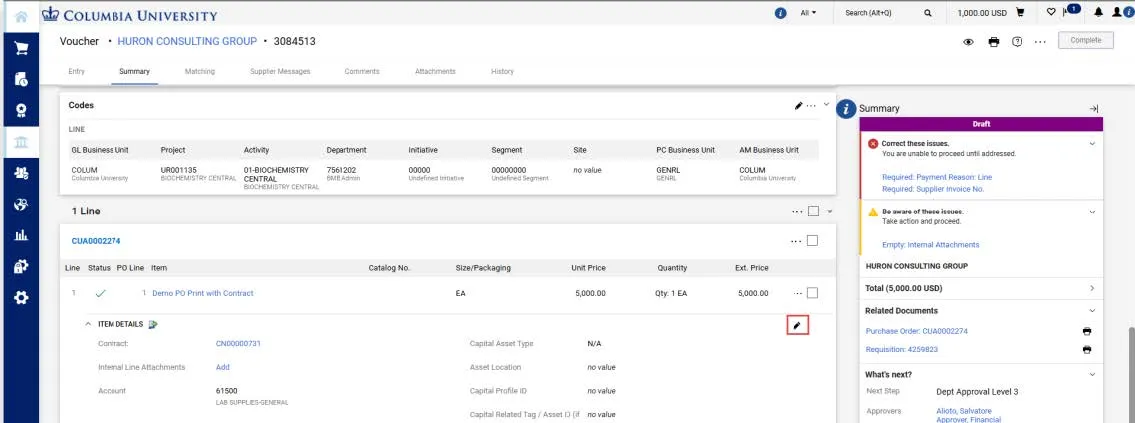
- On the Summary tab, scroll to the Line that is to be edited and click the Edit Line Item Details icon. The Edit Line Item Details window appears.
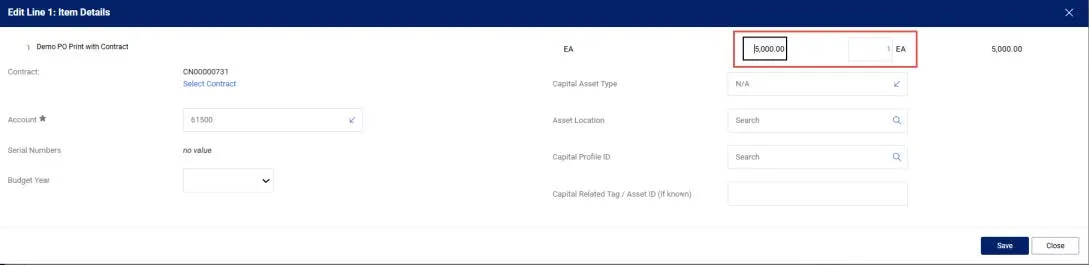
- Adjust the Unit Price or Quantity to align with the invoice.
- Click the Save button.
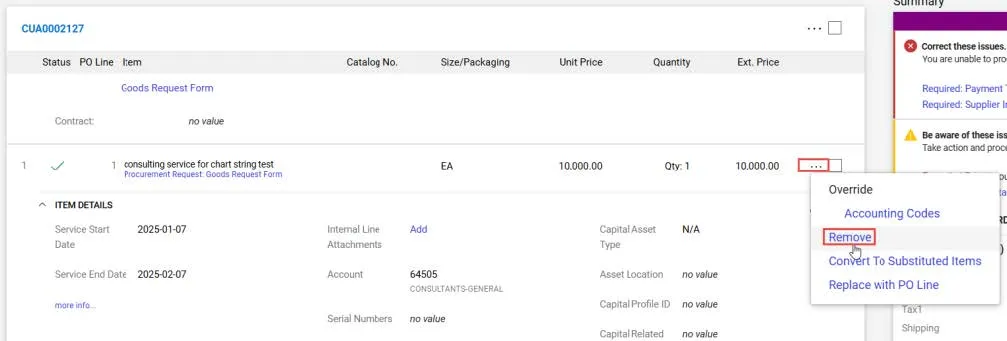
Removing a Line
- Scroll to the Line that is to be remove and click the Line Item Actions icon.
-
Select Remove.
Handling an Accounting Code Change for a Partially Vouchered Line
When processing a new Voucher for the remaining amount of a Purchase Order line that has undergone a Financial Change Request, the previously vouchered line will be matched and new lines will have been created for the new Accounting Code.
- Open the Purchase Order and click the Vouchers tab as instructed in the Creating a Voucher Directly from a Purchase Order section of this guide to view Voucher information and Line Details showing the Voucher Qty/Cost applied to the Purchase Order Line(s).
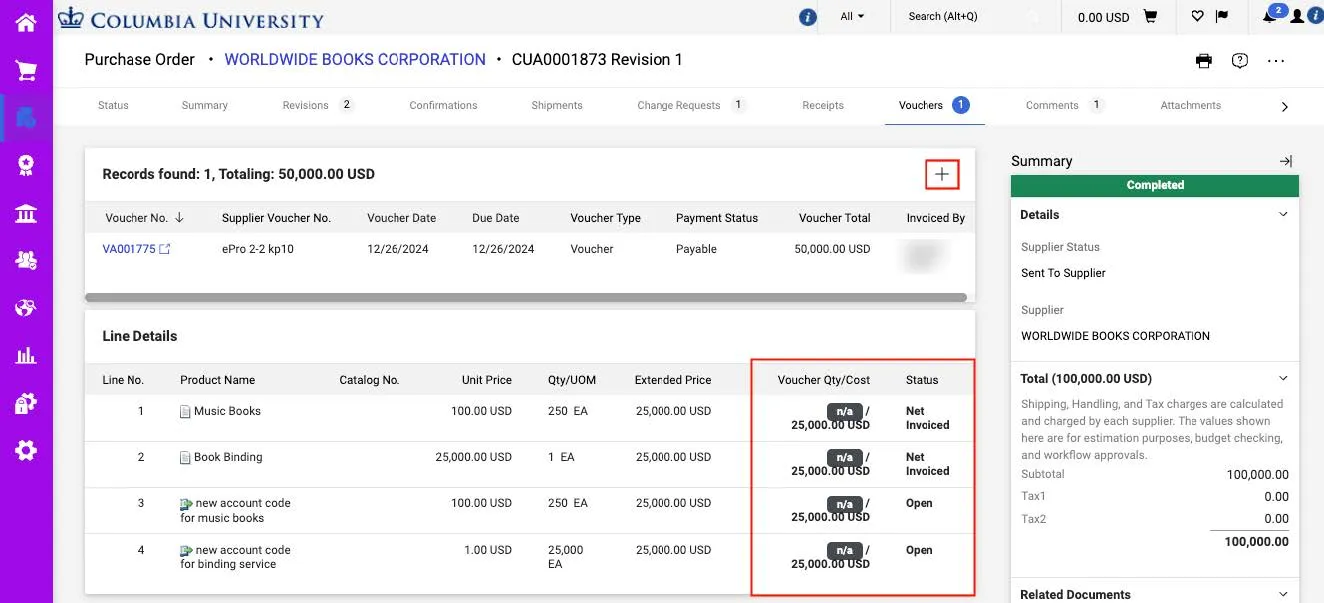
- Click the Add icon. The Voucher form appears.
- Click the Summary tab. Do not complete any information from the Entry tab.
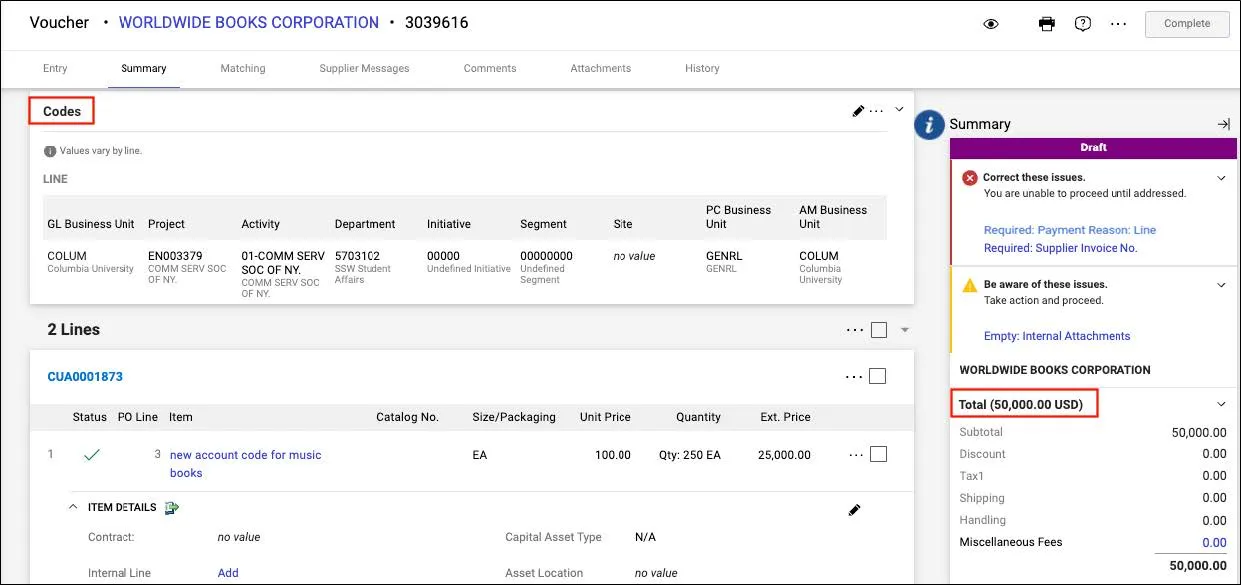
The remaining available amount to be vouchered is displayed in the Summary panel on the right.
- Scroll down to see the original Accounting Code in the Codes section.
- Scroll down further to see the new PO Lines available to voucher against and the new Accounting Codes associated with the line as a result of the Financial Change Request.
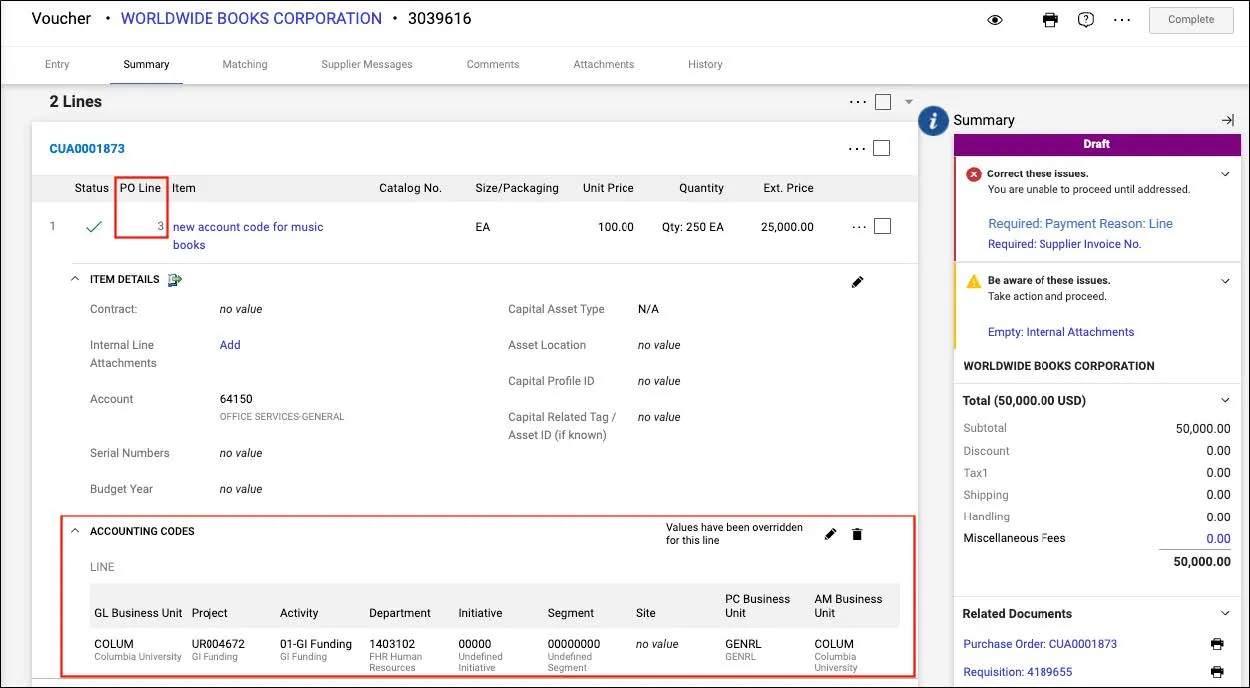
- If you need to update the amount or quantity to match the invoice received, click the Edit Line Item Details icon.The Override Line: Accounting Codes window appears.
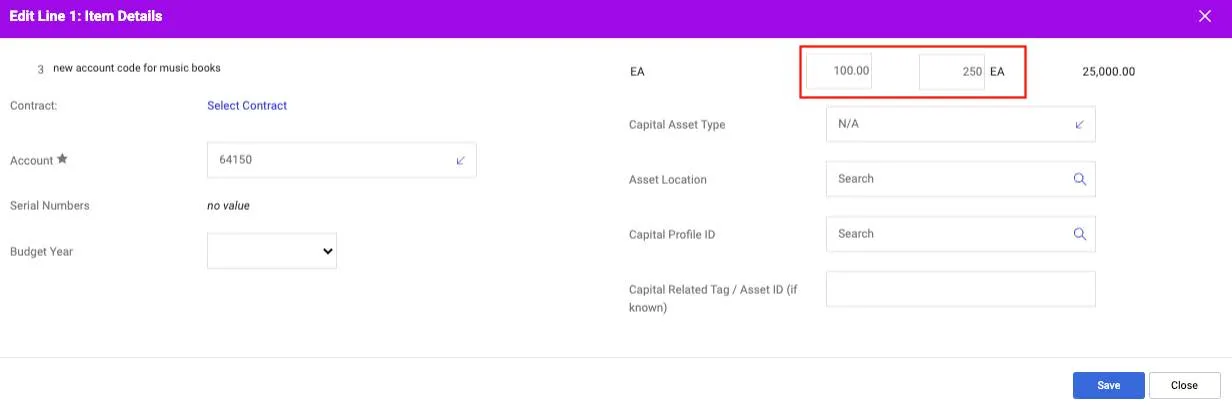
- Edit the Amount or Quantity to match the invoice received and click the Save button. Repeat for additional lines as needed.
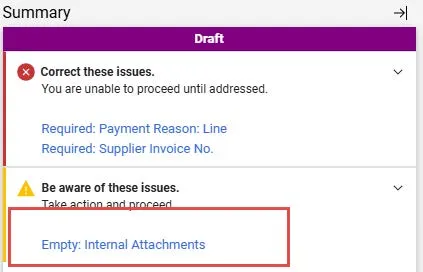
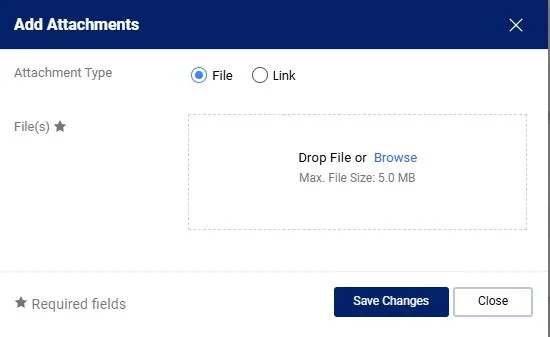
- From the Summary Pane, click the Empty Attachments link. The Add Attachments window appears.
- Drag or drop your invoice file into the Drop File(s) section or click the Browse link to search and select your file. You can add additional documentation to this window, if needed.
- Click the Save Changes button. You can navigate to the Attachments tab to view your attachments or upload additional documents.
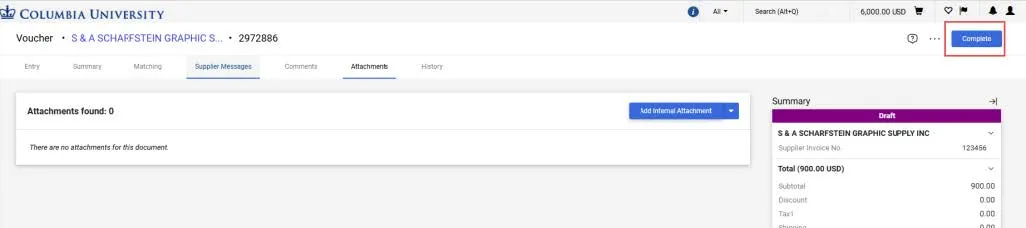
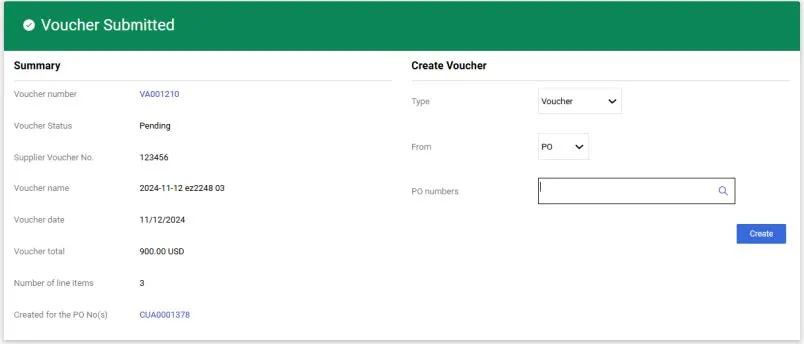
- Click the Complete button to submit the Voucher. The Voucher Submitted confirmation screen appears.
- You can click the Voucher number to view the Voucher details. Additionally, you can create a new Voucher from this screen.