PaymentWorks Quick Guide for Schools and Departments
University staff use PaymentWorks to invite vendors (both entities and individuals) who are new to the university or have not yet completed the PaymentWorks onboarding process. This guide covers how to invite vendors and track the onboarding process in PaymentWorks.
Last revision: February 2026
PaymentWorks is a Vendor onboarding and management system. University staff will use the system to invite vendors (both entities and individuals) who are new to the university or have not yet completed the PaymentWorks onboarding process. All University employees and enrolled students automatically have an ARC vendor profile set up for them, eliminating the need for Schools and departments to request vendor setup for expense reimbursement.
Details
Prior to inviting a vendor for onboarding via PaymentWorks, use the ARC vendor ID Lookup to see if the vendor is already setup. If the vendor already exists then there is no need to invite the vendor to connect with Columbia via PaymentWorks. If the vendor does not exist in ARC or an update is required for an existing vendor not connected with Columbia via PaymentWorks, you need to invite the vendor.
- Log into PaymentWorks using Single Sign On (SSO). If you encounter an error logging in, refer to the Resolving Your PaymentWorks SSO Authentication Error job aid for instruction on resolving the issue.
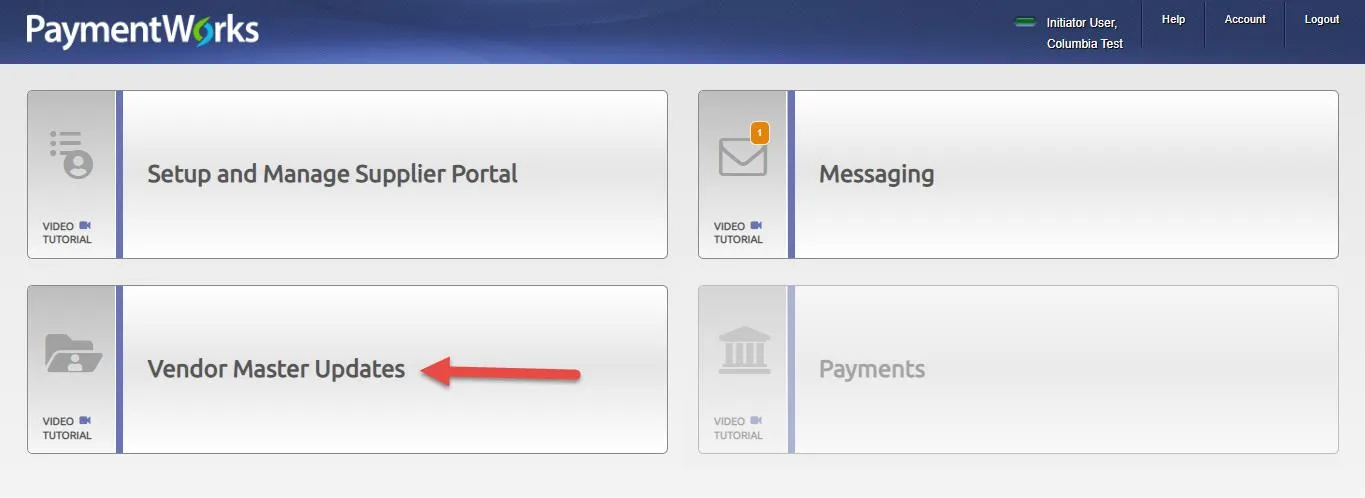
- Select the Vendor Master Updates tile.
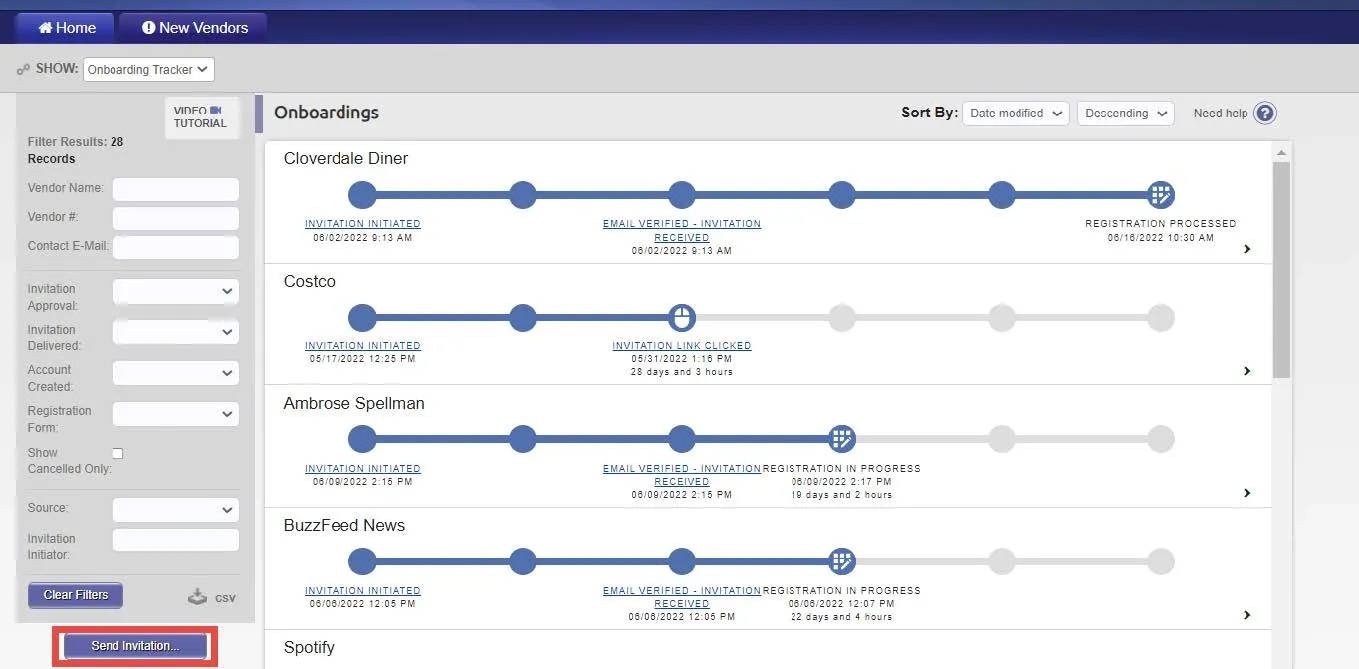
- Click the Send Invitation button. If you attempt to send an invitation to a vendor that has already been invited to connect, you may receive an error message, as a contact email address can only be used once. The Invite New Vendor window appears.
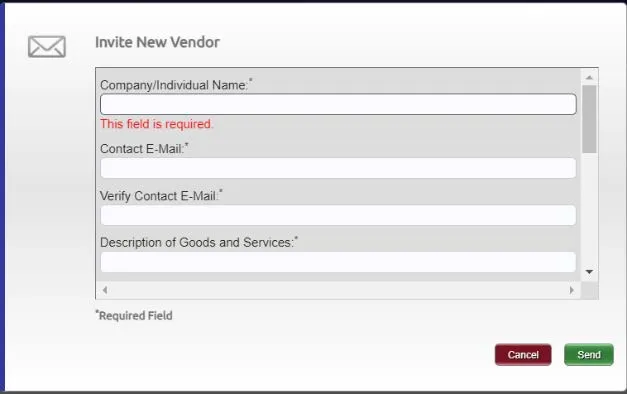
- Complete the required fields in the Invite New Vendor form.
- The Description of Goods and Services field should capture the business purpose, what the vendor does, and what you are paying them for, and will be used by the Vendor Management team as part of their evaluation and approval process. If a robust description is not provided, the onboarding of the vendor may be delayed.
- Leave the Personalized Message field blank.
- If you are unsure what to select in the Reason for inviting this supplier dropdown, select Service.
Note: If you are inviting a department that is part of a larger previously connected vendor, there will only be connected vendor per Tax ID. However, the vendor can have multiple addresses and payment locations under a single Tax ID.
- Click Send. The vendor will be sent the invitation.
- f your contact at the vendor is not the individual within their organization who will be completing and submitting the request, your contact can forward the invitation email to the appropriate colleague within their organization prior to beginning account registration.
- The vendor will also receive regular, periodic emails reminding them to complete their registration and, if needed, might receive phone calls from PaymentWorks.
- You will receive an email from PaymentWorks when the onboarding process is complete (Check your spam or junk mail folders if you don’t see PaymentWorks emails).
You can track the progress of the onboarding status for the vendors that you have invited. You will not be able to view the onboarding status of vendors that have been invited by others. In addition, you will not have visibility to the status of update requests submitted by connected vendors.
If you require assistance with visibility to the status of vendor onboardings or vendor update requests, please log an incident using the self-service web form or contact the Finance Service Center.
Viewing Onboarding Status
- Log into PaymentWorks using Single Sign On (SSO).
- Select the Vendor Master Updates tile. The Onboardings screen displays the status of the vendors you have invited.

Note: PaymentWorks also sends you email notifications when your vendors reach key onboarding events. If you do not wish to receive notifications for one or more onboarding events, you can manage them in the Manage Notifications page of your account. Refer to the PaymentWorks Initiator Email Notifications article for more information. If you will be out of the office, you can create a rule in your email application to forward your PaymentWorks email alerts to a colleague.
Exporting Your Onboardings List
While other PaymentWorks users cannot view your invited vendors in PaymentWorks, you can export a list of vendors you have invited along with their onboard status and other information to an Excel file. You can then share the Excel file with colleagues to apprise them of your vendor onboardings if you are out of the office. In addition, you can create a rule in your email application to forward your PaymentWorks email alerts to your colleague(s).
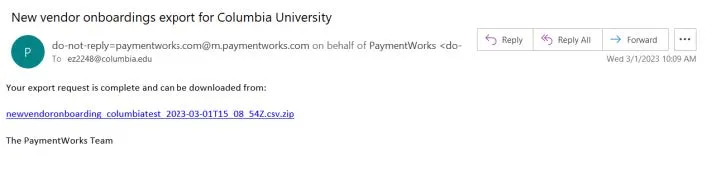
- Click the CSV download icon from the left panel and click OK in the confirmation dialog box. You can use the filters in the panel to limit the data exported. A link to the file will be sent to your email. The size of the vendor list might affect the time that the email is sent.
-
Click the link in the email to download the file.

Note: If a colleague with active PaymentWorks invitations has left the University, you can click the Help link from the upper right corner in PaymentWorks and then click Contact Support to submit a request to gain access to the former colleague’s onboarding list.
Vendor Reminder Emails
Reminder emails are automatically sent to vendors when:
- Invitations are pending a response at 1, 3, 7, 14, 21, 28, and 35 days after your invitation is received by the vendor.
- The New Vendor Registration (NVR) is started but not yet submitted at 1, 3, 7, 14, 21, 28, 35 days after the is NVR started by the vendor.
- The vendor account is registered but not activated at 3, 7, and 14 days after the vendor registers the account.
Onboarding Status Milestones
The Invitation Status changes as it is processed, according to the table below:
Once the registration or update has been fully approved, a vendor profile will be created in ARC via system integration. Vendor profiles will be created and updated via the daily ARC intra-day batch processing scheduled at 8:00 am, 10:00 am, 12:00 pm, 3:00 pm and 5:00 pm.
If your vendor is not responding to your invitation or you inadvertantly sent the invitation to the wrong email address, you can resend the invitation from the Onboardings screen. You also have the option to cancel the invitation to the vendor. You can only resend or cancel an invitation if the vendor has not begun the registration process. If you cancel the invitation, the onboarding process will be terminated, but you can initiate a new invitation, if needed.
- Log into PaymentWorks using Single Sign On (SSO).
- Select the Vendor Master Updates tile. The Onboardings screen displays the status of the vendors you have invited.
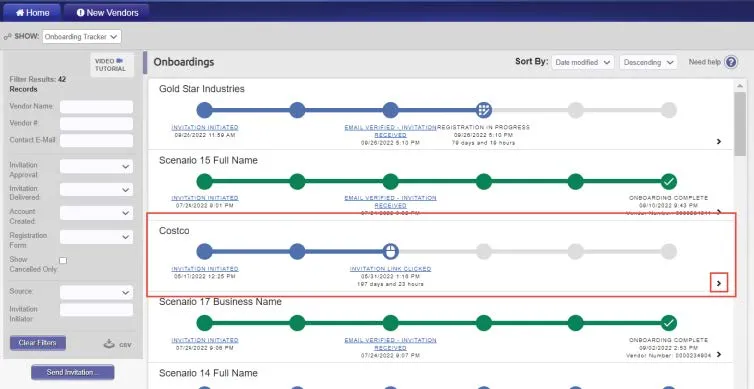
In the example highlighted above, the invitation has been clicked by the vendor but they have not yet submitted their registration. If necessary, you can resend the invitation or cancel the invitation.
- Click to Expand the Onboarding status for the vendor.
- Click the Invitation Detail tab.
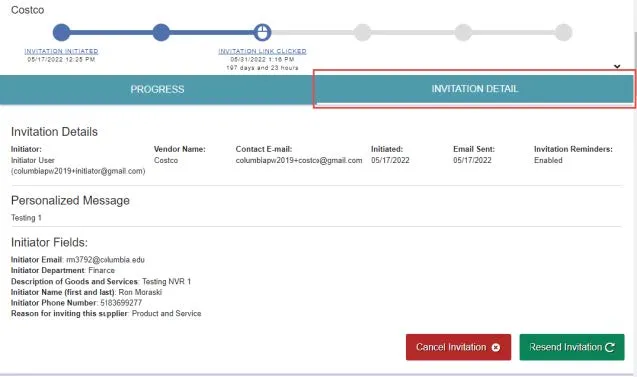
- Click the Resend Invitation to resend the invitation. The Resend New Vendor Invitation window appears. Note: If you click Cancel Invitation, a confirmation window appears. If you cancel, the onboarding process is terminated. You can cancel an invitation anytime in the onboarding process up until their New Vendor Request has been submitted by the vendor.
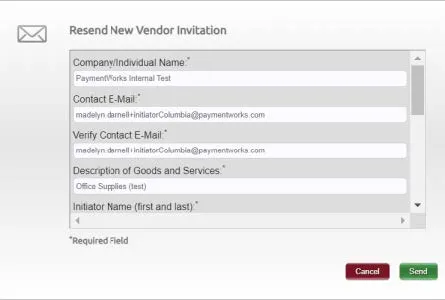
- You can edit the invitation fields, including the Contact E-Mail. Click Send to resend the invitation.