Using Per Diems on a Travel Expense Report in Concur
This job aid demonstrates how to set up a Travel Expense Report in Concur with an itinerary to receive meal per diems, which automatically specifies meal allowances for each day of your trip based on the Federal Government’s published per diem rates (GSA) for each trip location. In the case where a different per diem rate is appropriate, you can use the Per Diem (Manual Calculation) expense type to calculate and explain your meal reimbursement.
To see a video version of this video, refer to the Using Per Diems on Travel Expense Report in Concur video.
View and download the Using Per Diems on a Travel Expense Report in Concur job aid.
Last Revision: February 2022
Details
After initially creating your Travel Expense Report, you will be on the Manage Expenses screen of your Report.
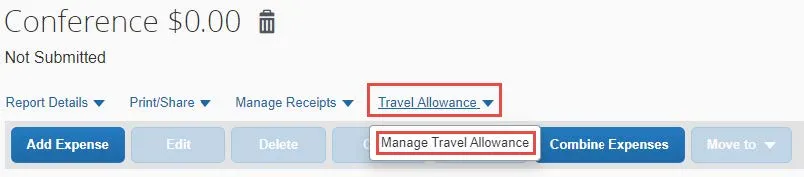
- Click Travel Allowance and select Manage Travel Allowance. The Travel Allowances screen appears. If you previously created Itineraries, they would be listed in the Available Itineraries section, which you can reuse and assign to this report, if needed.
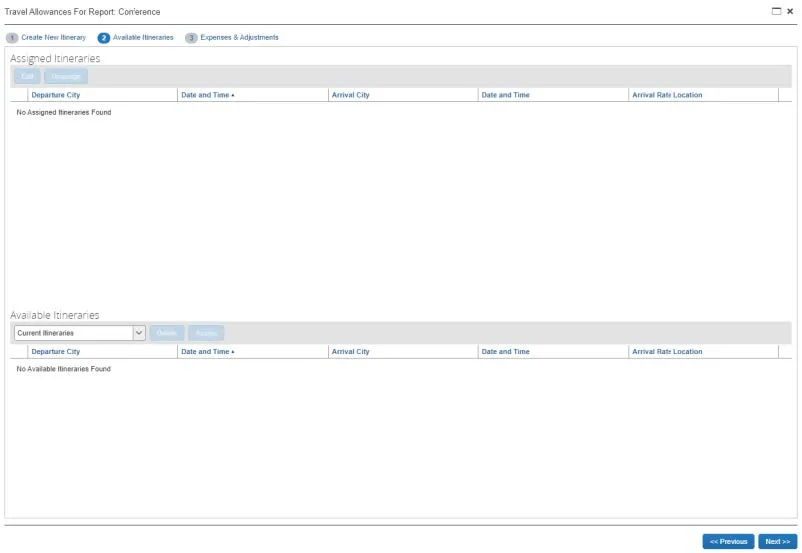
- Click Create New Itinerary to create a new itinerary for this Report. The screen to enter a New Itinerary Stop appears.
Note: If you used Concur Travel to book your itinerary, you can click Import Itinerary and edit departure times for each stop.
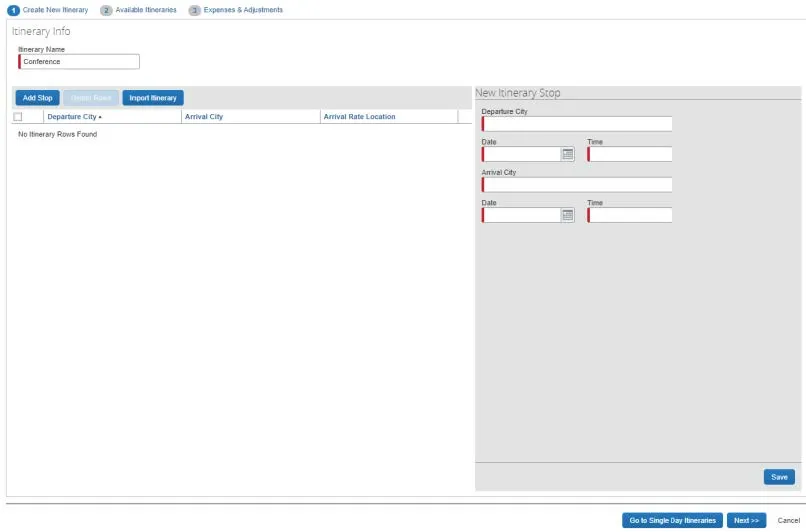
Completing the First Itinerary Stop (leg) of Your Trip
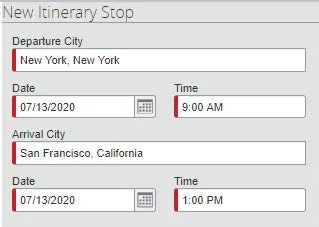
- Enter the Departure City. You can type and select a matching city or select from previously entered cities.
- Enter the departure Date and Time. This should be when you leave your home or office.
- Enter the Arrival City.
- The arrival Date defaults to the same day. You can change it, if necessary.
- Enter the Time of arrival to the destination city. This should be the time you arrived at your hotel.
- Click Save.
Completing the Second Itinerary Stop (leg) of Your Trip
In this example, the Second Itinerary Stop is the return home. The Departure City defaults to the arrival city of the previous stop and Arrival City defaults to the original departure city. It is possible to edit and then enter additional legs for multiple trip locations.
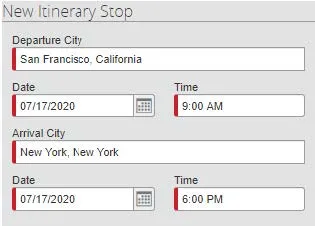
- Enter the departure Date and the departure Time.
- Enter the Date and Time when you arrived at your home or office.
- Click Save
- Click Next after completing all the legs of your trip. The Itinerary is assigned to your Report.

- Select your Itinerary and click Expenses & Adjustments.
Each day of the itinerary is listed with the Allowance amount.
Notice that the Allowance for the first and last days of travel are 75% of the full daily Allowance, which is aligned with General Services Administration (GSA) rate calculation guidance.

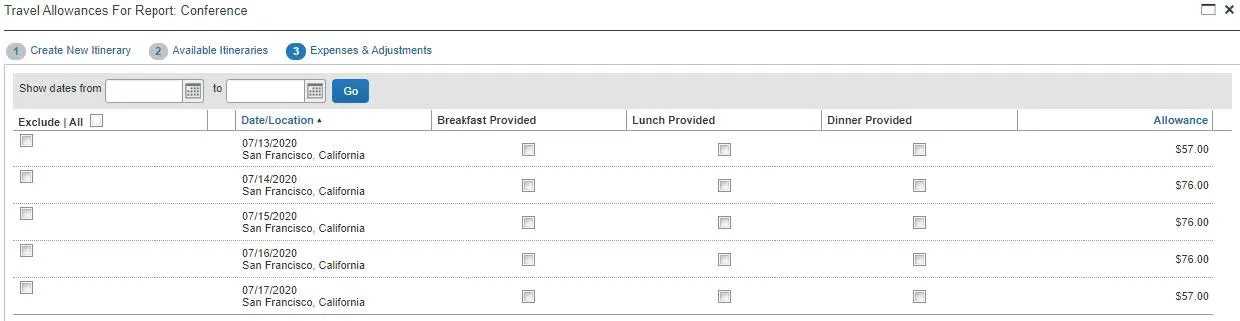
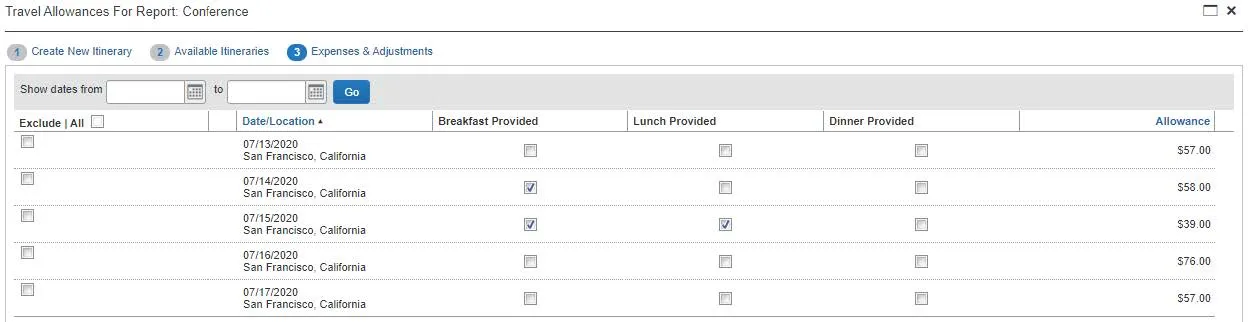
- In this example, some meals were provided by the conference. Select the check boxes to exclude those meals in order to adjust the allowance.
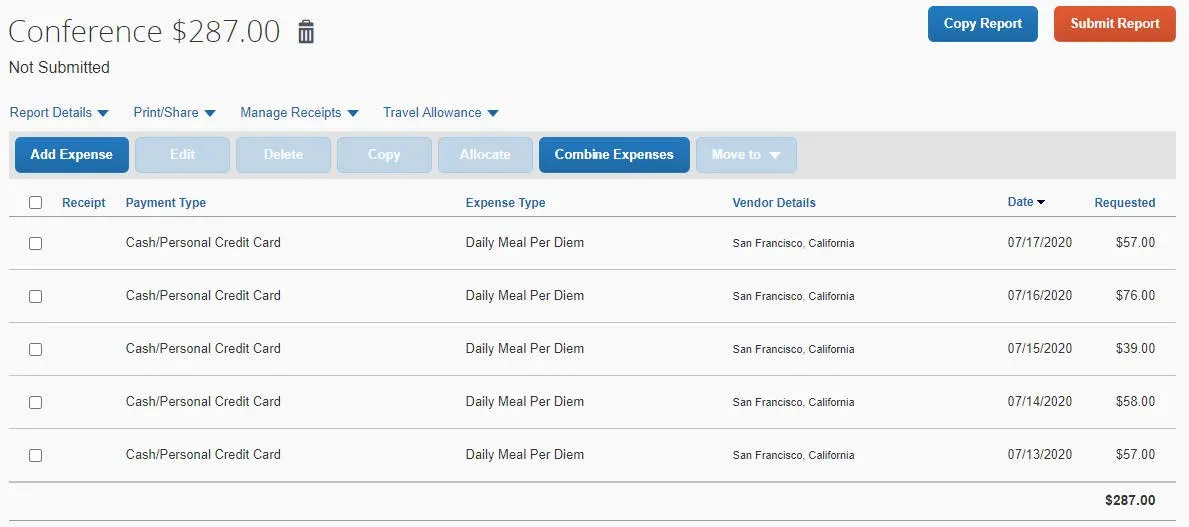
- Click Create Expenses. Each travel day’s allowance is now an expense item to be reimbursed.
Continue to Add Expenses to the Report, such as Airfare, Hotel/Lodging or Ground Transportation. After adding all your Expenses to the Report, click Submit Report.
There are two circumstances when you would need to reduce your per diem: 1) if your Department requires a lower per diem rate than the General Services Administration (GSA) rates used by Concur, or 2) if you had to use the Travel and Expense Corporate Card to pay for a meal.
Using Per Diem Reduction to Decrease the Per Diem Rate
Your Department may require a lower per diem rate than indicated by the Concur GSA allowance. If so, you can use the Per Diem Reduction expense type, either one per day of your trip or once to reduce the total Per Diem reimbursement.
In the example below, Concur indicates the per diem rates for your three-day San Francisco business trip.
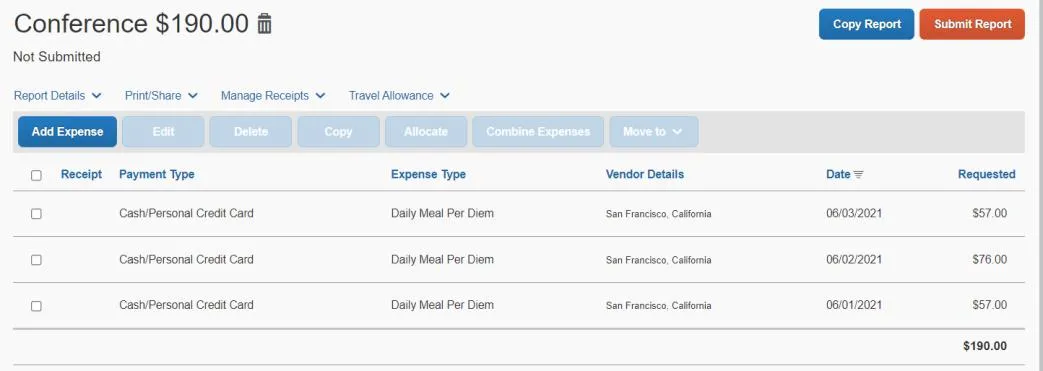
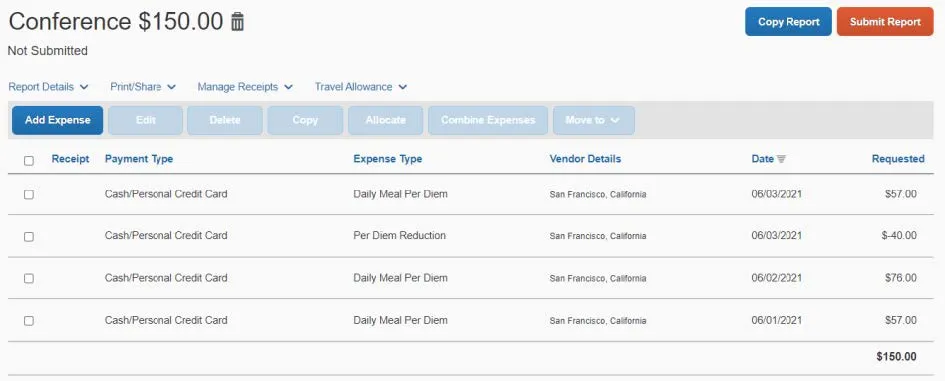
However, your Department only allows a maximum of $50 per day. You can enter three Per Diem Reduction expense items of -$7, -26, and -7 or a single Per Diem Reduction for -$40. The steps below detail a single Per Diem Reduction.
- Click the Add Expense button. The Add Expense window appears.
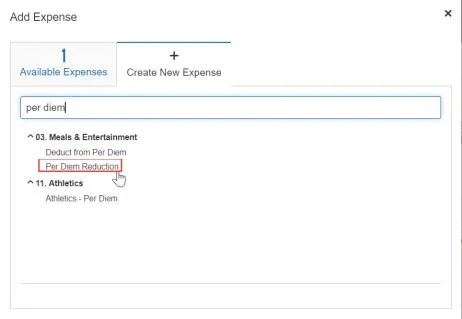
- From the Create New Expense tab, select Per Diem Reduction. The Expense page appears.
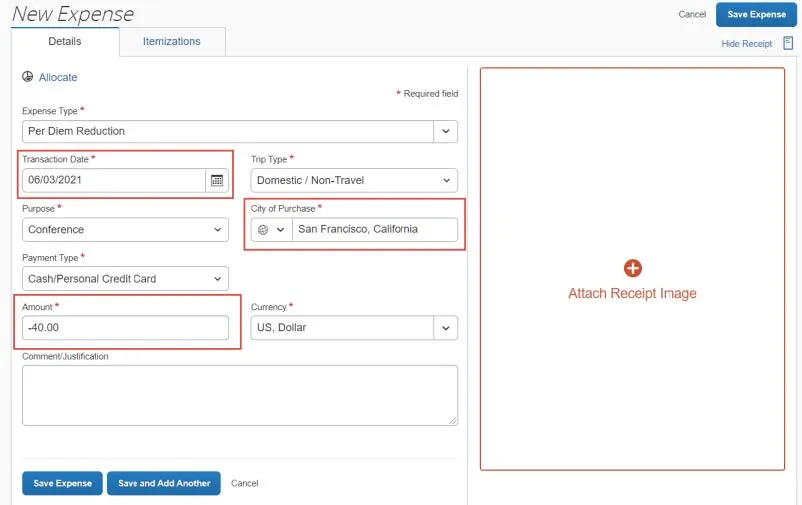
- Enter a Transaction Date. Because we are entering a single reduction amount, select the last day of the trip. If you are entering a reduction for each day of the trip, select the date for the reduction.
- Select the City of Purchase. Because we are entering a single reduction amount, enter the destination city of the trip. If you are entering a reduction for each day of the trip, indicate the city for that day.
- Enter the Amount of the reduction as a negative number.
- Click the Save Expense button. The Expense Report is ready to add additional expenses or to Submit into approval workflow.
Using Deduct from Per Diem for a Corporate Card Purchase
If you are using per diem for travel reimbursement, you should use a personal credit card or cash, not the Travel and Expense Corporate Card, to pay for your meals when traveling. This is because when using the Corporate Card, you do not incur an out of pocket expense and you should not be reimbursed for the meal.
However, if there is a circumstance when the Corporate Card is the only available option for you to pay for a meal, you can use the Deduct from Per Diem expense type in your Expense Report. When using a Corporate Card to pay for a Per Diem meal, you must reimburse the University the Deduct from Per Diem amount.
In the example below, Concur indicates the per diem rates for your three-day San Francisco business trip.
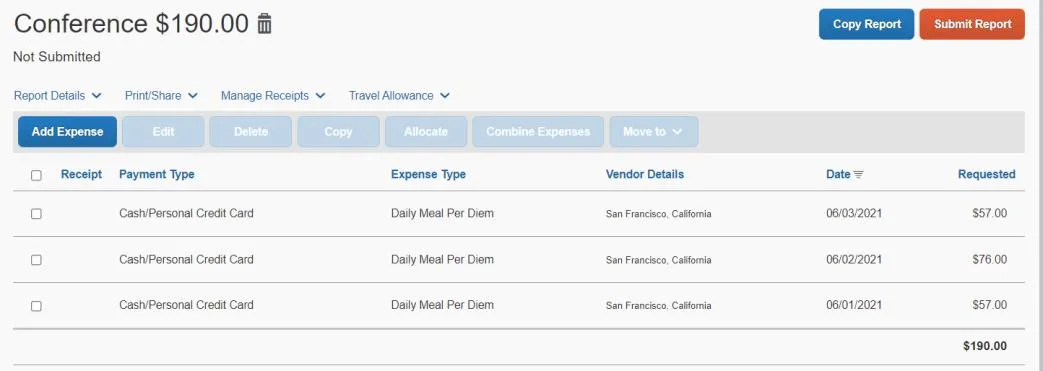
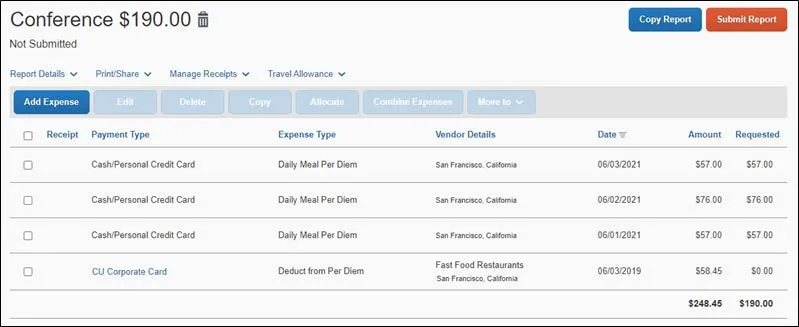
However, you used your Corporate Card to purchase dinner on the third day of your trip. You must reconcile this purchase to deduct from the per diem.
- Click the Add Expense button. The Add Expense window appears.
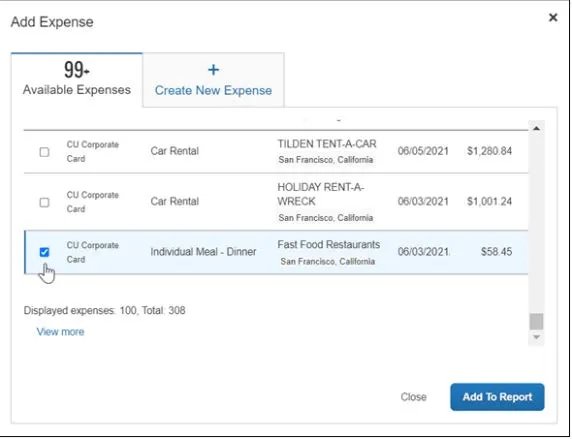
- From the Available Expenses tab, select the checkbox for the Corporate Card purchase you are deducting from per diem and click Add to Report. The Expense Item appears on your Report.
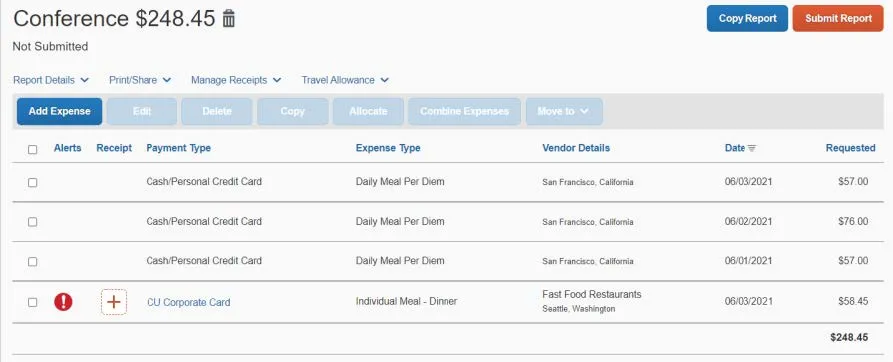
- Select the row of the Expense Item to edit it. The Expense Item appears.
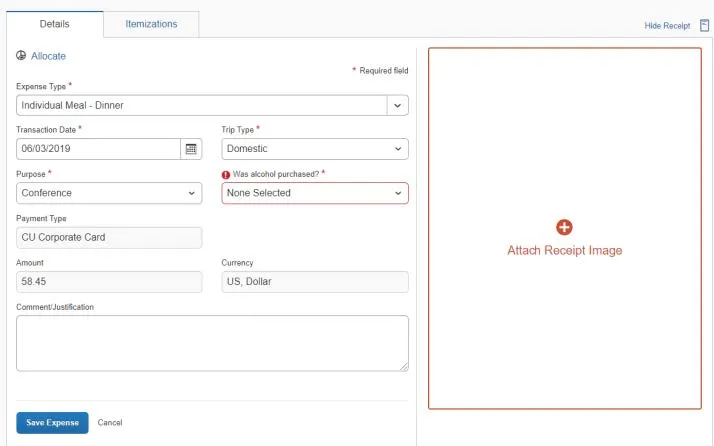
- Change the Expense Type to Deduct from Per Diem.
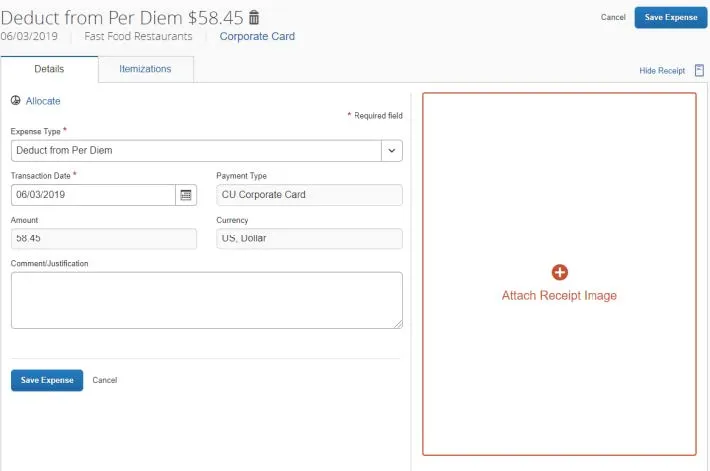
- Click Save Expense. The Expense Report is ready to add additional expenses or to Submit into approval workflow.
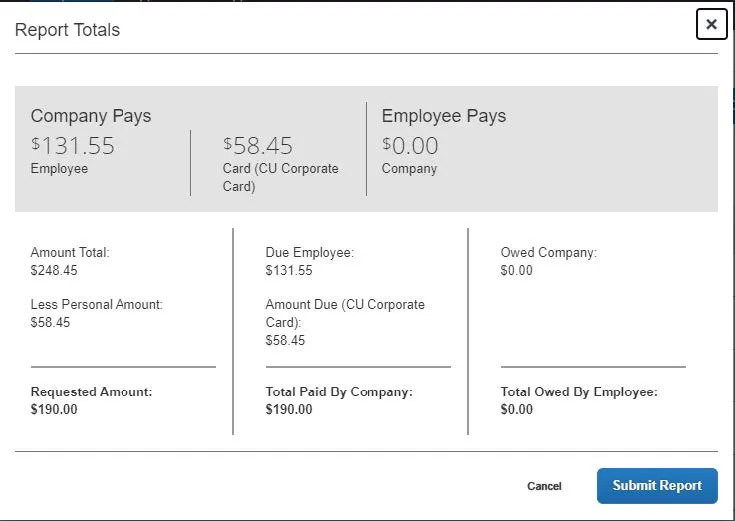
Important Note: The Report Totals screen will not show the amount you must reimburse the University for the Deduct from Per Diem expense type. You must reimburse the University for the amount of the Deduct from Per Diem expense with a check made payable to The Trustees of Columbia University within 20 days from the trip end date or 20 days from the transaction date for business expenses. Please click here for more information on how to return funds to the University.
If a different per diem rate other than the Federal Government’s published per diem rate is required for your travel locations, you can select the Per Diem (Manual Calculation) expense type on your Travel Expense or Non-Profiled Payee Expense Report for each trip location. If you are manually calculating the per diem for a trip location, do not add a Travel Allowance Itinerary to the Expense Report. You must attach documentation to the Expense Item to justify the per diem rate
- After creating your Travel or Non-Profiled Payee Expense Report, click the Add Expense button. The Add Expense window appears.
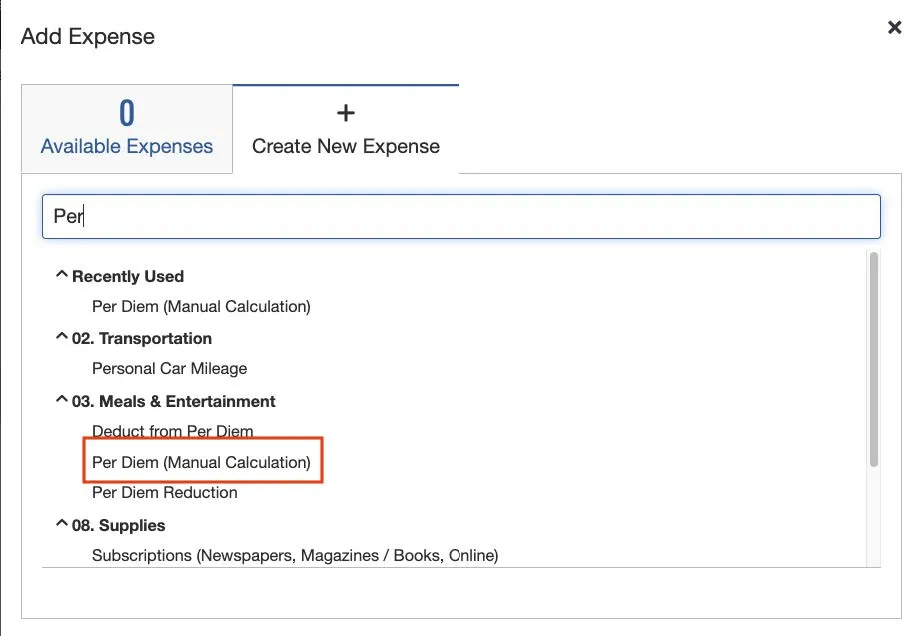
- Search and select Per Diem (Manual Calculation). The Expense Item screen appears.
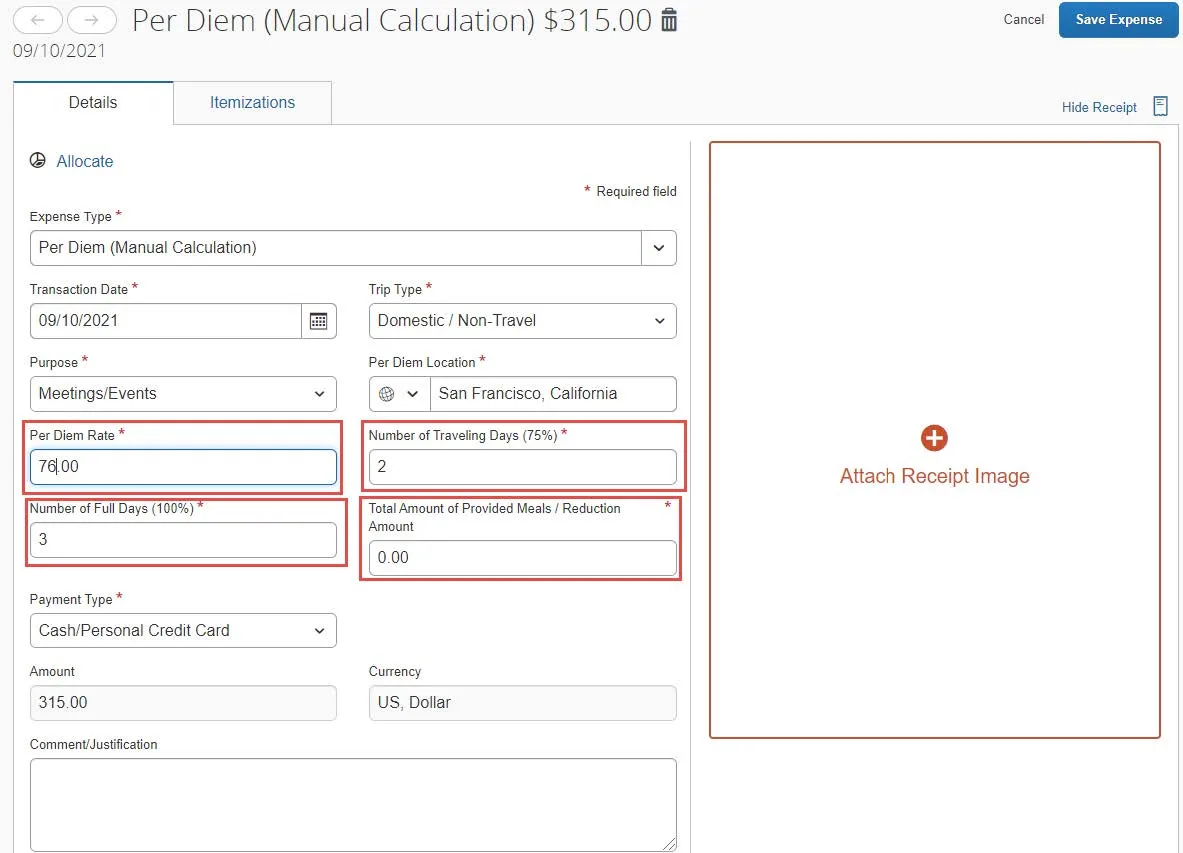
- Enter the Per Diem Rate.
- Enter the Number of Traveling Days. A travel day is defined as a day when you are traveling between locations, usually the first and last day of a trip.
- Enter the Number of Full Days. A full day is defined as a day when you are at your trip location for the full day (not traveling between locations).
- If meals were provided for you at meetings or a conference, enter the value in Total Amount of Provided Meals/Reduction Amount, which is deducted from the total per diem reimbursement. You can determine the value of a provided meal by looking up the GSA’s Meals & Incidentals (M&IE) Breakdown for your trip location.
- Click Attach Receipt Image to provide supporting documentation to justify the per diem rate.
- Click Save Expense.