Prepayment and Advance Reconciliation Vouchers in the CU Marketplace Training Guide
This job aid covers how to create a Prepayment Voucher to make an advance payment and then create an Advance Reconciliation Voucher to reconcile the prepayment.
Those with the Procurement Initiator role can create and submit Vouchers into approval workflow.
Last Revision: April 2025
Details
Both Prepayment and Advance Reconciliation payment types are Non-PO Vouchers. In order to complete and submit those payment types, you begin by Initiating a Non-PO Voucher.
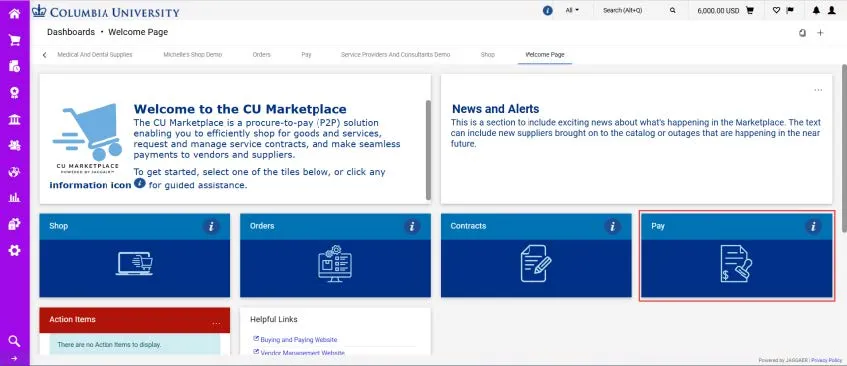
1. Navigate to the Procurement Paying website, click the CU Marketplace logo, and log in using your Single Sign On. The JAGGAER application launches.
Note: The CU Marketplace will automatically time out after thirty minutes of inactivity, consistent with other University Enterprise Systems.
2. Select the Pay tile. The Pay dashboard appears.
3. In the Create Vouchers and Receipts section, select Voucher from the Type dropdown and Non-PO from the From dropdown.
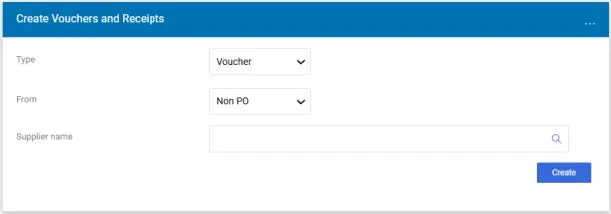
4. Enter the Supplier you are paying. Click the Search icon to find and select the Supplier.
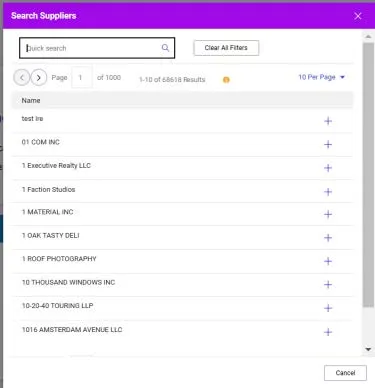
Type your criteria in the Quick Search field, press Enter, and click the Add icon for the matching Supplier.
5. Click the Create button. The Voucher form appears.
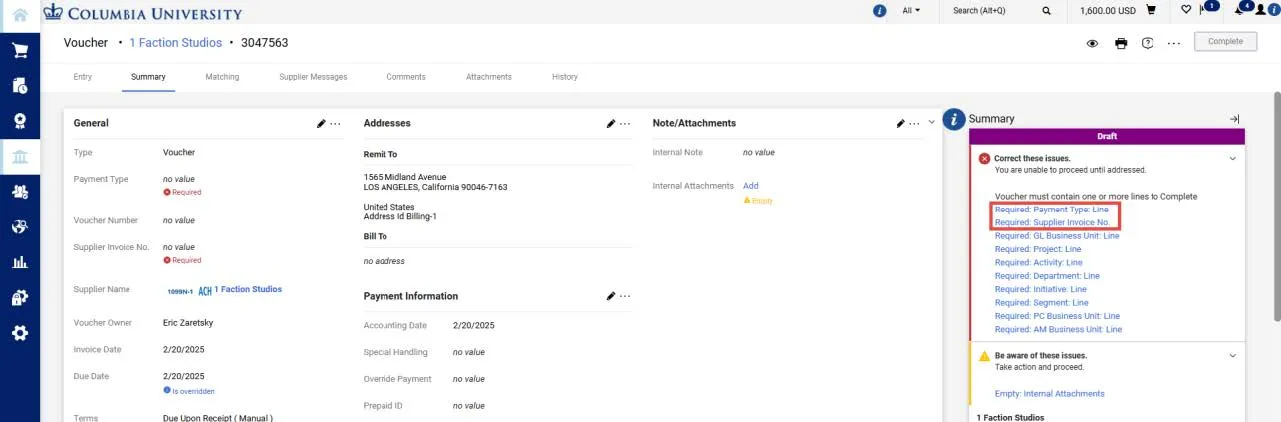
The Voucher Entry screen appears with the Summary pane indicating the required fields. If you setup a Default Accounting Code (ChartString) in your Profile (refer to the Modifying Profile Settings in the CU Marketplace job aid), that ChartString information will be automatically populated and won’t appear as missing information in the Summary section.
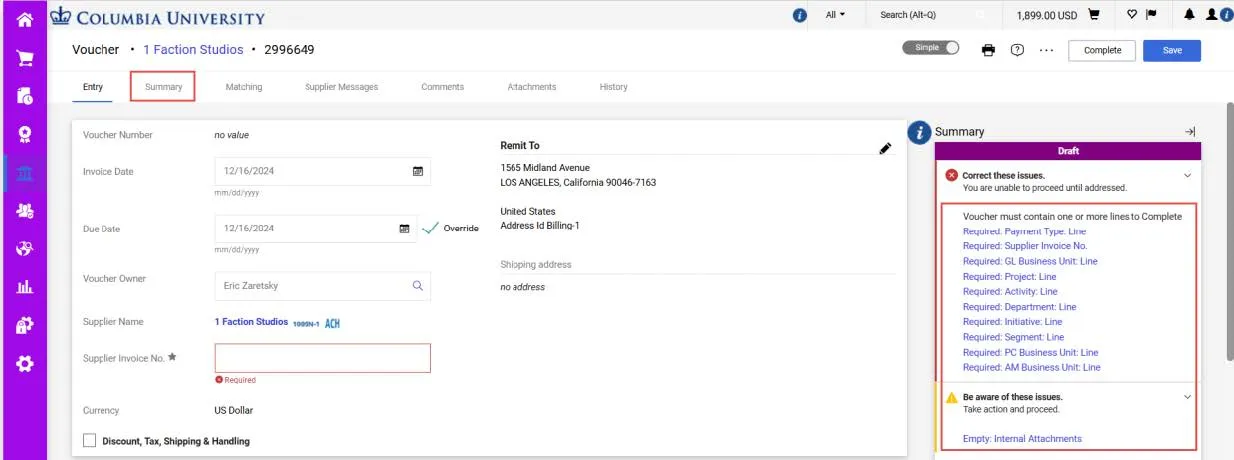
1. Navigate to the Summary tab to begin completing the required information.
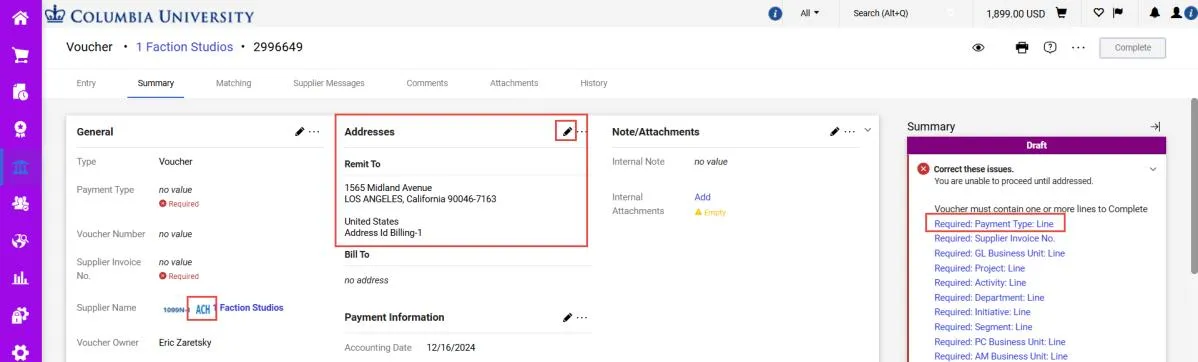
- An icon next to the Supplier Name indicates the default payment method for the Supplier. If the Supplier must be paid using a different method, the Supplier should update the default payment method in their PaymentWorks account. If the Supplier is to be paid by Wire , you will need to attach the Wire Request Form to the Voucher.
- The Remit To Address indicates the primary address for the Supplier. If you need to remit to a another address, click the Edit icon to select a different address. If an address for the Supplier is not listed, the Supplier should update their PaymentWorks account.
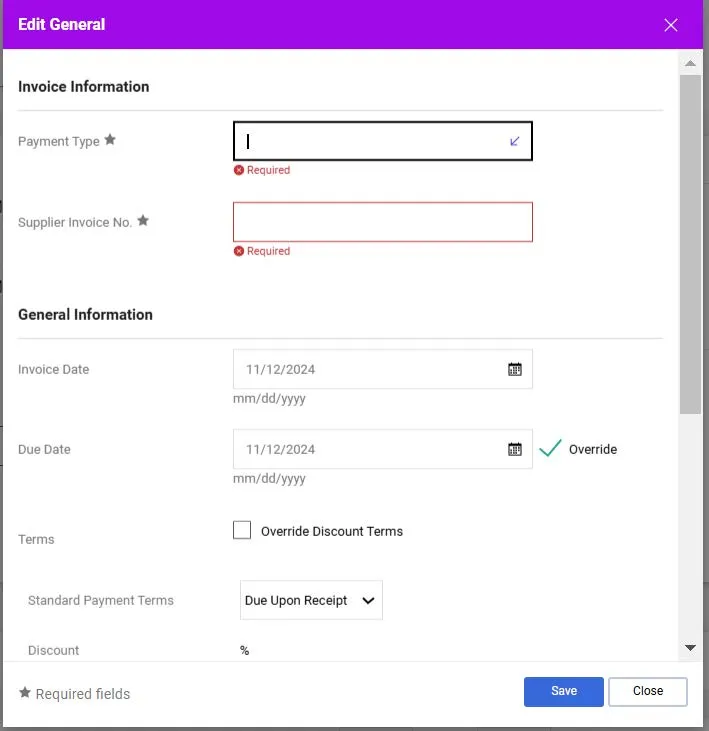
2. Click the link for the Required Payment Type Line. The Edit General window appears where you can enter the required Payment Type and the Supplier Invoice No.

3. Select Prepayment from the Payment Type from the dropdown.
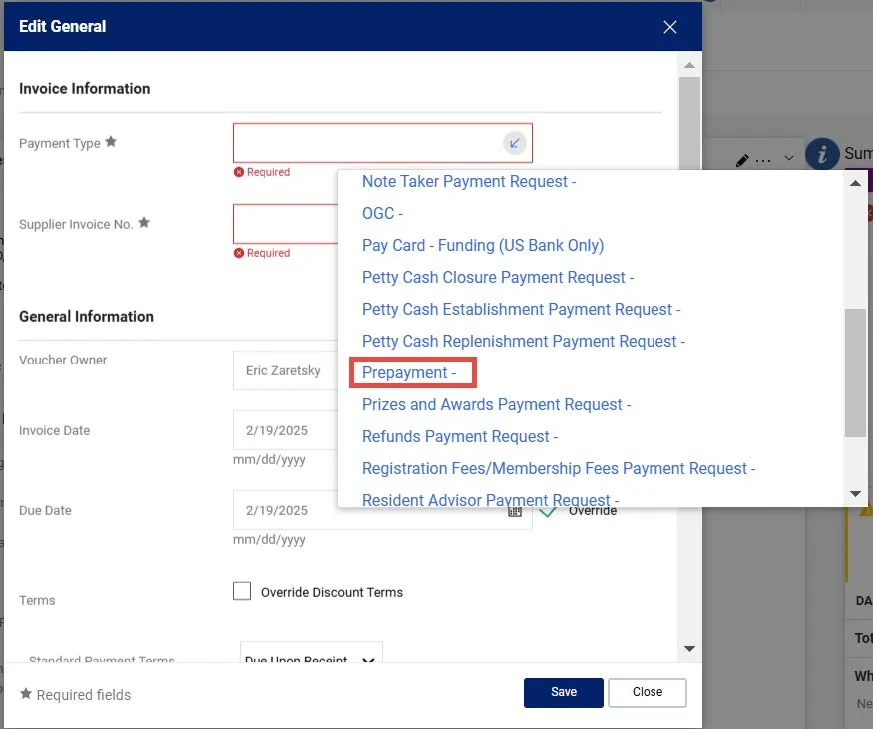
4. For the Supplier Invoice No., For the Supplier Invoice No., enter the current day’s date and the actual amount indicated in the Voucher (MMDDYYAMOUNT). For example, if today is 07/01/2025 and the Voucher amount is $350, the Invoice No. should be entered as “070125350”.
5. Click the Save button.
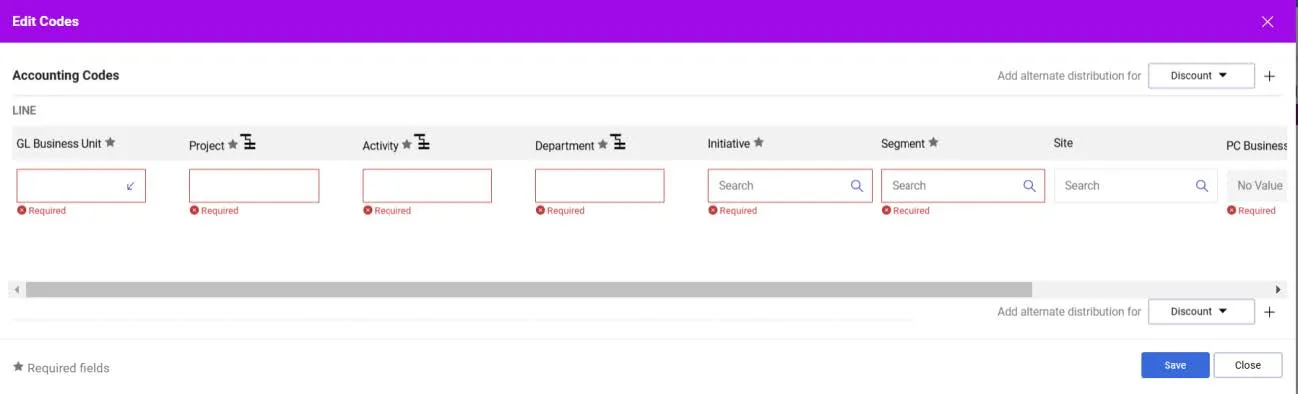
Adding or Editing Accounting Codes (ChartStrings)
Ensure that you have the correct ChartString information populated in the Accounting Codes section. If you set up a Default Accounting Code (ChartString) in your Profile (refer to the Modifying Profile Settings in the CU Marketplace job aid), that ChartString information will be automatically populated. You can edit the Accounting Codes for the voucher as a whole, as needed. In addition, you have the option to edit Accounting Codes for each Line of your Voucher.

1. In the Codes section, click the Edit Codes Section icon. The Edit Codes window appears.
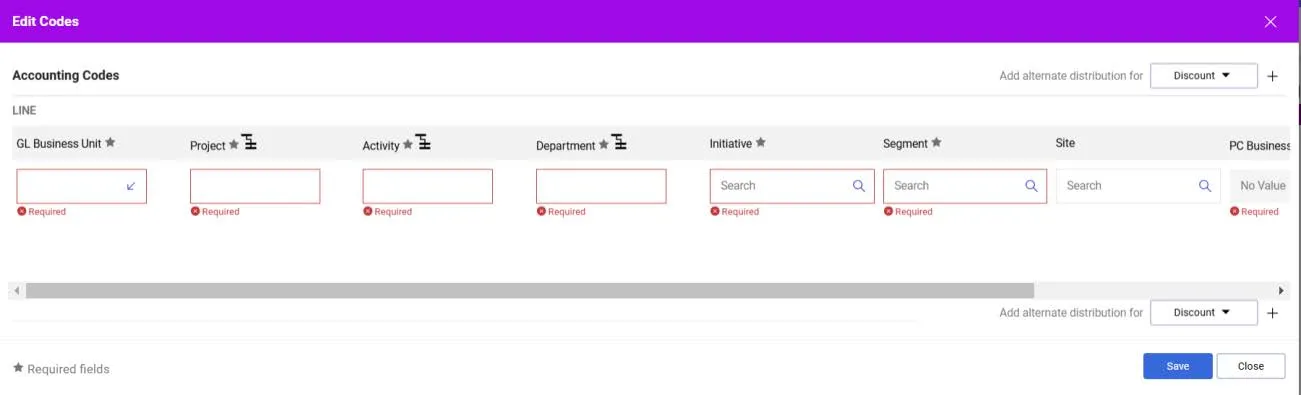
2. Update the ChartFields as needed. ChartFields must be entered in order left to right as the available values are dependent on the value in the previous field. You can click the Dropdown arrow in the field you are populating to view the available values.

3. Click the Validate icon to ensure your ChartFields were entered correctly. If you corrected a ChartField and it still appears as Required , click the Validate icon again.
You can click the Add Split icon to add an additional ChartString line and indicate a percent distribution.
You can click the Code Favorites icon to select a favorite ChartString you created in your Profile.
4. Click the Save button.
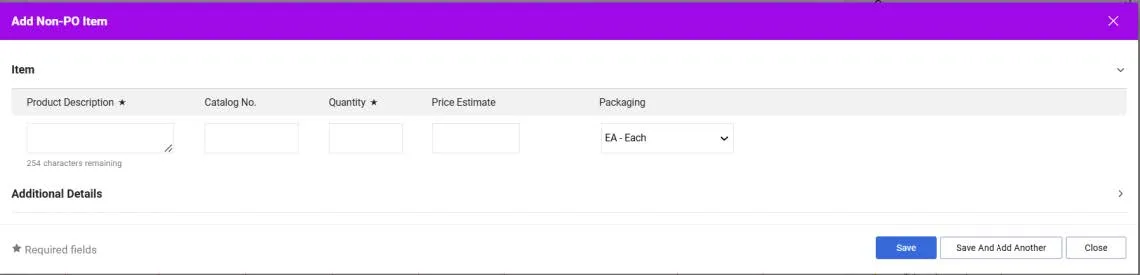
Adding Lines
You must enter a Line to describe the prepayment, the price, and the quantity..
1. In the Lines section, click the Add Non-PO Item link.

The Add Non-PO Item window appears.

2. Enter the Product Description, Quantity, and Unit Price (the amount of the payment). If applicable, you can enter a Catalog No. and a Packaging unit of measure.
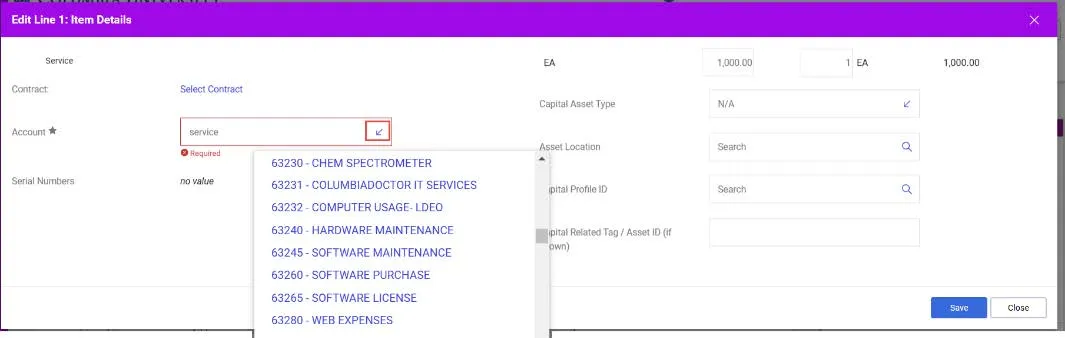
3. Click the Save button to add the Line. The Item Details appear and the Account field appears as required.
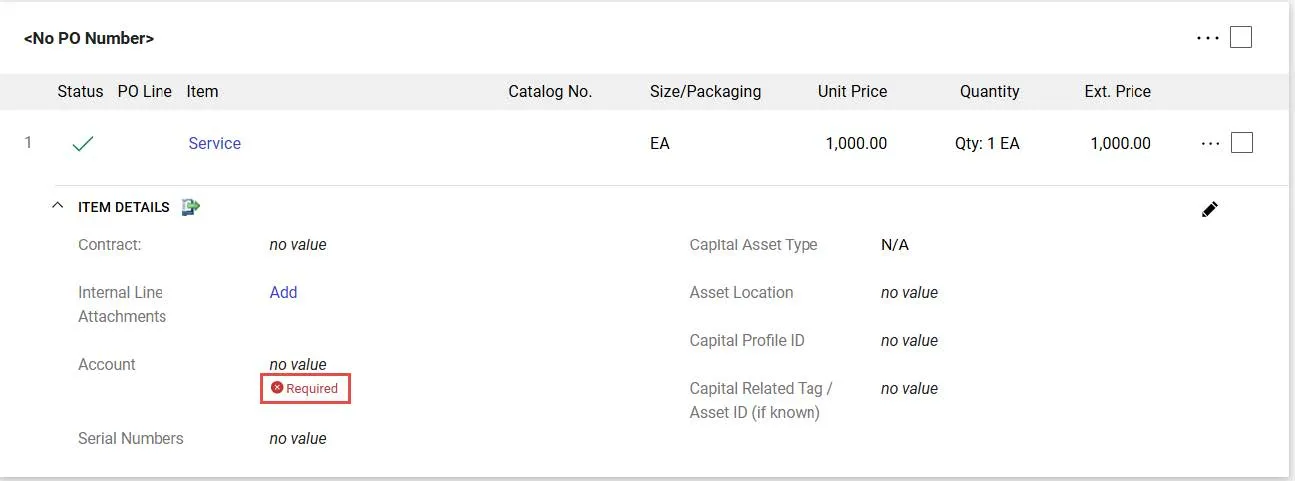
4. Click the Required link for the Account value. The Item Details screen appears.
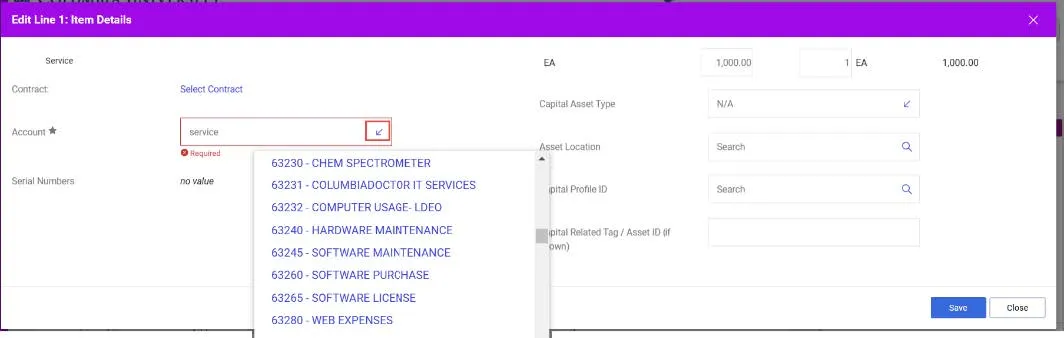
5. In the Account field, enter the Natural Account 17110. Note: Selecting prepayment type and entering any natural account other than 17110 will result in an auto return to correct the natural account entered.
6. Click the Save button.
Adding an Additional Line
Click the Actions link at the top right of the Line section and select Add Non-PO Item.

Editing Line Accounting Codes (ChartString)
The Accounting Codes that you entered in the main Accounting Codes section automatically copies to your Voucher Lines. If you have multiple Lines, you can edit Accounting Codes for each Line as needed.
1. Click the Actions button to the right of the Line detail and select Accounting Codes.

2. The Override Line Accounting Codes window appears.

3. Click the Plus icon to Add alternate distribution for Line. The fields appear ready to populate.
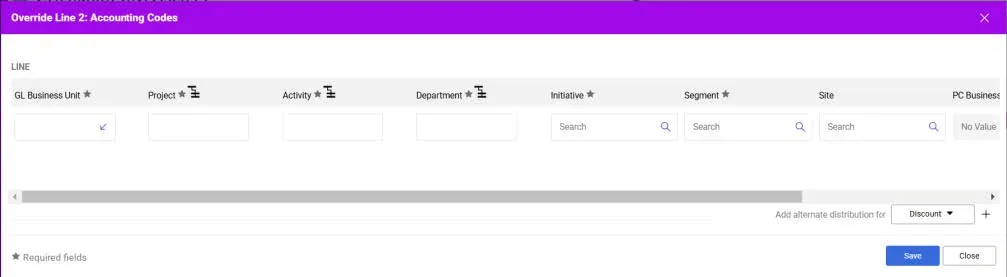
4. Update the ChartFields as needed. They must be entered in order left to right as the available values are dependent on the value in the previous field. You can click the Dropdown arrow in the field you are populating to view the available values.
5. Click the Validate icon to ensure your ChartFields were entered correctly. If you corrected a ChartField and it still appears as Required , click the Validate icon again.
You can click the Add Split icon to add an additional ChartString line and indicate a percent distribution.
You can click the Code Favorites icon to select a favorite ChartString you created in your Profile.
6. Click the Save button.
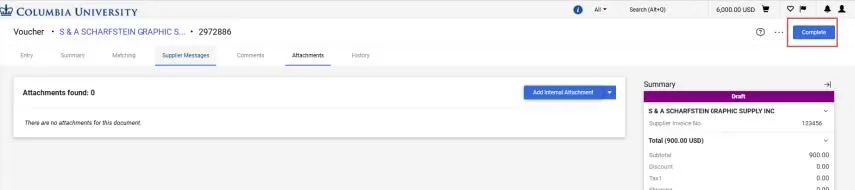
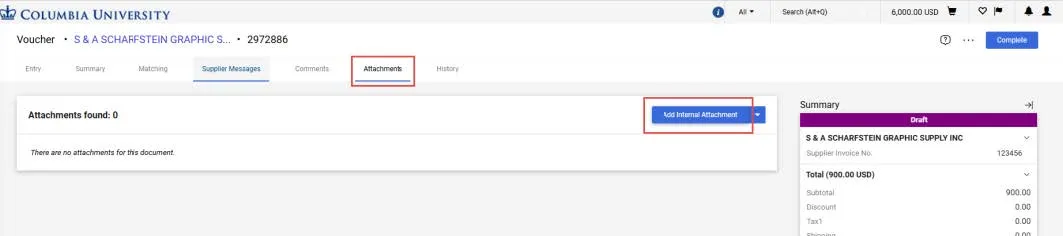
Attaching Documentation
Attach supporting documentation that provides the business reason for your prepayment. If you are paying by wire, attach the Wire Request Form.
1. In the Summary pane, click the Empty Internal Attachments link.
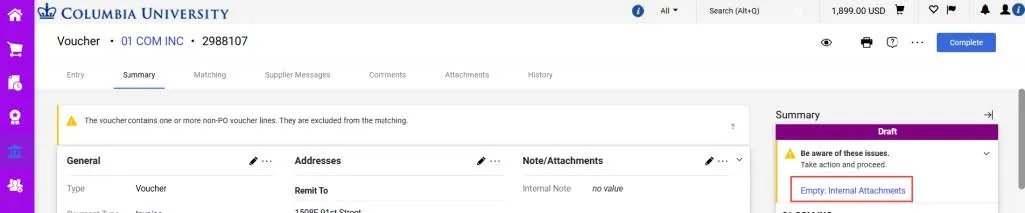
The Add Attachments window appears.

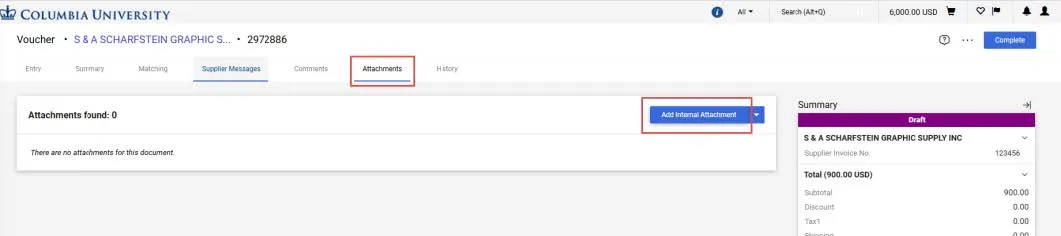
2. Drag and drop your file to the Drop File section or click the Browse link to search and select your file. You can add additional documentation to this window, if needed.
3. Click the Save Changes button. You can view and attach additional documents via the Attachments tab.
Submitting the Voucher
Click the Complete button to submit your Voucher.
The Voucher Submitted confirmation screen appears.
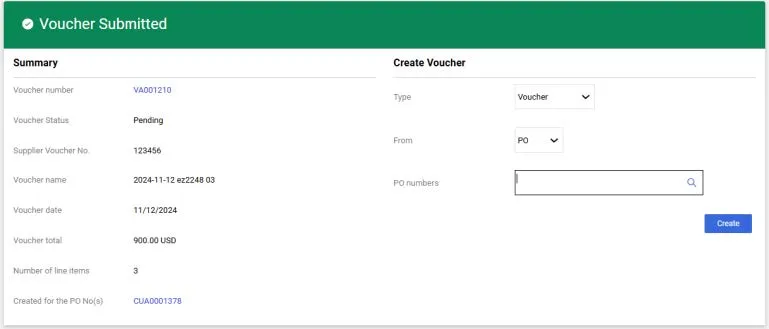
You can click the Voucher number to view the Voucher details.
Additionally, you can create a new voucher from the right side of this screen under the Create Voucher heading.
Initiate a Non-PO Voucher in order to complete an Advance Reconciliation Voucher after you received an invoice related to the prepayment. If you are receiving multiple invoices over time, you can submit as many Advance Reconciliation Vouchers as it takes to fully reconcile the prepayment.
When initiating and entering the Supplier for your Advance Reconciliation Voucher, enter the same Supplier you entered for your Prepayment Voucher.

1. Navigate to the Summary tab to begin completing the required information (as indicated by the links in the Summary pane.)
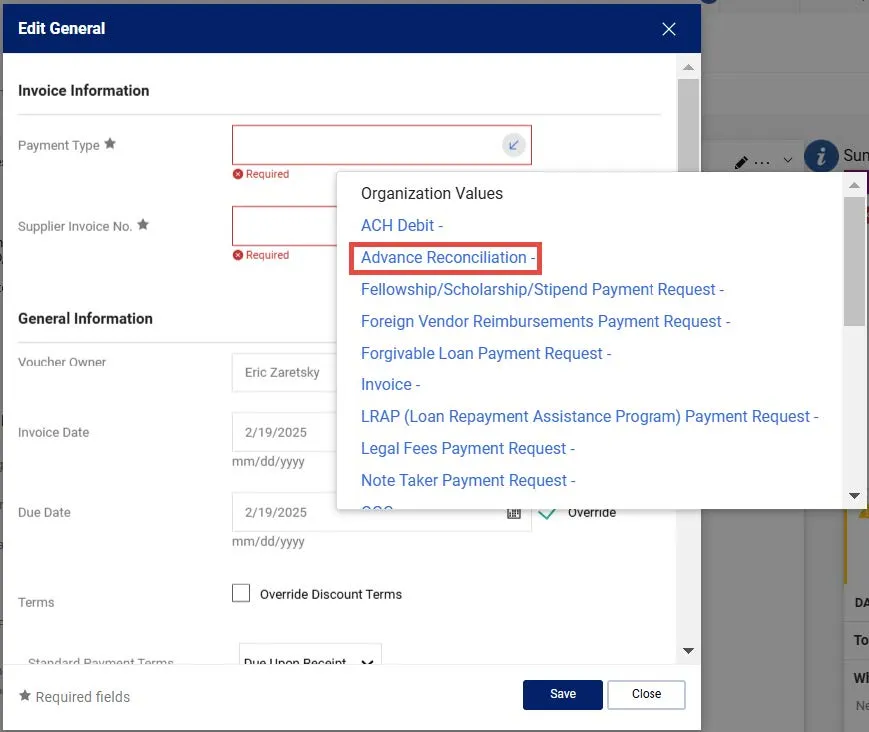
2. Click the link for the Required Payment Type Line. The Edit General window appears where you can enter the required Payment Type and the Supplier Invoice No.
3. Select Advance Reconciliation from the Payment Type from the dropdown.
4. For the Supplier Invoice No., enter the original invoice number from the prepayment voucher and append the letter “R1” to prevent the system from recognizing it as a duplicate.
If multiple Advance Reconciliation Vouchers must be applied against the same Prepayment Voucher, use the original prepayment invoice number and increment the suffix for each additional reconciliation (e.g., R1, R2, R3, etc.).
Example:
If the Prepayment Voucher invoice number is 070125350 and you need to create three Advance Reconciliation Vouchers, the invoice numbers should be:
070125350R1
070125350R2
070125350R3
This method ensures that you and Accounts Payable can correctly identify prepayments and their corresponding advance reconciliation Vouchers within the same project.
5. Click the Save button.
Adding the Prepaid ID
In order to associate the Advance Reconciliation Voucher, you enter the Prepaid ID to associate it with the original Prepayment Voucher.
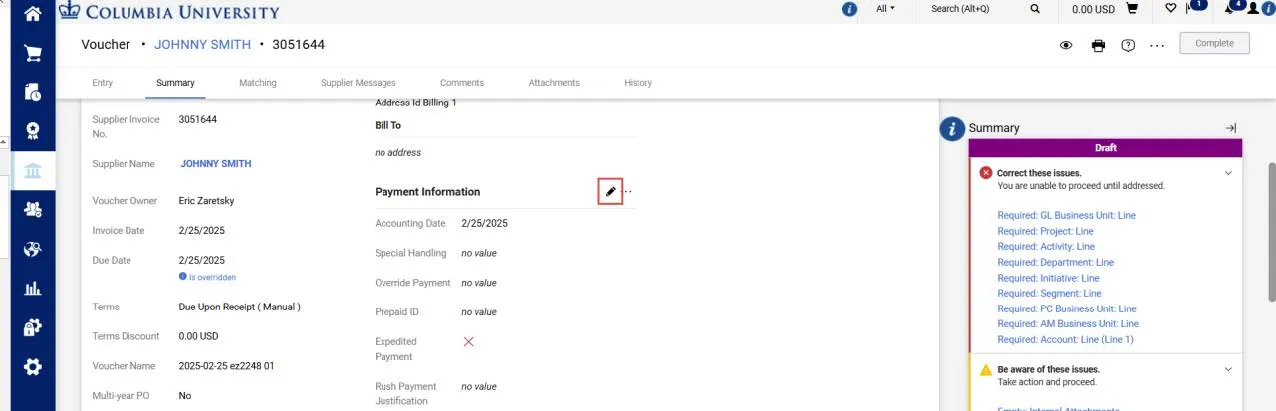
1. In the Payment Information section, click the Edit Payment Information Section icon. The Edit Payment Information window appears.
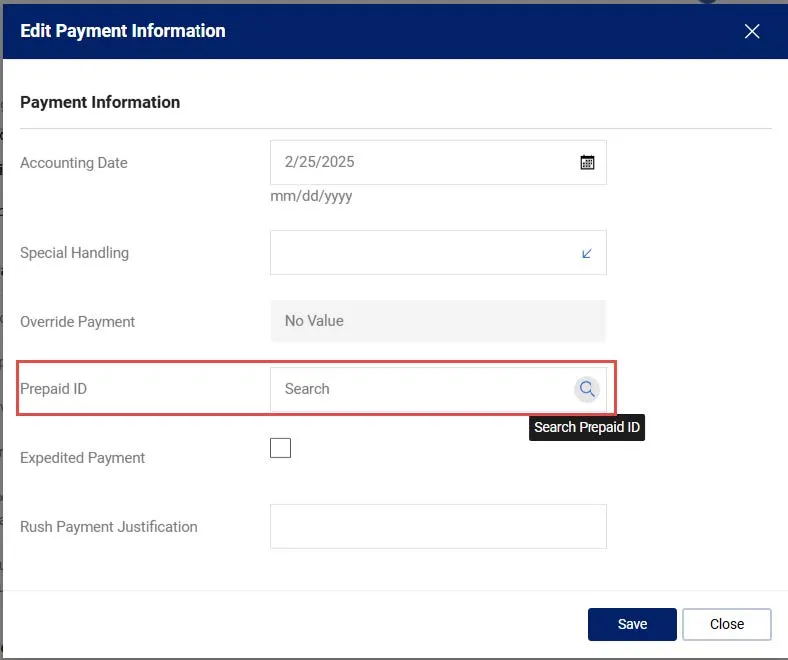
2. Click the Search Prepaid ID icon. The Custom Field Search window appears.
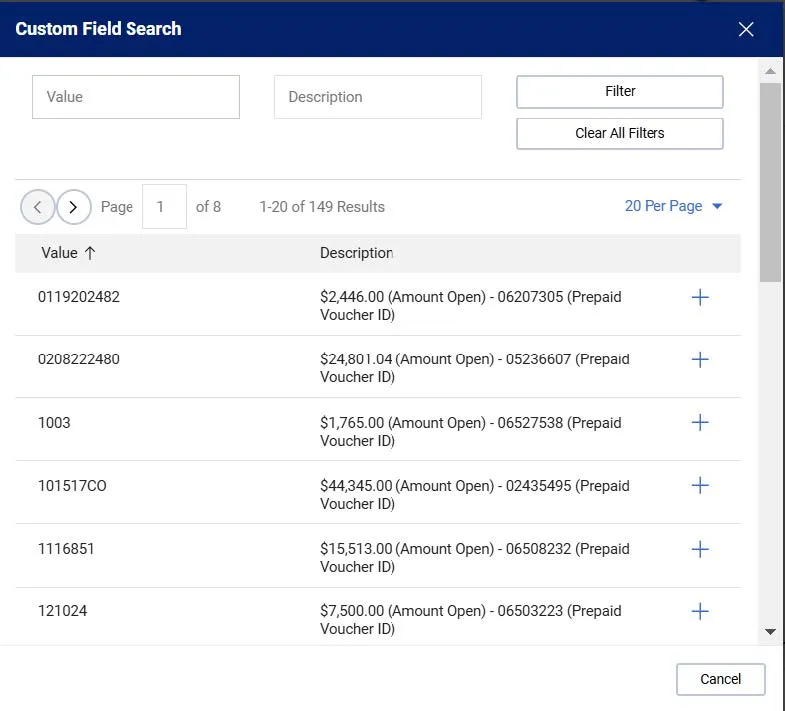
3. Search for the Prepayment Voucher ID by Value or Description and select the appropriate match by clicking the Select icon. The value will appear in the Prepaid ID field in the Edit Payment Information window.
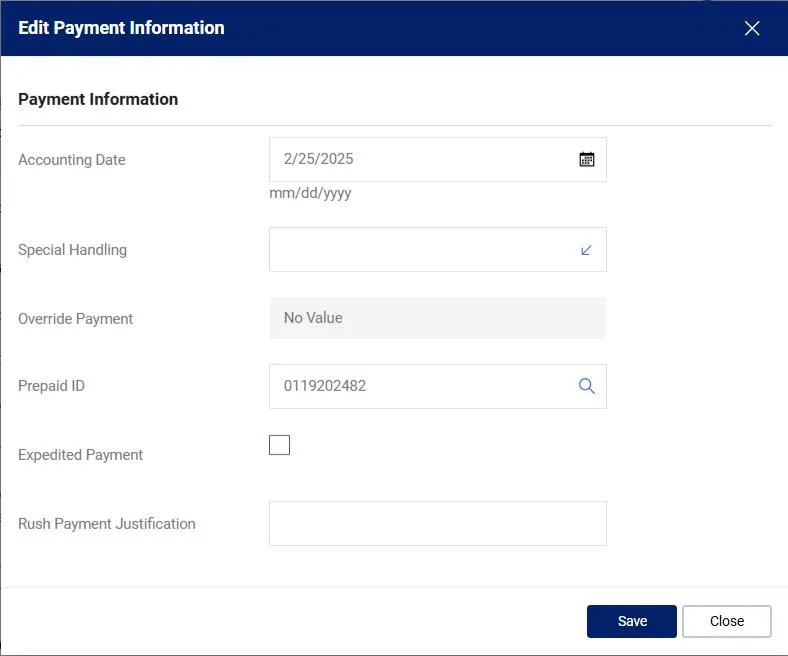
4. Click the Save button.
Adding or Editing Accounting Codes (ChartStrings)
Update the Accounting Codes (ChartString) information to match what you entered in the Prepayment Voucher.

In the Codes section, click the Edit Codes Section icon. The Edit Codes window appears.
Complete the Accounting Code fields as previously instructed.
Adding Lines
1. When adding a Line(s), enter the Product Description to match the description entered on the Prepayment Voucher.
2. Enter the Quantity and Unit Price.
3. Click the Save button. The Item Details appear and the Account field appears as required.
4. Click the Required link for the Account value. The Item Details screen appears.
For the Account, enter the natural account for the category of good or service that was invoiced.
Attaching Documentation
Attach the invoice or appropriate documentation regarding the payment reconciliation.
1. In the Summary pane, click the Empty Internal Attachments link.

The Add Attachments window appears.

2. Drag and drop your file to the Drop File section or click the Browse link to search and select your file. You can add additional documentation to this window, if needed.
3. Click the Save Changes button. You can view and attach additional documents via the Attachments tab.
Click the Complete button to submit your Voucher.

Please contact the Finance Service Center.
You can log an incident or request a service via Service Now.